Maptitude Help / Filters, Queries, and Selection Sets / Selecting Features Based on Adjacency
Selecting Features Based on Adjacency
The Select by Adjacency dialog box provides several methods for selecting the neighbors of the one or more areas in your area of interest. This has many potential uses, especially for topological querying, territory adjacency, and disease mapping.
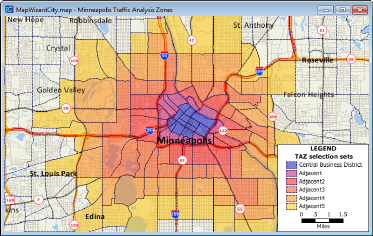
To compute adjacency, you need to create a map that has the area layer that you will use to analyze neighbor adjacency. You can use any selection set in the layer to define your area of interest. The methods for selecting neighbors are:
- Intersecting: selects neighbors that touch along area edges or at the nodes that bound the edges
- Edge: selects neighbors that touch only along area edges
- Only Node: selects neighbors that touch only at the nodes that bound the edges
- All Nodes: selects neighbors that touch any node (not shape point) around the boundaries of your area of interest
- Within: selects neighbors based on a distance you specify, rather than actual adjacency; if an area is at least partially within the distance from any boundary of your area of interest, it will be selected

There are two more methods for creating bands of neighbors, each of which is saved in a separate selection set:
- Bands by Intersect: using the Intersecting method, selects immediate neighbors of your area of interest, then neighbors of those areas, etc. for the number of bands you specify
- Bands by Edge: using the Edge method, selects immediate neighbors of your area of interest, then neighbors of those areas, etc. for the number of bands you specify
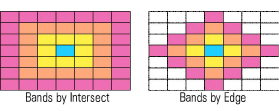
For both Bands methods you can choose to create univariate statistics for the neighbors, as if you were to choose Dataview>Statistics>Summary for the selection set for each band. When you choose to create statistics, Maptitude creates a temporary table file for each band and displays each in a new dataview window.
There is one final method that uses the Bands by Edge method to select neighbors, then uses one of the bands to create tables:
- Adjacency Tables: Distance and IDs: creates two tables for the chosen band, each with one record for each area in your area of interest; one table has the IDs of the areas in the band, sorted by distance from the area in your area of interest, and the other has the distances between the centroids of those areas, also sorted by distance
The tables are saved to files and displayed in a joined view. You can also use the tables for further analysis with Maptitude or with statistical packages.
For non-topological layers, the methods available are Intersecting, All Nodes, Within, and Bands by Intersect.
 To Select Features Based on Adjacency
- Choose an area layer from the drop-down list on the toolbar, and select the features that define your area of interest.
- Choose Selection>Select by Adjacency to display the Select by Adjacency dialog box.
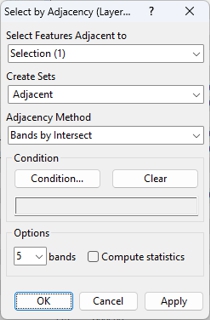
- Choose the selection set that defines your area of interest from the Select Features Adjacent to drop-down list.
- Choose or type a name for the sets to be created in the Create Sets editable drop-down list.
- Choose the adjacency method you want to use from the Adjacency Method drop-down list:
| To do this... | Do this... |
|---|---|
| Select areas touching by edge or node | Choose the Intersecting method |
| Select areas touching by edge only | Choose the Edge method |
| Select areas touching by node only | Choose the Only Node method |
| Select areas touching any node | Choose the All Nodes method |
| Select areas within a distance | Choosethe Within method and type a distance in the edit box in the Options frame |
| Select incremental bands | Choose the Bands by Intersect or Bands by Edge method, choose the number of bands from the Bands drop-down list, and checkCompute Statisticsif you want univariate statistics computed |
| Produce tables for a band | Choose Tables: Distance & IDs and choose the order number of the band from the Order drop-down list |
- If you want to determine adjacency for only those areas that meet a specific condition, click Condition to display the Select by Condition dialog box. Use the Condition Builder or type a condition in the Enter a Condition edit box and click OK to return to the Adjacency dialog box. Maptitude displays the condition in a text box. To determine adjacency without a condition, click Clear to remove the condition from the text box.
For more information on conditions, see Selecting Features Based on Attributes.
- Click OK.
If you are producing tables for a band, Maptitude displays the Save As dialog box for each table file. Choose a folder to store the results, type a file name, and click Save.
Maptitude runs your adjacency method and displays the results.
 |
NOTE: If you choose to compute statistics or create adjacency tables, the Apply button functions the same as the OK button. |
Try It Yourself: Computing Adjacency
1. Choose File>Open Workspace or click  on the Standard toolbar, then open the ComputeAdjacency workspace in the Tutorial folder to open a map of North American states and provinces with Colorado already highlighted in a selection set..
2. Choose Selection>Select by Adjacency to display the Adjacency dialog box.
3. Verify that Colorado is displayed in the Select Features Adjacent To drop-down list.
4. Choose Intersecting from the Adjacency Method drop-down list and click Apply. Maptitude highlights the states that touch along the edges or nodes of Colorado.
5. Choose Edge from the Adjacency Method drop-down list and click Apply. Maptitude highlights the states that touch only along the edges of Colorado; Arizona is no longer highlighted.
6. Choose Only Node from the Adjacency Method drop-down list and click Apply. Maptitude highlights the states that touch only at the nodes of Colorado; only Arizona is highlighted.
7. Choose Within from the Adjacency Method drop-down list, type “100” in the Options edit box, and click Apply. Maptitude highlights the states that are at least partially within 100 miles of Colorado.
8. Choose Bands by Edge from the Adjacency Method drop-down list, choose 5 from the bands drop-down list, and click OK. Maptitude redraws the map with the five levels of adjacency bands.
9. Choose File>Close Workspace and click Don't Save to close the workspace without saving any changes.
©2026 Caliper Corporation