Maptitude Help / Filters, Queries, and Selection Sets / Selecting Features with the Selection Tools
Selecting Features with the Selection Tools
You select features directly from the map using the Selection Tools drop-down on the Standard toolbar. You can select features that are within a circle, rectangle, or shape that you draw, or by clicking on individual features. You can also choose whether features that you select should be wholly or partially contained within the areas you define and whether or not to restrict features from being in more than one selection set at a time.
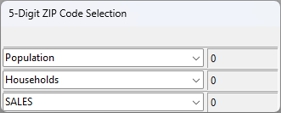
You also have the option of displaying a running total for a field of your choice in the Selection toolbar. For example, if you have a postal code layer that contains a field with sales data, you could see the total sales for all of the postal code features in a selection set. As you add and remove features from the selection set, the total sales is adjusted accordingly on the toolbar.
 |
For a video tutorial see: (Internet connection required) • Working with Maptitude Selection Sets: Using the selection tools, selecting by location, selecting by attribute, combining selection sets, and computing statistics |
 To Select Features Directly from the Map
- Choose the layer whose features you want to select from the drop-down list on the Standard toolbar or by right-clicking on the layer in the Display Manager and choosing Make Working Layer.
- Choose the selection set to use from the drop-down list on the Standard toolbar.
- To set the behavior of the selection tools, click
 in the Selection Management drop-down on the Standard toolbar to display the Selection Options dialog box and make choices as follows:
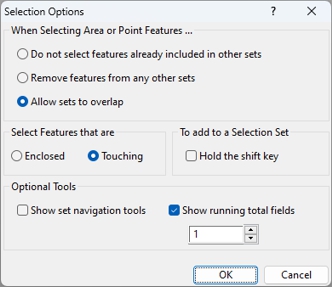
- Choose whether to prevent or allow features to be in more than one set when selecting features as follows:
| To do this... | Do this... |
|---|---|
| Prevent selection sets from overlapping by excluding features already in other sets from being selected | Choose Do not select features already included in other sets from the radio list |
| Prevent selection sets from overlapping by removing features from other sets to which they belong and adding them to new selection sets | Choose Remove features from any other sets from the radio list |
| Allow features to be in more than one set | Choose Allow sets to overlap from the radio list |
- If you are going to select by rectangle, circle, or shape, choose how to handle features that are only partially within the area as follows:
| To do this... | Do this... |
|---|---|
| Select features that are only completely contained within the area that you draw | Choose Enclosed from the radio list |
| Select features that are partially and completely contained within the area that you draw | Choose Touching from the radio list |
- If you want to use the optional tools to zoom to the individual features in a selection set, check the Show selection and navigation tools box.
- If you want to see aggregate data for the selected features, check the Show running total fields box and choose the number of fields.
- By default, when you use the select by rectangle, circle, or shape tools, features that you select are added to the selection set. If you want, you can choose to have Maptitude clear the selection set every time that you use the selection tools unless you hold the Shift key while using the selection tools by checking the Hold the Shift Key box.
Click OK to close the Selection Options dialog box.
- If you chose the Show Running Total Field option, choose the field(s) to total from the drop-down list(s) on the Selection toolbar.
- Click on one of the selection tools in the Selection Tools drop-down on the Standard toolbar to activate it, and use it as described in the table below:

Maptitude selects the features, and highlights the result on the map. If you chose to track running totals, the field(s) are updated with the aggregate values for the selected features.
Try It Yourself: Selecting Features with the Selection Tools
1. Choose File>Open Workspace or click  on the Standard toolbar, then open the Lower48 workspace in the Tutorial folder.
2. Click in the Selection Management drop-down on the Standard toolbar, choose the Touching option, and click OK.
3. Click  in the Selection Tools drop-down on the Standard toolbar to activate the Select by Circle tool, then click at the center of Kansas (KS). Maptitude displays the Enter Selection Radius dialog box.
4. Type 500, choose Miles for the units and click OK. Maptitude selects and highlights any states that are at least partially within 500 miles of the location you clicked, both on the map and in the dataview.
5. Click in the Selection Management drop-down on the Standard toolbar, choose the Enclosed option, and click OK.
6. Click  in the Selection Tools drop-down on the Standard toolbar to activate the Select by Shape tool.
7. Click a shape in the northeast around the outside of Maine (ME), New Hampshire (NH), and Vermont (VT) and double-click to close the shape. Those states are also selected and highlighted.
8. Click  in the Selection Tools drop-down on the Standard toolbar to activate the Select by Pointing tool and click on Kansas. That state is no longer selected or highlighted. Click on Kansas again to select it.
9. Click  on the Standard toolbar to clear the selection.
10. Choose File>Close Workspace and click Don't Save to close the workspace without saving any changes.
©2026 Caliper Corporation