Maptitude Help / Filters, Queries, and Selection Sets / Showing Selection Sets on a Map
Showing Selection Sets on a Map
When you select map features, Maptitude automatically shows features in each selection set in a distinctive style or color. You can further enhance the way a map looks by customizing the way selected features are displayed.
There are a number of ways that you can customize how selection sets are displayed on a map. You can:
- Change the style that is used to display them
- Change the color, font, or style of the labels
- Hide the features in the selection set
- Hide the layer so that only features in a selection set are visible
- Autoscale a selection set to display only at certain scales
- Zoom the map to show all of the features in a selection set
- Zoom to individual features in a selection set
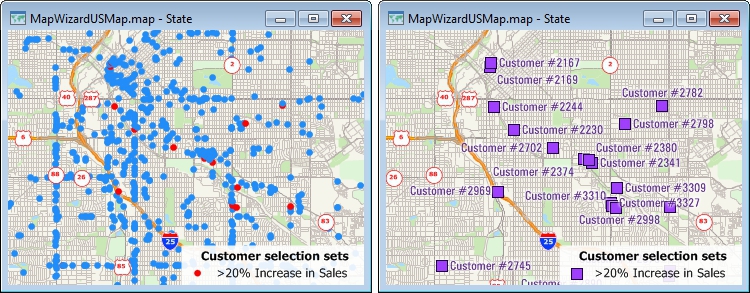
Selected features are highlighted in the map on the left. Selected features are highlighted, labeled, and other features are hidden in the map on the right.
 |
For a video tutorial see: (Internet connection required) • Working with Maptitude Selection Sets: Using the selection tools, selecting by location, selecting by attribute, combining selection sets, and computing statistics |
 To Change the Appearance of Selection Sets
- Choose Selection>Settings, or click
 in the Selection Management drop-down on the Standard toolbar to display the Selection Sets dialog box.
 - Choose the selection set you want to change from the Selection Sets list.
- Choose how to display the selection set as follows:
| To do this... | Do this... |
|---|---|
| Highlight the selection set | Click Status until the selection set status is “Active.” |
| Not highlight the selection set | Click Status until the selection set status is “Inactive.” |
| Hide the selection set | Click Status until the selection set status is “Invisible.” |
| Hide features not in the selection set | Choose the layer from the top of the Selection Sets scroll list and Click Status until the status is “Invisible.” |
| Change the style of a selection set | Click Style to display the Style dialog box. Choose the settings you want and click OK. See Using Styles for more information. |
| Change the labels of a selection set | Click Labels to display the Labels dialog box. Choose the settings you want and click OK. See Using Labels for more information. |
| To autoscale a selection set | ClickAutoscaleto display the Autoscale dialog box. Choose the largest and smallest scales at which to display the selection set and click OK. Note: The autoscale settings for a layer will override the autoscale settings for its selection sets, and you cannot autoscale the selection set named “Selection.” |
- Click Close to close the Selection Sets dialog box.
 |
TIP: If you only want to change the style of a selection set, you can click |
Maptitude draws the map with your changes. If a selection set is not active (that is, the status setting is Inactive or Invisible), changing the style or labels has no visible effect. When you make the set active again, however, the changes take effect.
- Choose the set you want to see from the Current Selection drop-down list on the Standard toolbar.
- Click
 in the Selection Management drop-down on the Standard toolbar. Click again to make all features visible.
— OR —
- Right-click on the selection set you want to see in the Display Manager and choose Show This Set Only. Choose Show This Set Only again to make all features visible.
- Choose the set you want to see from the Current Selection drop-down list on the Standard toolbar.
- Click
 in the Selection Management drop-down on the Standard toolbar.
— OR —
- Right-click on the selection set you want to zoom to in the Display Manager and choose Zoom.
Maptitude draws the map, changing the scale and center so that the map neatly shows all the features in the selection set.
To Zoom to the Individual Features in a Selection Set
- If the navigation buttons are not visible on the Selection toolbar, click
 in the Selection Management drop-down on the Standard toolbar to display the Selection Options dialog box, check the Show selection and navigation tools box, and click OK.
 - Choose the selection set from the Current Selection drop-down list on the Standard toolbar.
- Choose whether to keep the scale constant or to display each feature at a scale that fits it exactly in the map window:
| Choose... | To do this... |
|---|---|
 |
To adjust the scale as you scroll through the features |
 |
To keep the current scale as you scroll through the features |
- Use the buttons on the Selection toolbar to zoom to individual features as follows:
| Click... | To do this... |
|---|---|
 |
Zoom to the next feature in the selection set |
 |
Zoom to the previous feature in the selection set |
 |
Zoom to the first feature in the selection set |
 |
Zoom to the last feature in the selection set |
Try It Yourself: Showing Selection Sets on a Map
1. Choose File>Open Workspace or click  on the Standard toolbar, then open the Showing Sets workspace in the Tutorial folder. You are going to emphasize customers in southern New England with high sales.
2. Verify that Customers is chosen in the Working Layer drop-down on the Standard toolbar and High Sales is chosen in the Current Selection drop-down list on the Standard toolbar.
3. Click in the Selection Management drop-down on the Standard toolbar. Maptitude zooms the map to focus on the customers with high sales.
4. Click  in the Selection Management drop-down on the Standard toolbar and change the size to 14, choose a darker blue from the Color drop-down list, change the icon to a star, and click OK. Maptitude updates the map to show your changes.
5. Choose Selection>Settings or click in the Selection Management drop-down on the Standard toolbar, choose High Sales from the scroll list, and click Labels.
6. Choose SALES from the Field drop-down list, increase the size to 12, choose $12,345 from the Format drop-down list, and click OK.
7. Choose Layer: Customers from the list, and click Status to make the layer Invisible.
8. Click Close. Maptitude will show only the high sales customers.
9. Choose File>Close Workspace and click Don't Save to close the workspace without saving any changes.
©2026 Caliper Corporation