Maptitude Help / Tutorial / Locating Your Customers on a Map
Stage 2: Locating Your Customers on a Map
Maptitude can read the address information from the customer file, and create a new map layer that contains one point at the location of each customer. This is sometimes called pin mapping or geocoding. To do this, Maptitude uses a comprehensive street database that contains detailed address information.
Again, we are going to use Create-a-Map Wizard to simplify the task.
 To Create a Map of Your Customer Locations
- Choose Map>New Map. Maptitude again displays the Create-a-Map Wizard dialog box.
- Choose Map my data/table/spreadsheet from the radio list, click Browse, and again open the My Customers sheet in the sample customer Excel file in the Tutorial folder.
- Click Next. Again Maptitude finds the mappable fields in your data.
- Click Next.
- Choose the first locate option in the scroll list. Maptitude will first attempt to locate the records by address, and then locate any remaining records by postal code or city.
- You could locate your customers on the map that we just created in Stage 1, but for our purposes, we want to create a second map with the customer locations, so make sure the Add your data to existing map box is not checked.
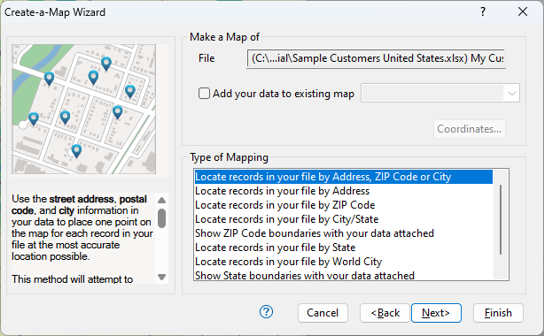
- Click Next.
- You can either import or link your data into the new point layer that you will be creating. When you import your data there will be no ties to your data source; if your data source changes, you will need to reimport it to see those changes in Maptitude. Alternatively, you can link the data source so that you can update your point layer with changes to your source data. When you link data, your source must contain a field with unique IDs for each record and you will not be able to edit the data from within Maptitude. Because you will be modifying sales territories and then updating the customers with their new territories in stage 8, you will need to import the data to map it.
Choose Import data to map it from the radio list.
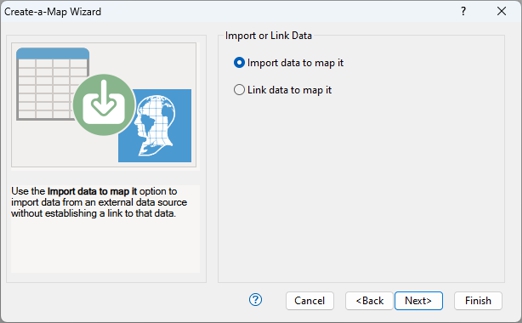
- Click Next.
- Create-a-Map Wizard shows the types of themes you can create with your data. Choose None from the radio list and click Next.
- Create-a-Map Wizard shows the types of analysis you can do with your data. For example, if you are locating your stores, you might want to also show 5 or 10 mile buffers around them, if you are locating customers, you might want to find a weighted center to determine the best site to centrally service them. For now, choose None from the radio list and click Finish.
Maptitude uses the addresses in your spreadsheet to create a new point layer of your customers. A dialog box is displayed reporting how many records were located and how they were located.
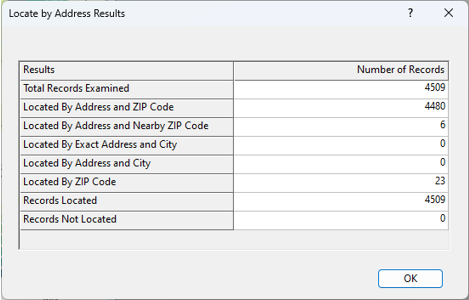
For most customers, there are addresses and postal codes that match the Maptitude street layer. These customers are located by address and postal code.
There are several reasons why some of the customers, however, were found using different methods. For example, a postal code may have been renumbered or a business may have its own postal code that differs from the area around it. In these cases, Maptitude will look for matching addresses anywhere in nearby postal codes or in the respective city. Other addresses may simply be Post Office boxes that are not part of the street file. In this case the customers are simply located at the postal code location.
12. Click OK to close the report.
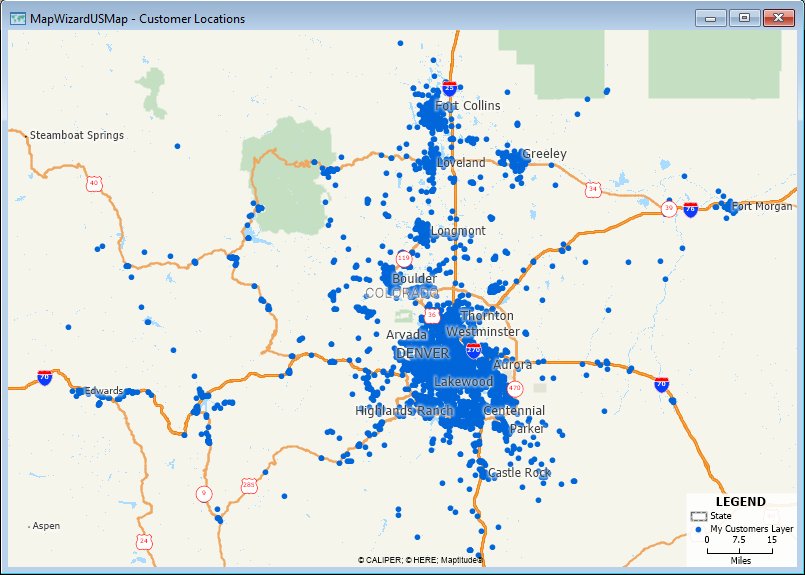
Maptitude displays a new map that includes a point layer with the locations it found in your data.
Because we now have several maps open, it can be useful to retitle maps to avoid confusion.
To Retitle a Map
- Right-click anywhere on a map except on a label and choose Properties.
- Change the title to "Customer Locations" and click OK.
You’ve finished the map showing the locations of your customers which should look like the map below.
We are going to want to do two different analyses with the customer data. So first let's make a duplicate of this map so we can have the base map of located customers available for both analyses.
To Make a Copy of Your Map
- Choose Map>Duplicate.
You’ve created two maps showing the locations of your customers. Now let's move on to Stage 3: Selecting Customers of Interest
©2026 Caliper Corporation