Maptitude Help / Tutorial / Updating the Customer Data
Stage 8: Updating The Customer Data with the New Territory Assignments
The territories are balanced by sales volume, but for now, the customer data do not reflect the territory changes.
 Creating a Color Theme of the Customer Territories
- In the Display Manager, right-click on the customer point layer and choose Make Working Layer.
- Choose Map>Thematic Mapping>Color or click
 Color Theme in the thematic mapping drop-down on the Standard toolbar.
 - Choose Territory from the Field drop-down list. The other settings are correct.
- Click OK.
Maptitude shows the customers with a color theme indicating what territory they are in. Notice that customers that are in the postal codes that you moved from one territory to another are shown as belonging to their original territory.
Tagging the Customers to The New Territory Definitions
- In the Display Manager, right-click on the customer layer and choose New Dataview.
- Click on the Territory column heading to highlight the whole column. We are going to replace the values in this column by tagging the customers to the new territory boundaries.
- Choose Edit>Fill to display the Fill dialog box.
- Click Tag in the radio list, choose Territory from the Using Layer drop-down list, All Features from the Selection Set drop-down list, and Territory from the Tag With drop-down list.
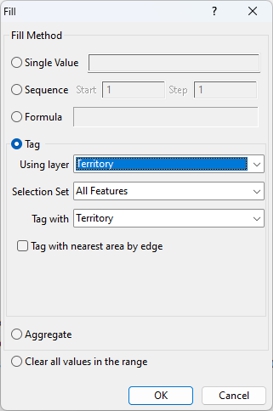
- Click OK. Maptitude updates the field with the name of the territory that each customer is in.
- Close the dataview.
- Choose Window>Refresh to update the map. The theme shows that the customer territory data are now correct.
(Note, the features in the Sales Over $250,000 selection set will still be highlighted. If you want to turn off the highlight, click next to the customer entry in the Display Manager to expand it and then expand the Sets entry, and click
  next to the Sales Over $250,000 set to turn off the highlight.)
 - In the Display Manager click next to the customer layer to hide the layer.
Your finished territory map should look something like this:
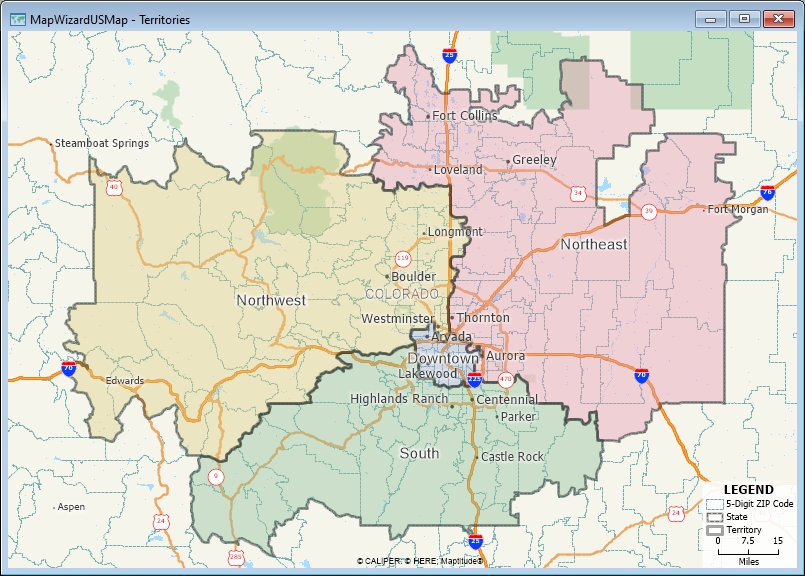
Now that we have a map of the new territories and the customers reassigned, let’s prepare an Excel file that has the new territory definitions, demographic information about the territories, and the new allocation of the customers in those territories.
Exporting the New Territories Back to Excel
- Click
 in the Territory Manager to display the Choose Territories dialog box.
 - Click Select All to export all of the territories to Excel.
- Click OK.
- Type “My Revised Customers” as the new Excel file name and click Save.
Maptitude exports the data and opens the new file in Excel. The new file contains the following sheets:
- The Territories sheet lists your territories and their area, sales, and population values
- The Territories Geography sheet lists all of the territories and the postal codes they comprise
- The Overlay sheet lists demographic characteristics for your territories. The demographics will vary depending on which Country Package you are using. For example, for the United States, there will be population, income, gender, age, race, housing unit, and disposable income data for each of your territories.
- The My Customers Layer sheet has all of your customer data including the updated territories to which they now belong and the calculated change in sales
- Close Excel and return to Maptitude.
Now you have a spreadsheet that contains your new territory allocations and demographics about the territories, the last thing to do is create a layout to illustrate your other findings.
©2026 Caliper Corporation