Maptitude Help / Tutorial / Creating a Layout
Stage 9: Creating a Layout
A layout lets you arrange any number of maps and dataviews on a printed page, along with freehand text and other items. You’re going to set up a layout, arrange your maps on it, add a title, and finally print the layout.
 To Create a New Layout
- Choose Tools>Reports>New Layout.
Maptitude displays a blank layout page.
To Set Up the Printer
- Right-click on the layout window and choose Properties.
- If you have a color printer installed, choose it from the Printer Name drop-down list, otherwise, choose any printer from the drop-down list.
- Choose Letter (8½” x 11”) or a similar size (such as A4) from the Page Size drop-down list.
- Choose Portrait from the Orientation options.
- Click OK.
Now that the layout page is set up for your printer, let’s place the maps using the Place tool.
To Place the Maps in the Layout
- Click
 on the Standard toolbar to activate the Place tool.
 - Drag a rectangle across the top third of the page. Maptitude displays the Add to Layout dialog box.
- Click on one of the maps in the grid view.
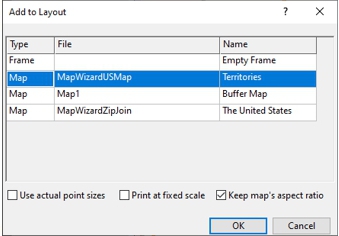
- Click OK. Maptitude adds the map and the legend to the layout.
- Drag another rectangle across the middle third of the page and place the second map in the layout, and drag a final rectangle across the bottom third of the page and place the third map.
Once the maps are placed, you may want to make them bigger or smaller, or change their size. Here’s how:
To Move or Resize a Layout Item
- Click
 on the Standard toolbar to activate the Pointer tool.
 - Click on one of the maps. Maptitude draws handles at the corners.
- To change the size of the map, drag one of the handles.
- To move the entire map, press and hold the mouse button in the center of the map, and drag the map to a new location. Similarly, you can move the legends by clicking and dragging them to a new location.
The Standard toolbar also has buttons you can use to change the alignment and position of items in the layout. To learn more about arranging items in a layout, see Moving, Editing, and Arranging Layout Items.
Now, let’s add a title to the layout.
To Add a Title to the Layout
- Click
 on the in the Drawing Tools drop-down on the Standard toolbar to activate the Draw Text tool.
 - Drag a short, wide rectangle across the top of the page.
- Type the title “Customer Study” and press the Enter key.
If the title is the wrong size or in the wrong place, select it with the tool and resize it or move it. You can also double-click it with the tool and specify a font, size, color, and style.
If you have a company logo stored in an image file such as a JPEG, BMP, GIF, etc., you can drag a rectangle on the layout with the  tool and add the logo to the layout.
Now, use the tool and the alignment buttons to adjust the sizes and placement of the maps, the legends, the dataview, and the title.
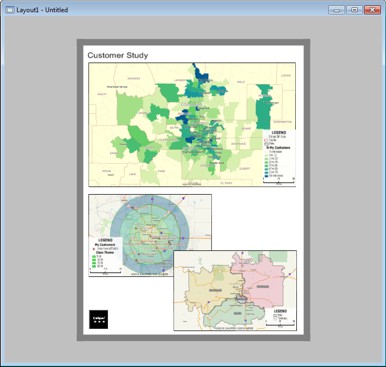
When you have an arrangement you like, you can print your layout.
To Print the Layout
- Choose File>Print or click
 on the Standard toolbar.
 - Choose the number of copies you want to print.
- Click OK.
Finally, click  to save the changes to the workspace.
To Close the Windows
- Choose File>Close Workspace.
Congratulations! You’ve finished the project. Where to Go From Here.
©2026 Caliper Corporation