Maptitude Help / Geographic Analysis Tools / Tagging Points by Area
Tagging Points by Area
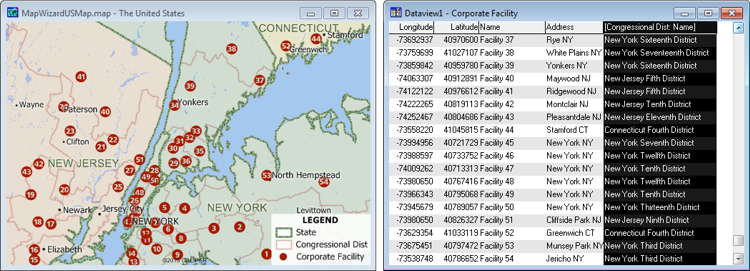
You can tag a point layer with a value from a field in an area layer. This command creates a new field with the tag results. The name of the field is a combination of the area layer and field that were used for tagging. For example, the highlighted field in the dataview below shows the results of tagging a point layer of facilities with the name of the Congressional District that they are in.
 |
TIP: It is also possible to tag points to the nearest point or line feature, or to the closest area if the point features are not within areas. For more information, see Filling a Range of Cells or Groups of Columns with Data. |
 To Tag Points by Area
- Open or create a map with at least one point layer and one area layer.
- Choose the point layer to tag from the drop-down list on the Standard toolbar.
- Choose Tools>Analysis>Tag Points by Area or click
 Tag Points by Area in the analysis tools drop-down on the Standard toolbar to display the Tag Points by Area dialog box.
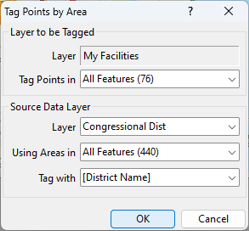
- Choose whether to tag all features, visible features, or a selection set in the point layer from the Tag Points in drop-down list.
- In the Source Data Layer frame, choose the area layer to use from the Layer drop-down list, choose whether to use all features, visible features, or a selection set in the area layer from the Using Areas in drop-down list, and choose the field to use for tagging from the Tag with drop-down list.
- Click OK.
Maptitude adds a new field and fills it with the value from the area that each point is within.
Try It Yourself: Assigning Customers
1. Choose File>Open Workspace or click  on the Standard toolbar, then open the TagCustomers workspace in the Tutorial folder. Maptitude opens a map with ZIP Codes and Stores. You will tag the stores with their respective ZIP Codes.
2. Verify that Stores is the working layer.
3. Choose Tools>Analysis>Tag Points by Area or click Tag Points by Area in the analysis tools drop-down on the Standard toolbar to display the Tag Points by Area dialog box.
4. Choose ZIP from the Tag With drop-down list. The rest of the settings are correct.
5. Click OK. Maptitude tags each store with the ZIP Code, placing the values in a new field in the dataview. If necessary, scroll to the right in the dataview to see the new field.
6. Choose File>Close Workspace to close the workspace without saving any changes.
©2026 Caliper Corporation