Maptitude Help / Routing, Directions, and GPS / Using a GPS Receiver
Using a GPS Receiver
With Maptitude and a GPS receiver you can:
- Track your own location with a portable computer
- Perform field data collection
- Create new or updated geographic files that mark map features
For example, salespeople who travel can mark the location of customers as they visit them, and line workers for the telephone company can mark the location of telephone poles as they find them.
Maptitude GPS System Requirements
When you connect a GPS receiver to your personal computer, you can use this information with Maptitude to track your location or to create or update geographic files. To use a GPS receiver with Maptitude, you must have Maptitude installed on your computer, and you must have a GPS device with a serial port output in the NMEA 0183 format correctly installed and configured.
Setting Up a GPS Receiver
All GPS receivers with serial port output come with complete instructions on how to set up and configure the GPS receiver to interface with your computer. Before you use Maptitude with a GPS receiver, make sure that your GPS device is installed and configured correctly.
 To Change the GPS Port Configuration
- Choose Tools>Routing & Directions>GPS>Read GPS Data to display the GPS Setup dialog box.
- Click the Options tab to display the Options page.
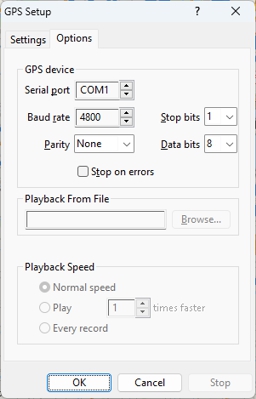
- In the GPS device frame modify any settings as necessary.
- Click OK.
Maptitude will use the new settings.
Using Maptitude with a GPS Receiver
You typically use GPS to track the location of the receiver in real time, or to record (log) the position of the receiver as a series of points to a geographic file for later display or analysis. The GPS receiver continuously monitors its location, reporting the location in degrees of longitude and latitude. Most GPS devices also report the following:
| Item | Meaning |
|---|---|
| Altitude | Estimated altitude of the GPS receiver (distance above or below sea level) |
| Course (T) | Compass direction in which the GPS receiver is moving with respect to True North (Degrees clockwise from North) |
| Course (M) | Compass direction in which the GPS receiver is moving with respect to Magnetic North (Degrees clockwise from North) |
| Speed | Speed at which the GPS receiver is moving |
| Date/Time | The current date and time, GMT (Greenwich Mean Time) |
| DGPS | A differential GPS indicator. If the number is 1, a correction signal was received from ground stations to overcome distortions in satellite signal readings. If the number is 0, no correction signal was received. |
| HDOP | The horizontal dilution of precision, represented by a number that indicates the level of accuracy of the computed position of the GPS receiver. The position of the receiver is computed from the geometrical configuration of satellites. In an ideal configuration, the number is 1, but numbers less than 2 are considered good, and numbers less than 6 are often considered acceptable. |
If your map units are miles, Maptitude reports the altitude and speed in feet and miles per hour. If your map units are kilometers, the altitude and speed are in meters and kilometers per hour.
 |
NOTE: To change the map units, choose Edit>Preferences and pick a unit of measurement from the Map Units drop-down list on the System tab. |
Maptitude can obtain updated information from the GPS receiver at any interval you choose. This interval, known as the sample interval, can be set to as little as 2 seconds or to as long an interval as you like. When you choose continuous tracking, the receiver position is updated on the Maptitude screen at the interval you specify. If you choose continuous logging, the position of the receiver is recorded to a geographic file at the same interval.
Maptitude provides two tracking options and three logging options. You can use up to four of these options at one time, combining continuous tracking and on-call logging in many different ways.
GPS Accuracy
The accuracy of GPS readings must be considered along with the accuracy of geographic files that will be used as reference layers in a map. Typical GPS accuracy is about +/- 20 ft (6 meters). Expensive, high-end survey GPS equipment using differential GPS and ground stations can achieve even higher accuracy, to within a fraction of an inch. Geographic files also have varying levels of accuracy. The net result is that tracking of GPS positions on a map may show inaccurate registration between the actual position of the GPS unit and the underlying base map. This problem exists only in some large-scale mapping applications of GPS, and generally does not affect small-scale applications.
Tracking the Location of the GPS Receiver
You can choose to track position and other GPS data in a toolbar or you can display the GPS position and heading on any open map.
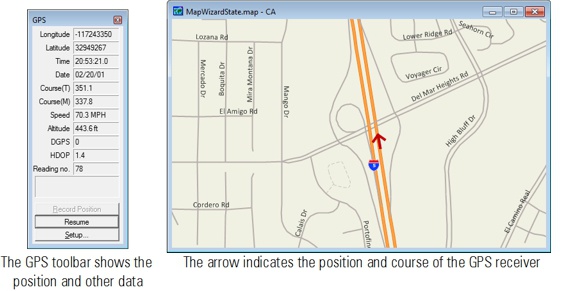
To Track Your Location in the GPS Toolbar
- Choose Tools>Routing & Directions>GPS>Read GPS Data to display the GPS Setup dialog box and make choices as follows:
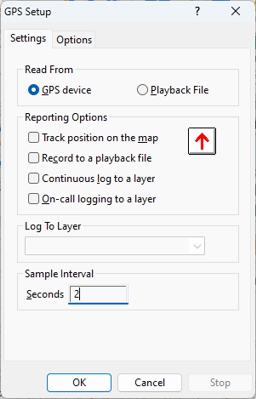
- Type the sample interval in the Seconds box.
- Click OK.
Maptitude initiates location tracking in the GPS toolbar.
To Track Your Location on a Map
- Click on the map on which you wish to track location.
- Choose Tools>Routing & Directions>GPS>Read GPS Data to display the GPS Setup dialog box and make choices as follows:
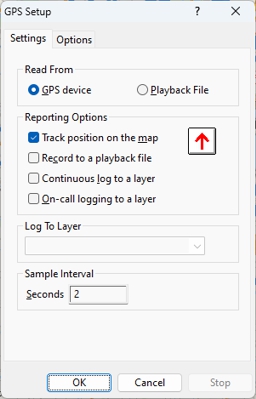
- Check the Track position on the map box.
- Type the sample interval in the Seconds box.
- Click OK.
Maptitude shows the position and heading of the GPS receiver on the map. When your location gets close to the edge of the map, Maptitude redraws the map with your location at the center.
To Stop On-Map Tracking
- Choose Tools>Routing & Directions>GPS>Read GPS Data to display the GPS Setup dialog box.
- Click Stop, or clear the check from the Track position on the map box, and click OK.
Maptitude disables on-map location tracking.
Logging GPS Data
When you record GPS data to a geographic file, Maptitude adds point features to the file indicating the location of the GPS receiver.
Maptitude lets you automatically record GPS position data to a map layer or to a playback file. A playback file records the data logged by the GPS receiver so the data can be played back at a later time. Playback files can be used with Maptitude or other applications.
Logging GPS Data to a Layer
You can add data to a map layer in two ways: continuous logging or on-call logging.
When you use continuous logging, the position of the GPS receiver is automatically recorded to the layer at set time intervals. You use continuous logging when you want to record the entire sequence of points visited by the GPS receiver. For example, you may want to:
- Create a digital road map by driving an automobile equipped with a GPS receiver
- Record the coordinates that define a rail line from a railcar-mounted GPS receiver
- Record and review the position of a pickup-and-delivery vehicle at various times through the work day
- Record the position of a vehicle at certain intervals so you can calculate average speed during rush hour on a certain highway
When you record to a layer using on-call logging, the position of the GPS receiver is recorded to the layer only when you indicate that you want to save the current receiver position. You use on-call logging when you want to record the coordinates of specific locations. For example, you may want to:
- Record the position of manholes, telephone poles, or other fixed infrastructure locations
- Mark the location of bridges, guard rails, or signposts along a road or highway
Data logged using continuous or on-call logging are stored in a standard format geographic file as a series of points. In addition to the longitude and latitude fields, the geographic file can contain any of the following fields: Elevation, Velocity, Heading, Date, Time, DGPS, and HDOP. Maptitude fills in whichever of these fields is present, and does not record the other information. For example, if the geographic file you choose does not contain fields for Heading and Date, then all but the Heading and Date information will be stored.
You can choose to log GPS data to an existing layer or to a new layer. When you choose to log GPS information to a new layer, Maptitude creates a new standard format geographic file with all the available fields. You can also add your own fields to the layer, for entering data about the points that are being recorded.
When you log to a layer, you can optionally include the layer as part of any open map. Note, however, that the map does not redraw automatically each time a new record is added to the file. If you want to see the location information updated continuously on the screen, use both the Track Position On the Map and the Continuous Log to a Layer options.
To Log GPS Information to an Existing Layer on a Continuous Basis
- Choose the layer you want to log to from the drop-down list on the Standard toolbar.
- Choose Tools>Routing & Directions>GPS>Read GPS Data to display the GPS Setup dialog box and make choices as follows:
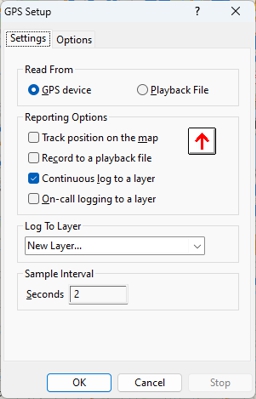
- Check the Continuous log to a layer box.
- Choose an existing layer from the Log to Layer drop-down list.
- Type the sample interval in the Seconds box.
- Click OK.
Maptitude adds points indicating the location of the GPS receiver at the sample interval you chose.
To Log GPS Information to a New Layer on a Continuous Basis
- Choose Tools>Routing & Directions>GPS>Read GPS Data to display the GPS Setup dialog box.
- Check the Continuous Log to a Layer box.
- Choose New Layer from the Log To Layer drop-down list. Maptitude displays the Create a New GPS Layer dialog box.
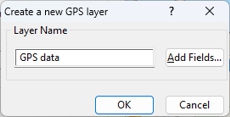
- Use the default layer name or type a new layer name.
- To add additional fields for entering data about the points being recorded:
- Click Add Fields.
- Add fields for your own data. For more information see To Modify the Structure of a Table.
- Click OK to return to the Create a New GPS Layer dialog box.
- Click OK. Maptitude displays the Save New Layer As dialog box.
- Type the file name of the new geographic file and click Save.
- Type the desired sample interval in the Seconds box.
- Click OK to close the GPS Set Up dialog box.
Maptitude adds points indicating the location of the GPS receiver at the sample interval you chose.
To Stop Continuous Logging
- Choose Tools>Routing & Directions>GPS>Read GPS Data to display the GPS Setup dialog box.
- Click Stop, or clear the check from the Continuous Log to a Layer box, and click OK.
Maptitude disables continuous logging. If all output options are disabled, the GPS toolbar is closed.
To Set Up On-Call Logging to an Existing Layer
- Choose the layer you want to log to from the drop-down list on the Standard toolbar.
- Choose Tools>Routing & Directions>GPS>Read GPS Data to display the GPS Setup dialog box.
- Click the Settings tab, then check the On-call Logging to a Layer box.
- Click OK.
Maptitude will add points indicating the location of the GPS receiver when you click the Record Position button in the GPS toolbar.
To Set Up On-Call Logging to a New Layer
- Choose Tools>Routing & Directions>GPS>Read GPS Data to display the GPS Setup dialog box.
- Click the Settings tab, then check the On-call Logging to a Layer box.
- Choose New Layer from the Log To Layer drop-down list. Maptitude displays the Create a New GPS layer dialog box.
- Use the default layer name or type a new layer name.
- To add additional fields for entering data about the points being recorded:
- Click Add Fields.
- Add fields for your own data. For more information see To Modify the Structure of a Table.
- Click OK to return to the Create a New GPS Layer dialog box.
- Click OK. Maptitude displays the Save New Layer As dialog box.
- Type the file name of the new geographic file and click Save.
- Click OK to close the Create a New GPS layer dialog box.
Maptitude will add points indicating the location of the GPS receiver when you click the Record Position button in the GPS toolbar.
To Log a Position to the File
- Click Record Position in the GPS toolbar. Maptitude adds a new point feature to the file.
To Stop On-Call Logging
- Choose Tools>Routing & Directions>GPS>Read GPS Data to display the GPS Setup dialog box.
- Click Stop, or clear the check from the On-call Logging to a Layer box, and click OK.
Maptitude disables on-call logging. If all output options are disabled, the GPS toolbar is closed.
Logging Raw Data to a Playback File
A playback file is a text file containing information produced by the GPS receiver in raw, unprocessed form. Playback files contain the data in a standard format, called NMEA 0183. You record data to a playback file when you want to:
- Illustrate tracking at a later date when no GPS receiver is available
- Go over the data later and log selected points to a geographic file
- Use the raw data in another program
When you use a playback file, you can choose continuous logging to a layer to log every record, or you can choose to log only selected points. To log selected points, you disable continuous logging to a layer. Then you play back the file, and select those points you want included in your map with the Record Position button in the GPS toolbar. Doing so can help you reduce the size of your GPS data files.
You can play back the file at normal speed, so that each record is displayed at the same speed it was recorded. You can also play back the file at a faster speed. If you choose to play the file back at two times normal speed, two records will be displayed in the time it took to log one record. This can save you time if the playback file contains data recorded over several hours.
If you want to play back records logged at fractions of a second, choose to play back every record.
To Create a New Playback File for Raw Data Logging
- Choose Tools>Routing & Directions>GPS>Read GPS Data to display the GPS Setup dialog box.
- Click the Settings tab and check the Create a New Playback File box. Maptitude displays the Create a New GPS Playback File dialog box.
- Type a file name for the GPS file and click Save.
- Type the desired sample interval in the Seconds box.
- Click OK.
Maptitude is now set up to log raw data in the playback file.
To Stop Raw Data Logging
- Choose Tools>Routing & Directions>GPS>Read GPS Data to display the GPS Setup dialog box.
- Click Stop, or clear the check from the Create a New Playback File box, and click OK.
Maptitude disables on-call logging. If all output options are disabled, the GPS toolbar is closed.
- Choose Tools>Routing & Directions>GPS>Read GPS Data to display the GPS Setup dialog box.
- Click the Playback File radio button. Maptitude prompts you to open a GPS playback file. Browse for the file and click Open.
- Check the boxes for the desired tracking and logging options.
- Click the Options tab.
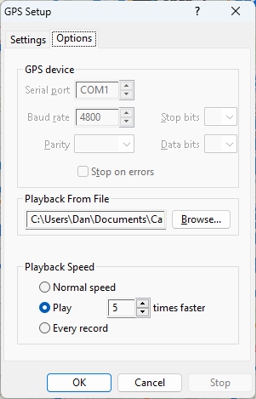
- Choose the playback speed you want from the Playback Speed radio list.
- Click OK.
Maptitude initiates tracking and/or logging from the GPS file.
Try It Yourself: Playing a GPS Playback File
1. Choose File>Open or click  on the Standard toolbar, then open the GPS workspace file in the Tutorial folder.
2. Choose Tools>Routing & Directions>GPS>Read GPS Data to display the GPS Setup dialog box.
3. Choose Playback File from the radio list. Maptitude prompts you for a playback file.
4. Choose the San Diego to LA.gps file and click Open.
Check the Track Position on the Map box.
5. Click the Options tab to display the Options page.
6. Choose Play from the Playback Speed radio list and type “60” in the Times Faster editable scroll list.
7. Click OK. Maptitude displays the GPS toolbar and displays the starting location on the map and in the toolbar. The map and toolbar update automatically as the file plays. You can close the toolbar to stop the file from playing at any time, or click OK when you reach the end of the file.
8. Choose File>Close Workspace and click Don't Save to close the workspace without saving any changes.
Importing GPS Playback Data
You can import GPS playback data directly into a point geographic file, without using the GPS toolbar, using the File-Open or the Tools>Routing & Directions>GPS>Import GPS Playback Data command.
If you have a map open with a point layer, with the Tools>Routing & Directions>GPS>Import GPS Playback Data command you can add the GPS points to that layer. With both commands you can also add the GPS points to a new point geographic file.
If the points are along lines, you can connect the points; see Connecting Points.
To Import GPS, GDB, or GPX Data
- Choose File-Open or click on the Standard toolbar, or right-click anywhere inside the Maptitude frame except on a window and choose Open. Maptitude displays the File Open dialog box.
- Choose GPS Data as the file type.
- Choose the .gps, .gdb, or .gpx file you want to open.
- Click Open. Maptitude displays the Save Imported GPS Data As dialog box.
- Type a name for the point geographic file, and click Save.
Maptitude imports the GPS playback file into the point geographic file.
To Import GPS Playback Data
- If you want to add points to an existing point geographic file, make sure it is an editable (.dbd) point layer in a map window.
- Choose Tools>Routing & Directions>GPS>Import GPS Playback Data to display the Import GPS Playback Data dialog box.
- Click
 and browse for the GPS playback file. Maptitude displays date, time, and size information for the file.
 - Make a choice as follows:
| To do this... | Do this... |
|---|---|
| Use a point layer | Choose a point layer from the Layer drop-down list and click OK. |
| Create a new point geographic file | Choose New Database from the Layer drop-down list and click OK. Maptitude displays the Create a New GPS Layer dialog box. Type a layer name in the Layer Name text edit box. If you want to add fields, click Add Fields to display the New Table dialog box and add fields (see To Create a New Table for more information), and click OK to return to the Create a New GPS Layer dialog box. Click OK to display the Save New Layer As dialog box. Choose a folder, type a file name, and click Save. |
Maptitude imports the GPS playback file into the point geographic file.
©2026 Caliper Corporation