Maptitude Help / Routing, Directions, and GPS / Vehicle Routing
Solving a Vehicle Routing Problem
Many businesses and government agencies transport goods from one or more central locations to a set of destinations. It is important to manage these operations efficiently, both to reduce operating costs and to ensure that pickups and deliveries adhere to reasonable service standards.
This general problem is known as the vehicle routing problem. Solving the vehicle routing problem involves determining which vehicles are required to service the destinations, and developing a route and schedule for each one. Because there are many variations of the problem, it can be very difficult to solve. Maptitude provides a rich set of vehicle routing tools that solve various types of routing problems.
The best way to introduce the vehicle routing problem is to give an example. Imagine a company that has one warehouse that supplies goods to 20 retail stores in various locations, as shown in the map below.
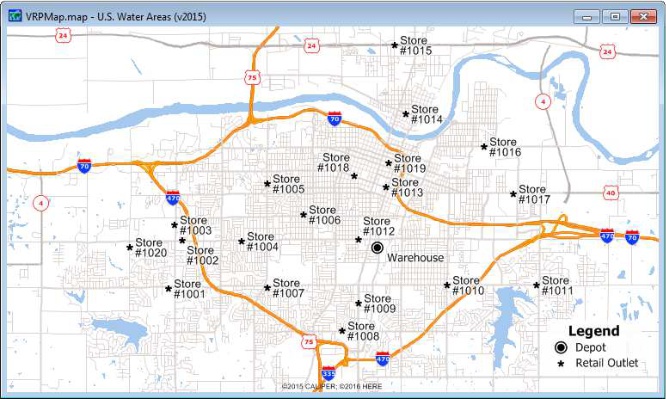
Each day, trucks must deliver goods from the warehouse to each of the retail stores, and then return to the warehouse. Each depot has a fixed number of trucks, and each truck has a fixed capacity, which is a limit on the weight or volume of the goods that the truck can carry. Each retail store has some demand, which is the weight or volume of goods that must be delivered each day. In the simplest version of the vehicle routing problem, the company must determine the number of trucks that are needed to meet the demand at each store, and find cost-efficient routes for each truck.
The starting points for each route (such as the warehouse in the above example) are known as depots, and the points to be visited are known as stops. A vehicle route starts at a depot, visits one or more stops, and may or may not return to the depot.
The goal of the procedure is to obtain a set of routes that optimize the total time spent by the entire fleet of vehicles. The procedure considers the number of vehicles of various capacities and the cost to operate them when determining a solution.
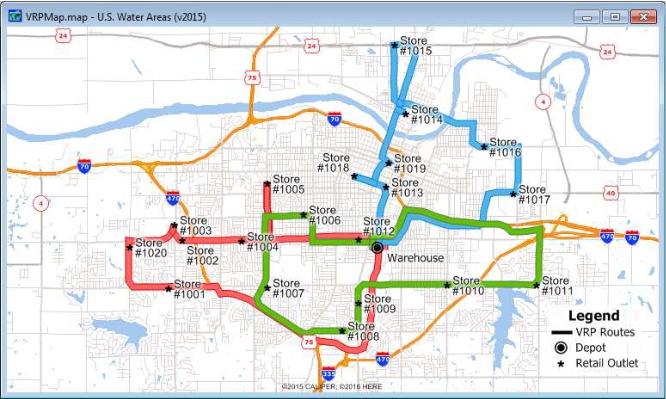
There are many factors that can make a vehicle routing problem more complex. The list below shows some common situations by the procedure:
- There may be more than one depot location, and stops can be serviced by trucks from anyone of these depots. This kind of a problem is known as a multiple-depot problem.
- There may be time restrictions on when deliveries can be made to some or all of the stops. For example, a particular stop might require that goods be delivered between 5:00AM and 7:00AM, before it opens at 8:00AM. This type of restriction is known as a time window. In addition, the whole operation may last more than one day, which is called multiple-day operation.
- Each stop may require a certain amount of time to service. In most cases, each stop has a fixed service time that is independent of demand. For example, it takes time to pull a truck into a loading dock and check in with the receiver. There is also a per-unit service time that depends upon the demand at that stop. For example, the time it takes to move boxes from the truck onto the loading dock varies depending on how many boxes there are to move.
- There may be a time restriction on total route length, or route duration. For example, when delivering take-out food, it may be desirable that the full route length is not more than an hour.
- There may be a restriction on the number of trips that each vehicle can make during the whole operation, which lasts either one day or multiple days.
- There may be backhaul stops. For example, vehicles may need to pick up empty containers at the end of their delivery trip. Backhaul stops can only be visited after all delivery stops are visited in a route.
- A vehicle route may contain mixed pickup and delivery stops, where the pickups and deliveries do not need to correspond to each other. A stop may require either a pickup, a delivery, or both services. These routes may also require a certain amount of shuffling space for the driver to be able to access delivery goods as the vehicle fills up with pickup goods and a maximum initial load which is the percent of space allotted for the delivery goods in a vehicle when it departs from the depot.
- You may want to offload the vehicles at the last stop before returning to the depot.
- You may want to minimize the number of routes. If a stop requires a longer waiting time due to its late opening time, the procedure may determine that overall time can be saved by dispatching another route to service the stop later. When you choose to minimize the number of routes, the procedure may choose to have a vehicle idle longer to service that same stop. The overall total time spent by the fleet will likely be higher than without minimizing the number of routes, but the number of routes will be lower.
- Vehicle routes may use a driving schedule, which includes different types of breaks, such as noon breaks, automatic rest breaks, and night breaks. Noon breaks have a higher priority over automatic rest breaks.
- A route may not need to end at the depot. In other words, the route does not contain the return trip from the last stop to the depot. This is often referred as an open-ended route instead of a closed tour. For example, a driver may want to drive home directly from the last stop of the day instead of returning to the depot. Another example is when the route duration constraint is effective only to the point of the last stop, such as in fresh goods delivery services.
- There may be a need to balance the routes based on the number of stops, the distance traveled, the total time traveled, the total cost, or the total loaded weight/volume. When doing route balancing, the overall time spent by the entire fleet of vehicles will likely be higher than without balancing.
When building routes without balancing between them, after creating a route, different ways of ordering the stops are tested within a route to improve the solution. When building routes with balancing, in addition to testing ordering stops differently within each route, swapping stops between routes is tested in an attempt to balance routes. Therefore, more solutions are checked, which could lead to a better solution.
The vehicle routing problem uses general-purpose methods that are appropriate for a fairly broad class of problems. There are some variations of the vehicle routing problem not handled directly within the Routing Deliveries & Pickups Wizard. Here are a few examples:
- Mixed products – Several different products must be delivered in the same vehicle, but some vehicles have restrictions on the goods that can be carried
- Partially pre-ordered routes – Certain stops must be visited in an exact order
- Other constraints – There are work rules or regulations that impose other types of constraints on the routes to be developed
Custom solutions for many of these variations on the vehicle routing problem are available from Caliper Corporation. In addition, the general-purpose methods that are included with Maptitude can be modified to handle special restrictions or to improve performance for some types of problems. Please contact Caliper Corporation for more information.
Preparing Data for Vehicle Routing
The Routing Deliveries & Pickups Wizard requires the following:
- A point layer with the location of depots (the “depot layer”) that includes the times that vehicles can be dispatched. Optionally, if you will want to offload the contents of vehicles at a location before returning the empty vehicles to a depot, you will need a selection set of depots and a selection set of offload locations in the depot layer.
- A point layer with the location of stops (the “stop layer”) that includes the times that the stops can be serviced, the unit demand, and both service and per-unit times.
- Information on the availability of vehicles, their capacity, their weight limits, and their cost at each depot. This can be in a table (the “vehicle table”) or entered and saved when using the Vehicle Routing procedure.
Depot and Stop Layers
To solve a vehicle routing problem, you must first prepare layers that contain the point locations of the depots and stops. The depots and stops can be either in the same layer, or in different layers.
If you use a single layer for both depots and stops, or if your layers contain extra points other than stops and depots, you must create a depot selection set and a stop selection set. You can create selection sets of stops and depots using any of the Maptitude selection commands and tools. For more information on selection sets, see Filters, Queries, and Selection Sets.
If you already have a point layer or layers for the depots and stops but some of the required fields are missing, you can add them using the Dataview>Table>Modify command, or create a joined view using the Dataview>Table>Join command. For more information, see Working with Tables, Databases, & Charts and Joining Your Data to a Map. Alternatively, you can specify fixed values for Open Time, Close Time, Service Time, Per Unit Time, Delivery Demand, and Pickup Demand in the Routing Deliveries & Pickups Wizard without having to modify your layers.
Depot Layer Fields
The depot layer must contain certain fields that are used in vehicle routing:
| Field | Type | Contents |
|---|---|---|
| ID | integer | A number that uniquely identifies the depot |
| Name | string | A name that is used to identify a depot in the route reports |
| Open Time | integer or time | The earliest time, in 2400 format (e.g. 1700 for 5:00pm) or in a time-formatted field, that vehicles can be dispatched from the depot |
| Close Time | integer or time | The latest time, in 2400 format or in a time-formatted field, that vehicles can return to the depot |
The fields do not need to have the exact names indicated above, although using these names may make it easier for you to use the routing procedure.
The Open Time and Close Time fields define the time window from which vehicles may be dispatched. For more information on time window inputs, see Time Windows below.
Stop Layer Fields
The stop layer must contain the following fields:
| Field | Type | Contents |
|---|---|---|
| Name | string | A name that is used to identify a stop in the route reports |
| Open Time | integer or time | The earliest time, in 2400 format (e.g. 1700 for 5:00pm) or in a time-formatted field, that vehicles can be serviced; See Time Windows below for more information |
| Close Time | integer or time | The latest time, in 2400 format or in a time-formatted field, that a stop can be serviced; See Time Windows below for more information |
| Service Time | numeric | The minimum time required to service a stop (in minutes); See Service Times below for more information |
| Per Unit Time | numeric | The service time required for each unit of demand (in minutes); See Service Times below for more information |
| Delivery Demand | numeric | The delivery demand at a stop (not required for Pickup mode) defined as units, volume, or weight, and the unit of which must match the units used to define the capacity of vehicles |
| Pickup Demand | numeric | The pickup demand at a stop (not required for Delivery mode) defined as units, volume, or weight, and the unit of which must match the units used to define the capacity of vehicles |
If you are routing from multiple depots, you have the option to pre-assign any number of stops to depots. To pre-assign stops to depots, the stop layer must include a field containing the ID numbers of the depots to which each stop is assigned:
| Field | Type | Contents |
|---|---|---|
| Depot Assigned | integer | The ID of the specific depot which services a stop. Maptitude will use the assigned depot when present and will choose the nearest depot when this value is blank. If a depot has excessive demand over its total vehicle capacity, some stops may be assigned to the second nearest depot. |
You have the option to also consider vehicle weight restrictions when solving a vehicle routing problem. If your vehicles have weight limits then your stop layer must also include:
| Field | Type | Contents |
|---|---|---|
| Weight per Unit | numeric | The weight of each unit of demand and the unit of which must match the units used to define the weight limit of vehicles. |
You may specify additional fields that you want included in the vehicle reports (e.g., address, contact name, drop-off instructions).
Time Windows
In both the depot and the stop layers, the Open Time and Close Time fields use 24:00 format, so 8:30AM should be written as 830, while 6:30PM should be written as 1830. A stop can also have multiple time windows. For example, a stop may accept deliveries from 10:00AM to noon and again from 2PM to 5PM. In this case, you will need separate fields in the stop layer for each of the time windows (e.g., OpenTime1, CloseTime1, OpenTime2, CloseTime2). Depots, on the other hand, have only one time window.
The opening and closing times of time windows must obey the following rules:
- The length of a time window must be greater than zero
- The opening times and closing times across all time windows must be in ascending order
- There must be no time overlapping between any time windows
- Only the closing time of last time window can cross midnight and span into the next day
- The closing time of a time window that crosses midnight must be less than the opening time of the first time window, namely, the accumulated time span across all the time windows must be less than a day
A multiple-day operation must be used for the after-midnight section of a time window to take effect. If the closing time of the last window exceeds midnight, it will be cut short at the midnight that is the end of operation. Here are some examples:
| Open Time | Close Time | Contents |
|---|---|---|
| 500 | 830 | Stop must be made in the early morning |
| 1200 | 1245 | A very small time window for making the stop |
| 700 | 1900 | There is essentially no restriction on servicing this stop |
| 2200 | 600 | This can be used as the last time window for a night shift |
| 1200 | 1100 | This time window is invalid, and would cause an error |
In general, as the time windows become more and more restrictive, the number of vehicle trips that are required to service the stops increases. If you do not need time window restrictions, you can simply set the open time to 0 and the close time to 2400.
Service Times
Vehicle routing accounts for the time required to service each stop when calculating routes. The service time can have a fixed component and a variable component that is demand dependent (time per unit). Both of these components can vary from stop to stop. The fixed time, for example, at one stop may take longer if it is difficult to park there or if it lacks a loading dock. Likewise, the per-unit time may be longer at a stop that requires delivery to an upper floor.
The amount of time it takes to service a stop is as follows:
service time = (fixed time) + (number of units) * (time per unit)
 |
NOTE: Certain combinations of time windows and service times may make it infeasible to service some stops. |
Vehicle Data
Vehicle information can be entered manually while performing vehicle routing or imported from a vehicle table. For each depot, you must specify the types of vehicles available. For each vehicle type, you must specify:
- The ID of the depot to which the vehicle type belongs
- A unique name for the vehicle type, such as "Truck X," "Vehicle Y," etc.
- The number of vehicles for the vehicle type
- The capacity of the vehicle type, the unit of which must match the unit of demand at the stops
- The purchase/operating/rental cost
The following field is optional and only required if your vehicles have maximum weight restrictions:
- Maximum Weight
For reporting purposes, each vehicle type defined can only be used by one depot.
If you are importing the vehicle information from a table, it must contain the following fields
| Field | Type | Contents |
|---|---|---|
| Depot ID | Integer | The ID corresponding to the depot ID in the depot layer |
| Vehicle Type Name | String | The name corresponding to each vehicle type |
| Vehicle Count | Integer | The number of vehicles for each vehicle type |
| Capacity | Real | The capacity of the vehicle type, the units of which must match the units of demand at the stops |
| Cost | Real | The purchase/operating/rental cost of each vehicle type |
| Max Weight (Optional) | Real | The maximum weight limit of the vehicle type, the units of which must match the weight per unit at the stops |
|
NOTE: The vehicle cost specified above is only one of the trip cost components. The other cost components include the cost for driving distance, the waiting cost, and the cost for trip breaks. The total trip cost is the sum of all these four cost components. |
Using the Routing Deliveries & Pickups Wizard to Solve a Vehicle Routing Problem
The Routing Deliveries & Pickups Wizard solves complex routing problems with time window, heterogeneous fleet, backhaul, mixed pickup and delivery, and route length constraints. It can handle multiple depots and open-ended routing problems. Additionally, you can choose to balance routes based on any of five different criteria: time, distance, cost, load volume, or the number of stops.
In addition, if some stops are not visited due to any restriction (such as vehicle capacity or time windows), a selection set named “Unserviced” will be created on the stop layer.
 To Solve the Vehicle Routing Problem
- Open a workspace with a map that contains a depot layer and a stop layer.
- Choose Tools>Routing & Directions>Routing Deliveries & Pickups or click
 Routing Deliveries & Pickups in the analysis tools drop-down on the Standard toolbar to start the Routing Deliveries & Pickups Wizard.
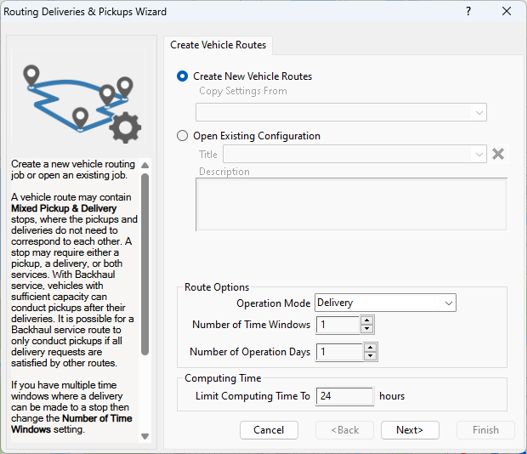
- Choose the Create New Vehicle Routes option from the radio list. You can start with settings from a previous configuration by choosing it in the Copy Settings From drop-down list or choose None to leave the route settings blank.
- From the Operation Mode drop-down list, make choices as follows:
| Option | When to use it... |
|---|---|
| Delivery | Vehicles from the depots will only be delivering units to the stops |
| Pickup | Vehicles from the depots will only be picking up units from the stops |
| Mixed Pickup & Delivery | Vehicles from the depots may be picking up or delivering units |
| Backhaul | Vehicles need to pick up empty containers at the end of their delivery trip |
- If your stop layer contains records with multiple time windows, specify the maximum number of time windows.
- If you are planning a multiple-day routing operation, specify the number of operation days. The maximum number is 30. Any number greater than one means it is a multiple-day operation.
- Enter a maximum computing time in hours. The process will stop after it has reached this maximum computing time and return routes that may not be balanced or the most optimized.
- Click Next> to specify information about the stops. Make choices as follows:
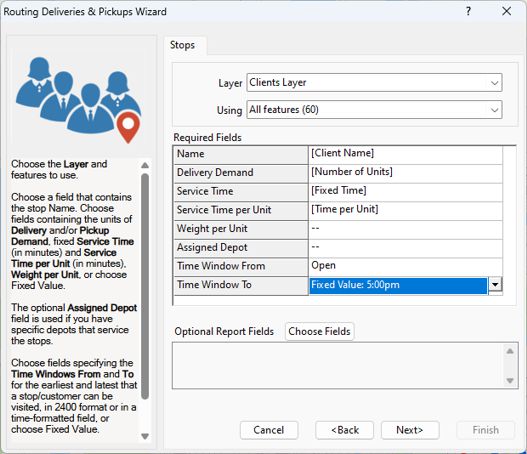
- Choose the layer that contains the stops from the Layer drop-down list
- Choose whether to use all features or a selection set from the Using drop-down list
- Use the drop-down lists in the right column to specify the fields in the layer containing the name, demand, fixed service time, per unit service time, open time, and close time. Optionally, you can specify a field that contains the weight per unit if vehicles are constrained by weight and you can specify a field that has the specific depots to which stops are assigned.
- Click Choose Fields to add additional fields that contain data to be included in reports (e.g., contact name, phone number, etc.)
 |
TIP: You can choose Fixed Value to set a value to use for all stops for demand, service time, per unit service time, open time, close time, and weight per unit. |
- Click Next> to specify information about the depots. Make choices as follows:
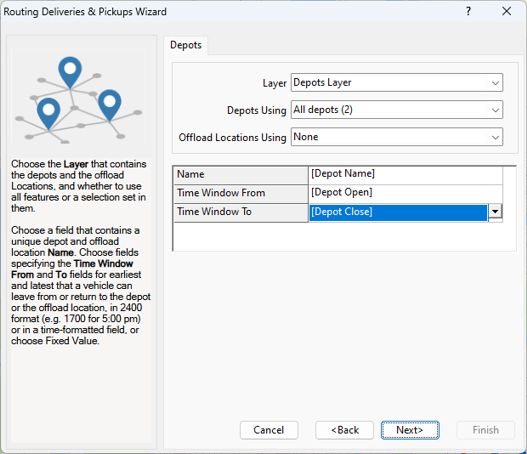
- Choose the layer that contains the depots from the Layer drop-down list
- Choose whether to use all features or a selection set from the Depots Using drop-down list
- If you want to offload vehicles before returning to a depot, choose the selection set that contains the offload location(s) from the Offload Locations Using drop-down list. For example, you may want to offload leftover items after a day of deliveries to a location before returning vehicles to a depot, or you may be picking up students and want to drop them off at a school before returning buses to a depot. If there is more than one offload site, each trip will choose an "optimal" offload location so that the total trip cost is minimized.
- Use the drop-down lists in the right column to specify the fields in the layer containing the open time and close time.
|
TIP: You can choose Fixed Value to set a value to use for all depots for open time, and close time. |
- Click Next> to specify information about the vehicles.
- To manually specify the available vehicles, click
 to add a vehicle type.
If you have a vehicle table, click , choose a file type, browse for the table, and click Open to display the Load Vehicle Table dialog box. Verify that the correct fields are chosen for Depot ID, Vehicle Type, Cost, Number of Vehicles, and Capacity, and click OK.
- For each vehicle type that you add, make choices as follows:
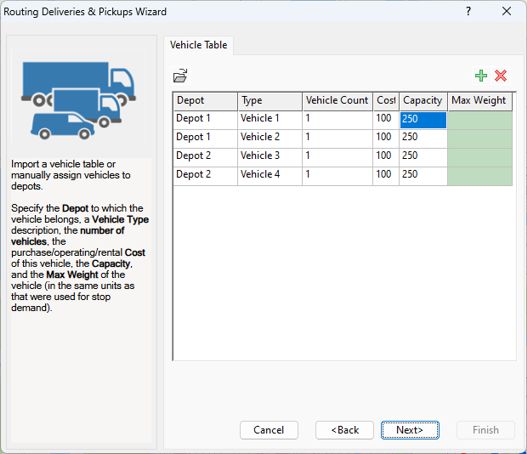
- Choose the depot to which the vehicle belongs from the drop-down list in the Depot column
- Enter a vehicle type in the Vehicle Type column
- Enter the number of vehicles of the vehicle type in the Vehicle Count column
- Enter the purchase/operating/rental cost in the Cost column
- Enter the capacity of the vehicle type in the Capacity column, using the same units as stop layer demand
- Optionally, enter the maximum weight limit in the Max Weight column, using the same units as stop layer weight per unit
Repeat steps 11 and 12 until you have defined all of the vehicle types available at each depot.
- Click Next> to specify the driving schedule and trip cost. Make choices about the scheduling options and trip cost parameters as follows:
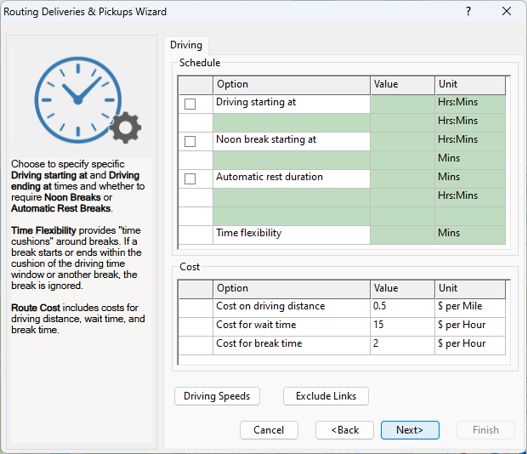
| To do this... | Do this... |
|---|---|
| Specify the earliest and latest driving time | Check the box in the Driving starting at row and specify the start and end times in the Value column. |
| Specify a midday break | Check the box in the Noon break starting at row and specify the start time and duration in the Value column. |
| Specify automatic rests | Check the box in the Automatic rest duration row and specify the duration and interval, choose whether to base the rest break interval on total route time or based on accumulated driving time, and enter a flexibility time interval. If an automatic rest break occurs within the time flexibility interval of the drive-time window or a noon break, the break is ignored. |
| Specify cost of driving distance | Enter a dollar amount for the operational cost of each mile traveled. |
| Specify waiting cost | Enter a dollar amount for each hour spent waiting at stops as well as waiting-caused inconveniences |
| Specify automatic rests | Enter a dollar amount for each hour spent in mandatory breaks along the trip. |
| Adjust speeds for the street layer | Click Driving Speeds, enteruse the sliders to make the speeds faster or slower for the different road classes or enter target speeds for some different road classes, and click OK.The sliders correspond to speeds factors 1/5, 1/3, 1/2, 1, 1.176, 1.538, and 2. |
| Exclude travel on some links | Click Exclude Links and check the All Ferries box to exclude traveling on ferries and/or check the Selected Links box and choose a selection set that contains the links to exclude from the Selection Set drop-down list. Click OK when you are done. |
- Click Next> to specify additional options for the procedure. Make choices as follows:
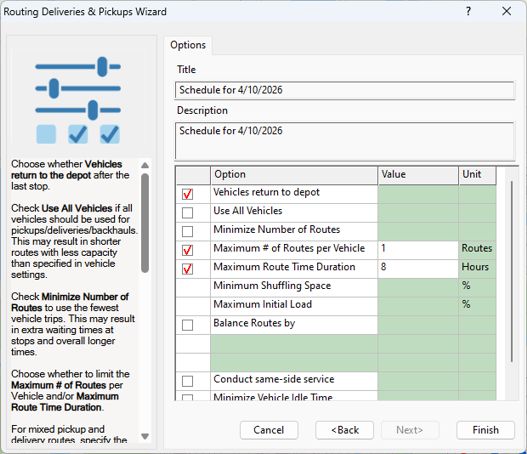
| To do this... | Do this... |
|---|---|
| Modify the title or description | Edit the text in the respective boxes |
| Have vehicles return to the depot | Check the box in the Vehicles return to depot row. |
| Use all available vehicles | Check the box in the Use All Vehicles row. This may result in shorter routes with less capacity than specified in vehicle settings. |
| Minimize the number of vehicle trips used | Check the box in the Minimize Number of Routes row. If a stop requires a longer waiting time due to its late opening time, the procedure may determine that overall time can be saved by dispatching another route to service the stop later. When you choose to minimize the number of routes, the procedure may choose to have a vehicle idle longer to service that same stop. The overall time spent by the entire fleet of vehicles will likely be higher when minimizing the number of routes. |
| Specify the maximum number of trips a vehicle can make | Check the box in the Maximum # of Routes per Vehicle row and enter a number in the Value column. |
| Specify the maximum allowed time of a vehicle trip | Check the box in the Maximum Route Time Duration row and enter a number in the Value column. |
| Specify the shuffling space and departure load for mixed pickup and delivery trips | Enter percentages in the Value column for the minimum percentage of space for when pickup and delivery are done at each stop in the Minimum Shuffling Space row and for the departure load in the Maximum Initial Load row. |
| Balance the routes | Check the box in the Balance Routes by row, choose whether to balance the route by time, distance, cost, load, weight, or number of stops from the drop-down list in the Value column, specify the route balance difference tolerance in the Balanced routes can differ by row, and choose whether to balance the routes within each depot or across every route from the drop-down list in the Balance row. The overall time spent by the entire fleet of vehicles will likely be higher than without balancing. |
| Limit the stops to the direction of travel on a street | Check the box in the Conduct same-side service row and choose whether to use stops on the right side or left side from the drop-down list in the Value column. Also enter a maximum distance from the road centerline for a stop to be considered. NOTE: Stops on one-way streets must be on the chosen side to use this option or the procedure will return an error. |
| Minimize vehicle idle time | Check the box in the Minimize Vehicle Idle Time row so that total trip time includes vehicle idle time, which is the time a vehicle waits at a depot before a trip begins. This option will attempt to minimize total trip time across all trips. |
| Prohibit U-Turns | Check the box in the Prohibit U-Turns row. |
- Click Finish.
Maptitude solves the vehicle routing procedure, displays the routes on the map, and opens the Routing Deliveries & Pickups Manager.
To View Details About One or More Routes
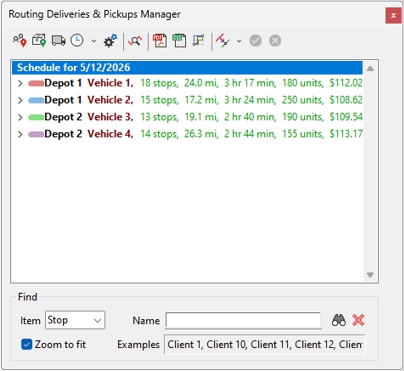
- You can view details about routes, display a map of a single route, and create reports with detailed information about the routes using tools in the Routing Deliveries & Pickups Manager as follows:
| To do this... | Do this... |
|---|---|
| See the list of stops for a route | Click  next to the route to see the arrival and departure time at the stop and the pickup and demand load. next to the route to see the arrival and departure time at the stop and the pickup and demand load. |
| Display a single route on the map | Do one of the following:
 to hide the stops on the route. to hide the stops on the route.
|
| Display all routes on the map | Right-click on the description at the top of the list and chooseDisplay All Routeor highlight the description at the top of the list and click  . . |
| Find a stop on the map and to which route it belongs | Choose Stop from the Item drop-down list, enter the name of the stop, and click  . Maptitude adds a freehand item showing the location of the stop. If you check the Zoom to fit box, Maptitude will also zoom to the stop location. The Routing Manager will also expand the route to which the stop belongs. Click to remove the freehand item. . Maptitude adds a freehand item showing the location of the stop. If you check the Zoom to fit box, Maptitude will also zoom to the stop location. The Routing Manager will also expand the route to which the stop belongs. Click to remove the freehand item. |
| Generate an itinerary report for a route | Right-click on a route in the list and choose Create Report for [Route Name], or highlight a route and click  . . |
| Generate an itinerary report for all routes | Right-click on the description at the top of the list and choose Create Report, or highlight the description at the top of the list and click . |
| Export a route to Excel | Right-click on a route in the list and choose Export Report for [Route Name], or highlight a route and click  . . |
| Export all routes to Excel | Right-click on the description at the top of the list and choose Export Routes to Excel, or highlight the description at the top of the list and click . |
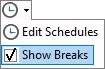
- If your routes include any rest, lunch, or night breaks you can check the Show Breaks box in the Edit Schedules drop-down to see the breaks in the list of stops for a route or uncheck it to omit breaks from the list of stops.
To Load Existing Routes onto a Map
- Open a map that contains a depot layer and a stop layer.
- Choose Tools>Routing & Directions>Routing Deliveries & Pickups or click Routing Deliveries & Pickups in the analysis tools drop-down on the Standard toolbar to start the Routing Deliveries & Pickups Wizard.
- Choose the Load Existing Vehicle Routes option from the radio list.
- Choose a route from the drop-down list or choose Load config file, browse for the Vehicle Routing Configuration file (.VRPConfig), and click Open.
- Click Next to display the Stops page.
- The stop layer and fields are loaded from the previous run of the procedure. Make any changes and click Next to display the Depots page.
- The depot layer and fields are loaded from the previous run of the procedure. Make any changes and click Next to display the Vehicles page.
- The vehicles used from the previous run of the procedure are displayed. Make any changes to the vehicles and click Next.
- The options used from the previous run of the procedure are displayed. Make any changes to the options and click Finish.
Try It Yourself: Solving a Vehicle Routing Problem
1. Choose File>New Workspace, chose New map of my data/table/spreadsheet from the first scroll list, and click OK.
2. In the Tutorial folder, open the Excel spreadsheet with logistics data for your country (e.g., Logistics Australia.xlsx, Logistics United States.xlsx, etc.).
3. Choose the Depots sheet and click OK. Maptitude displays Create-a-Map Wizard.
4. Click Next>, choose the first “Locate” option in the scroll list, and click Finish. Maptitude locates the two depots. Click OK to close the Results dialog box.
5. In the Display Manager, click the style sample next to the Depots Layer to display the Style dialog box. Change the size to 16pt, change the icon to a solid square, and click OK.
6. Choose Map>Add Table/Spreadsheet to a Map and choose the same logistics Excel file in the Tutorial folder.
7. Choose the Clients sheet and click OK. Maptitude displays Create-a-Map Wizard.
8. Click Next>, choose the first “Locate” option in the scroll list, and click Finish. Maptitude locates the clients. Click OK to close the Results dialog box.
9. Choose Tools>Routing & Directions>Routing Deliveries & Pickups or click Routing Deliveries & Pickups in the analysis tools drop-down on the Standard toolbar to display the Routing Deliveries & Pickups Wizard.
10. Click the Create New Vehicle Routes radio button, verify that Delivery is chosen from the Operation Mode drop-down list, and click Next> to display the Stops page.
11. Notice that the Routing Deliveries & Pickups Wizard already has chosen to use all features in the Clients layer and has found the fields for name, delivery demand, service time, and service time per unit. Choose Open for the Time Window From, Close for the Time Window To, and click Next> to display the Depots page.
12. Notice that the Routing Deliveries & Pickups Wizard already has chosen to use all features in the Depots layer and has found the field for name. Choose [Depot Open] for the Time Window From, [Depot Close] for the Time Window To, and click Next>to display the Vehicles page.
13. Click four times to add 4 vehicles.
14. Click and drag to highlight all of the cells in the Cost column and type 100 to set the costs for all four vehicles.
15. Click and drag to highlight all of the cells in the Capacity column and type 250 to set the capacities for all four vehicles.
16. Choose Depot 1 from the drop-down list in the Depot column for two of the vehicles, and Depot 2 for the other two vehicles.
17. Click Next> to display the Driving page and leave all of the break options unchecked.
18. Click Next> to display the Options page.
19. Enter My Delivery Routes in the Title box, check the box in the Vehicles return to depot row, check the box in the Maximum # of Routes per Vehicle row and enter 1 in the Value column, check the box in the Maximum Route Time Duration row and enter 8 in the Value column, and check the box in the Balance Routes by row,, choose Time from the drop-down list in the Value column, and choose Every route from the drop-down list in the Value column of the Balance row.
20. Click Finish. Maptitude determines the routes to service all of the stops using the available vehicles.
21. Click next to a route to see the stops that route services.
22. Right-click the itinerary description at the top of the list and choose Create Report. Maptitude creates a PDF report. Scroll through the PDF to see the itinerary for each route. Close the report when you are done.
23. Choose File>Close Workspace and click Don’t Save to close the workspace without saving changes to the map.
Vehicle Routing Results
The Customer-Routes dataview will contain the following fields:
| Field | Description |
|---|---|
| Route | ID for each route used internally |
| VehicleID | Unique identifier for the vehicle |
| VehicleCapacity | Capacity of the vehicle |
| Stop | ID of each stop used internally |
| Name | The name of the stop |
| Sequence | The order of stops in the route |
| [Open Time] | The opening time for the stop |
| [Due Time] | The closing time for the stop |
| [Arrv Day] | The day that the vehicle arrives at the stop |
| [Dept Day] | The day that the vehicle departs from the stop |
| Arrival | The time that the vehicle arrives at the stop |
| Departure | The time that the vehicle departs from the stop |
| [Break Time] | Time spent on break |
| Wait | Time spent waiting at the stop |
| [Service Time] | Time spent on service at the stop |
| [Travel Time] | Time traveled to arrive at the stop |
| Distance | Distance traveled to arrive at the stop |
| [Total Distance] | Cumulative distance traveled by the vehicle when it arrives at the stop |
| [Total Cost] | Cumulative cost incurred by the vehicle when it arrives at the stop |
| Delivery | The delivery demand of the stop |
| Pickup | The pickup demand of the stop |
| [Total Load] | Cumulative load delivered/picked up by the vehicle when it arrives at the stop |
| Weight | Weight of the delivery/pickup of the stop |
| [Total Weight] | Cumulative weight delivered/picked up by the vehicle when it arrives at the stop |
| [Stop Type] | Information on the type of stop (Delivery or Pickup) |
| VehicleType | Type of the vehicle |
| StopLon | Longitude of the stop |
| StopLat | Latitude of the stop |
| Cost | Fixed cost of the vehicle |
| RouteName | The name of the route |
| TimeConflict | Filled with "0" if the stop causes the route to exceed the time limit |
| LoadConflict | Filled with "0" if the stop causes the vehicle to exceed the capacity limit |
Editing Vehicle Routes
Once you have created vehicle routes, you can use the Routing Deliveries & Pickups Manager to modify routes. You can change the color and name of a route, modify the route settings, move stops, and delete routes.
Sometimes there will be stops that were not assigned to any route in the initial solution, or that are removed from routes by you. The Routing Deliveries & Pickups Manager lets you handle these unserviced stops in several ways:
- You can modify the settings that were used to produce the routes and rerun the procedure. For example, you could modify the number of trucks available or change the balancing method, then rerun the procedure to see if there are fewer unserviced stops.
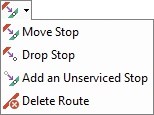
- You can use the tools to manually move stops from one route to another, add unserviced stops to a route, or remove stops from a route. Changes you make to the routes are automatically updated on the map and in the Routing Deliveries & Pickups Manager. These tools are accessible via a drop-down list in the Vehicle Routing Manager:
To Change the Style of a Route or a Route Name
- Click on the style sample next to the route to display the Route Settings dialog box.
- Enter a Name in the Route Name edit box and choose a line style, width, color, and opacity for the route.
- Click OK.
To Modify the Stops Serviced
- Click
 to display the Stops portion of the Vehicle Routing Wizard.
 - Make any changes to the stops, such as the layer and/or selection set to use, and click OK.
- Click
 to run the vehicle routing procedure again with the changes to the stops.
To Modify the Depots Serviced
- Click
 to display the Depots portion of the Vehicle Routing Wizard.
 - Make any changes to the depots, such as the layer and/or selection set to use, and click OK.
- Click to run the vehicle routing procedure again with the changes to the depots.
To Modify the Available Vehicles
- Click
 to display the Vehicles portion of the Vehicle Routing Wizard.
 - Make any changes to the vehicles available at each depot and click OK.
- Click to run the vehicle routing procedure again with the changes to the vehicles.
To Modify the Driving Schedule
- Click
 to display the Driving Schedule portion of the Vehicle Routing Wizard.
 - Make any changes to the schedule and click OK.
- Click to run the vehicle routing procedure again with the changes to the vehicles.
To Modify the Route Duration, Route Balancing, and Other Settings
- Click
 to display the Options portion of the Vehicle Routing Wizard.
 - Make any changes to the options and click OK.
- Click to run the vehicle routing procedure again with the changes to the options.
To Move a Stop to a Different Route
- Click
 in the Vehicle Routing Manager to activate the Move Stop tool.
 - Click on a stop, then click on the route to which you wish to add the stop. Where you click on the route will determine the sequence in which the stops are serviced. Stops earlier in the route will be unchanged; stops later in the route will be serviced after the inserted stop. You will be warned if moving a stop violates time window or vehicle capacity constraints.
- If you click a location where there is more than one route, Maptitude displays the Pick Destination Route dialog box. Choose the route you wish to move the stop to and click OK.
- The stop is removed from the sequence of stops in the initial route, and inserted into the new route. Maptitude recalculates the changed routes, highlights them on the map, and shows detailed information about the change in the Vehicle Routing Manager.
- Click
 to save the changes or click
  to cancel the changes.
If you save the changes, Maptitude updates the changed routes and redraws the map.
To Add an Unserviced Stop to a Route
- Click
 in the Vehicle Routing Manager to activate the Add an Unserviced Stop tool.
 - Click on an unserviced stop, then click on the route at the location where you would like to move the stop. Where you click on the route will determine the sequence in which the stops are serviced. Stops earlier in the route will be unchanged; stops later in the route will be serviced after the inserted stop. You will be warned if moving a stop violates time window or vehicle capacity constraints.
- If you click a location where there is more than one route, Maptitude displays the Pick Destination Route dialog box. Choose the route you wish to add the orphan to and click OK.
- Maptitude recalculates the route with the new stop, highlights the new route on the map, and shows detailed information about the new route sequence in the Routing Deliveries & Pickups Manager. Any stops that violate time window constraints are shown in red in the scroll list.
- Click to save the changes or click to cancel the changes.
If you save the changes, Maptitude inserts the unserviced stop into the route, and redraws the map with the new route.
To Remove a Stop from a Route
- Click
 in the Vehicle Routing Manager to activate the Drop Stop tool.
 - Click on the stop you wish to mark as unserviced.
- Maptitude recalculates the route without the stop, highlights the new route on the map, and shows detailed information about the new route sequence in the Routing Deliveries & Pickups Manager. Any stops that violate time window constraints are shown in red in the scroll list.
- Click to save the changes or click to cancel the changes.
If you save the changes, Maptitude removes the stop from the route and adds it to the unserviced stops selection set.
To Delete a Route
- Click
 in the Vehicle Routing Manager to activate the Delete Route tool.
 - Click on the route you wish to remove.
- If you click a location where there is more than one route, Maptitude displays the Pick Destination Route dialog box. Choose the route you wish to delete and click OK.
- Maptitude highlights the route on the map.
- Click to save the changes or click to cancel the changes.
If you save the changes, Maptitude deletes the route, makes all of the stops along the route orphans, and adds them to the orphan selection set.
©2026 Caliper Corporation