Maptitude Help / Tutorial / Creating and Modifying Territories
Stage 7: Creating and Modifying Territories
Maptitude lets you build territories such as sales territories or school districts. With the Territory Wizard you can create territories either interactively from areas in a map such as postal codes or states, by using a table with your territory definitions, or by using a point or area layer.
All of the customers in our spreadsheet have a territory assigned to them. In most cases the territories are based on postal code areas (e.g., ZIP Codes in the United States, FSAs in Canada, Postcode Districts in the United Kingdom, Postal Areas in Australia, France, and Germany). Let’s use the territory fields to create territories from these postal layers.
 To Create Territories from a Table
- Click on the original geocoded customer map without the buffers or choose the Customer Locations map from the Window menu.
- Choose Map>New Territory Layer to display the Territory Wizard dialog box.
- Choose From my territory table from the radio list. Maptitude opens the Choose File to Import dialog box.
- Verify that Excel Worksheet is the file type, browse for the Tutorial folder in the Maptitude Documents folder (e.g., Documents\Caliper\Maptitude 2026\Tutorial), choose the sample customer Excel file, and click Open.
- Click OK to use the My Customers sheet in the Excel file.
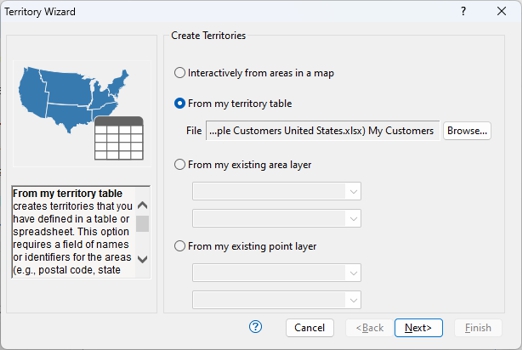
- Click Next.
- Choose Customer Locations from the Map drop-down list to add the territories to the active map.
- Maptitude will do its best to identify the geography layer in the map to use and the fields to use from the Excel file. Verify that the choices are correct as follows:
- The map layer to use to build the territories is shown in the Geography Layer drop-down list. It should be the 5-Digit ZIP Code layer if you are using the U.S. Country Package (Postal Area for Australia, Postal Area for Canada, Postcode District for the United Kingdom, etc.).
- The field in the map layer you chose above that contains the names or codes that correspond to the postal fields in the Excel file is shown in the first Geography Field drop-down list. It should be the ZIP field if you are using the U.S. Country Package (Postal for Australia, FSA for Canada, District for the United Kingdom, etc.).
- The field in the Excel file that has the postal codes that correspond to the field you chose in the second bullet above is shown in the Geography Field drop-down list. It should be [ZIP Code] if you are using the U.S. Country Package (Postcode for Australia, FSA for Canada, Postal District for the United Kingdom, etc.).
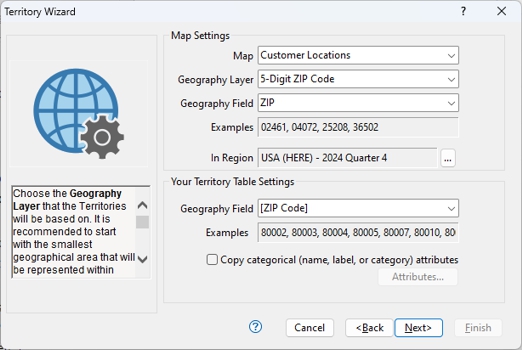
- Click Next. The Territory Wizard lets you import your data to territories or link the spreadsheet data to the territories. Keep the default Import data to territories option chosen.
- Click Next. The Territory Wizard lets you create hierarchies of territories. We just want to create a single level of territories so leave the default hierarchy settings unchanged.
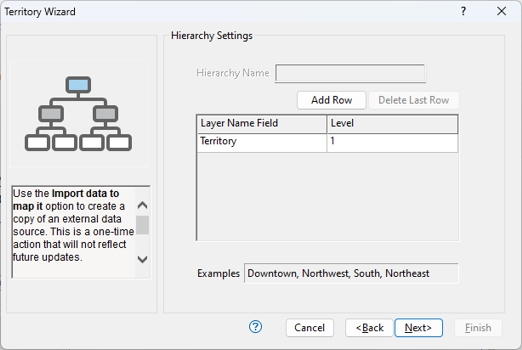
- Click Next. The Territory Wizard lets you track values such as population or sales that you can use to help you balance the size of the territories. The values can come from a table or from a map layer.
- Click
 and choose Import Territory Table Fields. Choose [QTR2 Sales] from the scroll list and click OK to track the second quarter sales values of the territories.
 - Click and choose Add Geography Layer Fields. If your Country Package includes demographic data for the chosen geography layer, choose Population from the scroll list and click OK to track the population of the territories. Otherwise click Cancel.
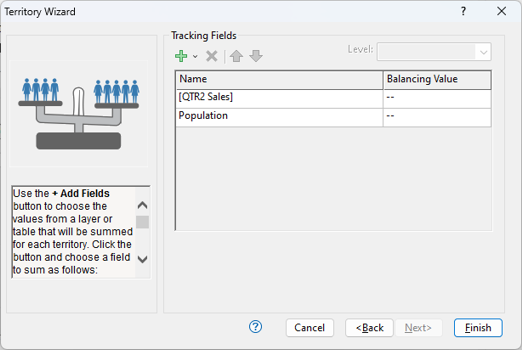
- Click Finish. Maptitude creates a territory layer using the postal code territory assignments from the Excel file, creates a new map with the territory layer, and opens the Territory Manager.
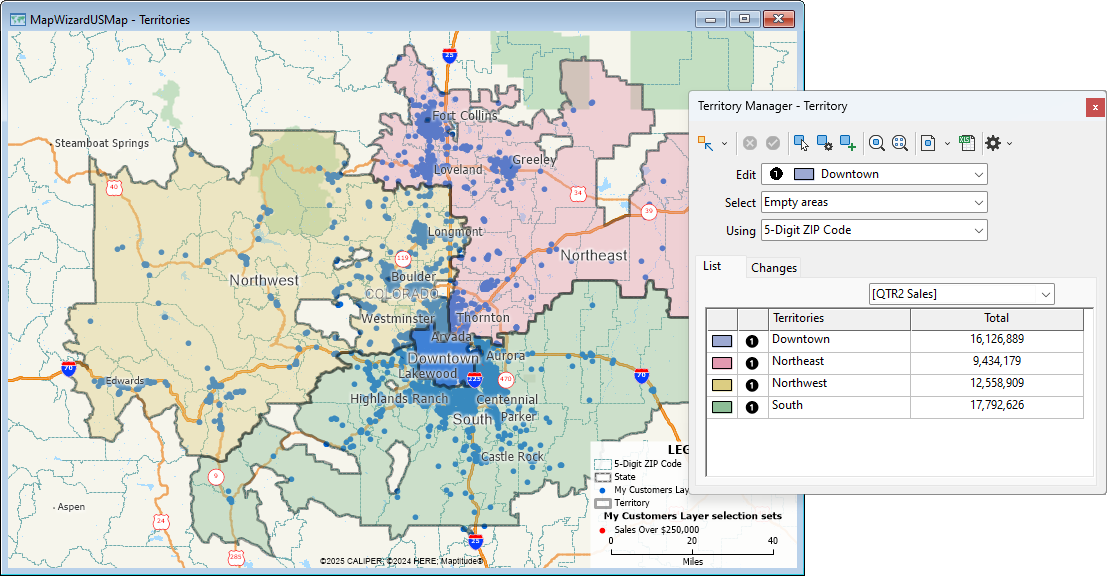
- Notice the List tab on the Territory Manager. It lists the names of the territories that were created and shows the total second quarter sales for each of the territories derived from the sales data in the Excel file. If you tracked population, choose Population from the drop-down list on the Territories tab to see the population of each territory derived from the postal code layer.
You may notice that several of your territories have holes in them. This occurred because there were no customers in your Excel file located in those postal codes. You can, however, also use the tools in the Territory Manager to fill in those holes if you desire.
 |
TIP: The territories are made from the postal code layer that you specified in step 7. You can use the Display Manager to show that layer if you want to see how the postal codes align with the territories. |
To Modify Territories with the Territory Manager
- If one of your territories has a hole in it, choose it from the Edit drop-down list.
- Click the Changes tab on the Territory Manager to see the tracking field values for that territory.
- Click
 to activate the Select by Pointing tool and click on one or more of the holes in the territory you chose in step 1. Maptitude highlights the postal codes and shows the effect on the population that the added postal codes will have to the territory.
 - Click
 . Maptitude updates the territory boundary to include the areas you highlighted.
Alternatively, you can fill all of the holes in the map automatically provided that they are entirely surrounded by a single territory. - Click
 and choose Auto-Assign Unassigned Holes. Maptitude reports the number of features that it was able to automatically assign to territories.
 - Click OK.
-
If you want, you can repeat the steps 1-4 to fill any remaining holes that are on the boundary of a territory.
You can also make the territories more balanced by moving some of the postal codes from territories with high sales or population to territories with lower sales or population. The Territory Wizard makes it easy to track the changes on the Changes tab.
Let’s balance the territories a little more based on the sales.
To Balance Territories with the Territory Manager
- Click the List tab and choose [QTR2 Sales] from the drop-down list. You want to move some postal codes from a territory with high sales to one with low sales.
- Choose a territory that has a low value of sales from the Edit drop-down list.
- Choose Any area & prevent overlaps from the Select drop-down list. This will allow you to select postal codes that are already assigned to the high sales territory to be moved to the low sales territory.
- Click the Changes tab on the Territory Manager to see the tracking field values for that territory.
- Still using the Select by Pointing tool, click on some postal codes in a neighboring high sales volume territory. Continue selecting more postal codes until the sales volumes are closer to equal. Click OK to confirm that you want to move the ZIP Codes that are already assigned to a territory.
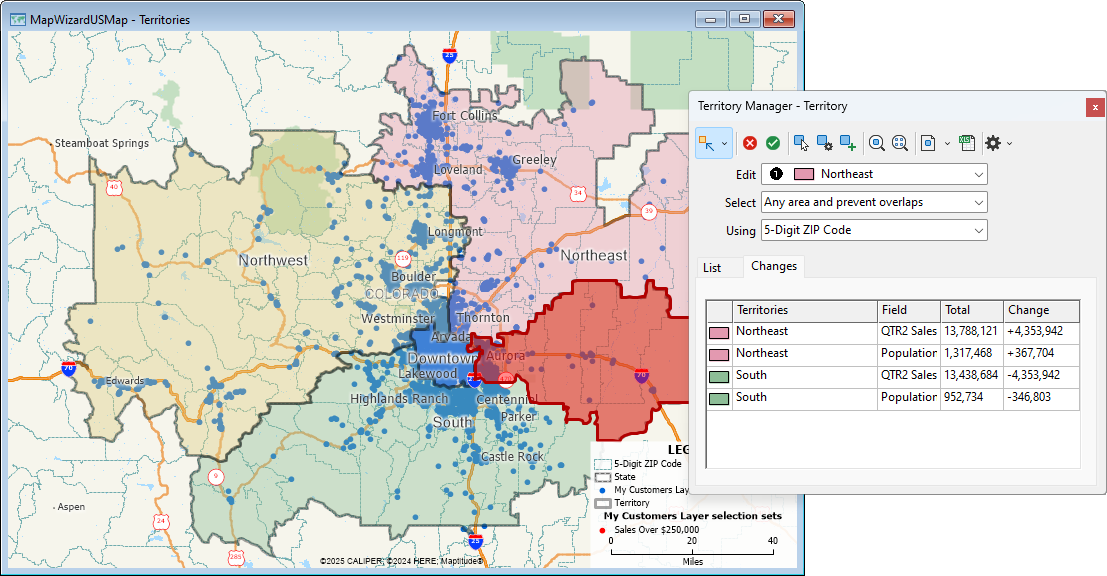
- Click . Maptitude updates the boundaries of the affected territories.
Creating territories from a table is just one way to create a territory layer. You can also create territories interactively by clicking on a map, by using a point layer that includes territory assignments, by using an area layer, or by using selection sets on an area layer. To learn more about creating territories, see Creating Territories.
Again you may want to click  to save the changes to the workspace.
Now that you have redefined the territories to make them more balanced, you will want to update your data to account for customers who are in postal codes that you reassigned to a new territory.
Stage 8: Updating The Customer Data with the New Territory Assignments
©2026 Caliper Corporation