Last updated on May 11, 2026
Organizing and Sharing Maptitude Online Maps
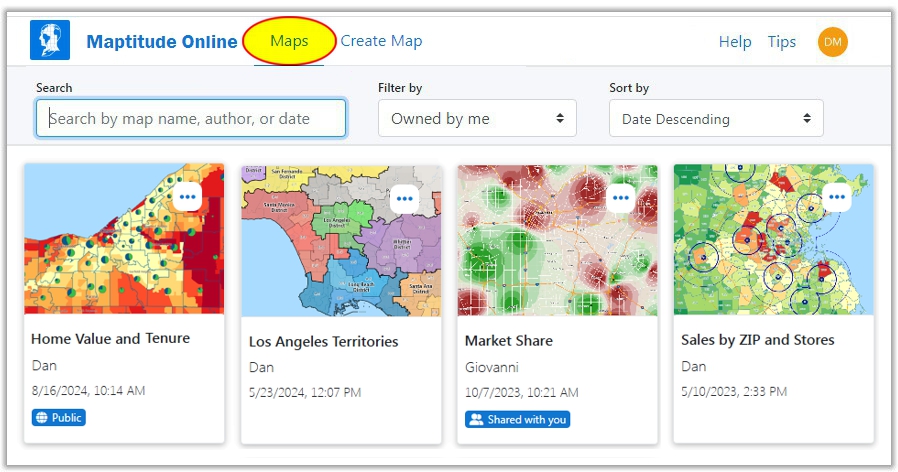
The Maps tab shows cards for all of the maps that are either owned by you or shared with you. The maps owned by you could be ones that you have uploaded from the desktop version of Maptitude or ones that you have previously created in Maptitude Online. Map cards can be sorted, filtered, renamed, shared with other users or as a public URL, or deleted.
To Open a Map
- Click on a map card.
Maptitude Online opens the map. For information on using a map, see Viewing Maptitude Online Maps. For more information on adding data, themes, or analysis to a map, see Modifying the Contents of a Map. To add territories to a map, see Creating Territory Layers.
Organizing Maptitude Online Map Cards
To Filter the Map Cards
- Filter the maps as follows:
To do this... Do this... Search for a particular map Type part of the map name in the Search box. Only cards for maps that contain the text you enter will be displayed. View maps created by a particular author Type part of the author's name in the Search box. Only cards for maps created by that author will be displayed. View maps by date Enter a year (e.g., 2020), a month/day (e.g., 10/31), or a complete date (e.g., 10/31/2020). View maps created by you Choose Owned by me from the Filter by list. View maps shared with you Choose Shared with me from the Filter by list.
- Sort the maps by date or name by choosing an option from the Sort by list.

TIP: You can pin one or more map cards so that they always appear before any other map card. Click ... on the card and choose Pin to pin the card to the beginning of the list of cards or choose Unpin to unpin the card and sort it with the rest of the cards.
To Rename Map Cards
- Click ... on the map card and choose Rename.
- Enter a name in the edit box and click Rename.
Sharing a Map
Maptitude Online makes it easy to openly share your story maps, site locations, territories, or any other information that you have mapped. You can share your maps privately with other users or with a URL.
Sharing with Other Subscribers
You can choose which subscribers to share a map with by searching for individual subscribers or by choosing subscribers from a team. If you share with a team then the subscribers currently in that team are listed.
|
NOTE: If a subscriber is added to a team after the map is shared, the map will not be shared with them. Dropping a subscriber from a team does not change the maps shared with them. |
To Share a Map with Other Subscribers from a Map Card
- Click ... on the map card and choose Share.
- Click the Share with Subscribers tab and make changes as follows:
To do this... Do this... Share with all subscribers Check the Share map with everyone on this account box. Share with one or more subscribers Search for a subscriber by name or email by typing a few characters in the search box and choosing a subscriber from the filtered list and use the search box to add any additional subscribers. You can remove a subscriber by clicking the X next to their name. Share with subscribers from a team Choose a team from the list and click Add. You can exclude some of the members of the team by clicking the X next to their name. - Click +Add a message to add a description about the map that you are sharing.
- Check the Subscribers can add/edit layers on this map if you want to enable subscribers to modify the map. When checked, any subscriber invited to a map can make edits. The owner can create an unshared copy of a map to preserve it. Any user edits are silently committed without notifying other users, and other users need to refresh their map to see the changes.
- Click Share.
- Click Done when you are finished.
To Share an Open Map with Other Subscribers
- Choose
 Share on the sidebar.
 - Make changes as follows:
To do this... Do this... Share with all subscribers Check the Share map with everyone on this account box. Share with one or more subscribers Search for a subscriber by name or email by typing a few characters in the search box and choosing a subscriber from the filtered list and use the search box to add any additional subscribers. You can remove a subscriber by clicking the X next to their name. Share with subscribers from a team Choose a team from the list and click Add. You can exclude some of the members of the team by clicking the X next to their name. - Click +Add a message to add a description about the map that you are sharing.
- Check the Subscribers can add/edit layers on this map if you want to enable subscribers to modify the map.
- Click Share.
|
|
TIP: After you share a map, you can choose |
Sharing with a URL
When you share your maps with a URL there is no need to log in to access and view them, you just need to have the URL. You can choose to publish as an unlisted URL where anyone with the link can view the maps but search engines will not index it, or you can publish as a public URL where anyone can find the map, including search engines.
You also have the option to customize the title and logo used on your publicly shared maps.
|
|
TIP: Administrators can prevent users from publicly sharing maps with a URL. The Publish option will not be displayed if administrators have chosen this option. For more information, see Account Settings. |
To Share a Map with a URL from a Map Card
- Click ... on the map card and choose Publish.
- Choose whether to publish as an unlisted URL or a public URL.
- Click Copy to copy the URL of the map to the clipboard, click Open to open the published map URL in a new tab, or click Embed to copy the iframe embed code to the clipboard to use on a webpage or blog.
|
|
TIP: If you would like a vanity URL for your publicly shared map, then you can make the iframe the only content of a web page, with whatever URL you choose. |
|
|
TIP: After you share a map, you can repeat the steps to copy the URL again or to stop sharing. |
To Share an Open Map with a URL
- Choose
 Publish on the sidebar.
 - Choose whether to publish as an unlisted URL or a public URL.
- Click Copy to copy the URL of the map to the clipboard, click Open to open the published map URL in a new tab, or click Embed to copy the iframe embed code to the clipboard to use on a webpage or blog.
|
|
TIP: If you would like a vanity URL for your publicly shared map, then you can make the iframe the only content of a web page, with whatever URL you choose. |
|
|
TIP: After you share a map, you can choose |
To Customize Your Publicly Shared Maps
- Click the User Options and Settings Menu (located at the top right-hand corner of the screen in a drop-down under your user name icon) and choose Settings.
- Scroll down to the Publicly Shared Maps section.
- Check the Use custom branding box.
- Make changes as follows:
Option How to Use It Custom Site Title Enter a title that you want to appear at the top of your shared map or type "none" to remove any custom site title. Custom Logo URL Enter the URL for a logo that you want to appear at the top of your shared map. Link URL Enter a URL that should open if the logo is clicked. - Click Save Changes.
Deleting a Map
To Delete a Map
- Click ... on the map card and choose
 Delete or choose
 Options on the Sidebar of an open map and choose Delete.
 - Click Delete to confirm.
©Copyright Caliper Corporation www.caliper.com • 1172 Beacon St., Suite 300, Newton MA 02461 USA