| Mapping, GIS, & Transportation Software Solutions |
| Mapping, GIS, & Transportation Software Solutions |
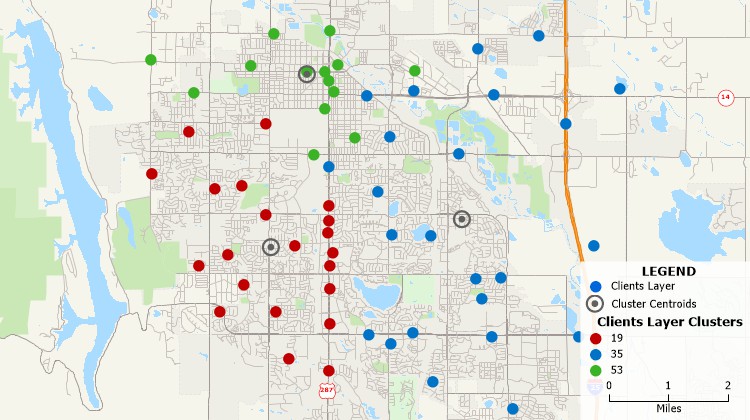
The Clustering Wizard provides you with an automated method of grouping a set of points or areas into compact clusters, while placing optional constraints on the clusters such as maximum size or a balanced total field, such as Sales or Population. To use the tool, you will need a map containing a point or area layer that you would like to group into clusters.
The goal of clustering is to produce groupings that are as compact as possible, where there may also be limits on the size of each cluster. For example:
You can cluster point or area features.
The clustering procedure lets you specify a maximum cluster size or cluster capacity, which limits the number of features assigned to each cluster. When you specify a capacity, Maptitude adds together the sizes of all the features that are assigned to a cluster, and stops adding features when the capacity limit is reached.
The size of a feature and the capacity of a cluster can be expressed in many different ways. For example:
When there are limits on cluster capacity, it is possible for the clustering procedure to produce clusters that overlap. This could occur in the following situations:
In particular, if there is a very tight capacity constraint, it is likely that features from one cluster may be located in the midst of features that are assigned to other clusters.
You can leave the clusters unbalanced, or you can balance clusters based on:
You control how well the districts are balanced by specifying the maximum acceptable percentage difference for the number of features in each cluster, the size of each cluster, or the cost of servicing each cluster. This value is known as the tolerance, and can be set to any number between 0 and 100 percent.
When you run the clustering procedure, Maptitude will display the resulting clusters on the map with a color theme based on the ID of the most centrally located feature in each cluster. It will also display a point layer that indicates the geographically weighted center of each cluster and a joined view of the clustered layer with fields indicating the cluster to which each feature is assigned and the distance or time cost of travel between that feature and its cluster.
*NOTE: The Clustering add-in works only with latest version of Maptitude.
| To do this... | Do this... |
| Choose the layer to split into clusters | Choose a layer from the Layer drop-down list |
| Choose the records to include in the clusters | Choose All Features or a selection set from the Selection Set drop-down list |
| To do this... | Do this... |
| Use the Drive Time between points | Check Route and choose Fastest from the Route Type drop-down menu |
| Use the Driving Distance between points | Check Route and choose Shortest from the Route Type drop-down menu |
| Use the Straight Line Distance between points | Check Straight Lines |
| Skip routes longer than a certain Drive Time or Driving Distance | Check Skip routes longer than and enter a value |
| To do this... | Do this... |
| Set the number of Clusters to make | Enter a value for Number of Clusters |
| Restrict the clusters to be under a given value for a total field | Check Restrict, pick a field from the drop-down list and enter a value to restrict the clusters to |
| Compute statistics for the resulting clusters | Check Compute Statistics |
| Make the clusters as compact as possible | Choose None under Cluster Balancing |
| Balance the clusters to have similar number of points | Choose Number of Points under Cluster Balancing |
| Balance the clusters to have similar totals for a given field | Choose Total of under Cluster Balancing and pick a field from the drop-down list |
| Balance the clusters to have similar average time/distance to the center of the cluster | Choose Average Cost under Cluster Balancing |
| Set an acceptable tolerance for the balancing of the clusters | Enter a value or use the spinners to set the acceptable percent tolerance |
Maptitude groups the target layer into clusters based on the chosen settings, with the following outputs:
Home | Products | Contact | Secure Store