Maptitude Help / Moving Around a Map / Finding Locations Using the Find Command
Finding Locations Using the Find Command
You can use the Edit>Find command to zoom your map to locations based on the region and world geographic files that come standard with Maptitude. The types of locations that you can find will vary depending upon the regional data that you have installed. Typically you can find an address, a city, a state/province, or a postal area within the region, or a city, country, or coordinate anywhere in the world.
Simply choose the type of location you want to find and enter the requested information about it such as address or name. Maptitude searches for the location and, depending on the options you choose, zooms to the location, marks it with a symbol, and/or adds a freehand item label. The symbol and label are freehand items that you can move, modify, or remove. To learn more about freehand items, see Working with Freehand Items.
 |
NOTE: You can change the defaults including the symbol to display, whether to display a label, whether to zoom to the location, and what type of location to find, by choosing Edit>Preferences and changing the settings on the Locating tab. You can change the default font to use for labels by choosing Edit>Preferences and changing the settings in the Freehand Font frame on the Freehand/Layout tab. The color of the font will always match the color of the symbol. |
Maptitude will find the location using one or more of the included geographic files. Maptitude may ask you where to find the geographic file so that it can perform the search. For more information on how Maptitude searches for geographic files, see Locating Geographic and Other Data Files.
 |
For a video tutorial see: (Internet connection required) • Moving Around a Maptitude Map: Using the Zoom In, Zoom Out, and Pan tools, finding particular locations on a map, and specifying a map scale |
In this topic:
- Finding a Street Address within a Region
- Finding Other Locations within a Region
- Finding a Particular Map Feature
- Finding Two or More Locations
- Using the Region Manager
Finding a Street Address within a Region
To find an address, you must enter the number, the street name, and either the postal code/ZIP Code or the city and state/province. For example, Maptitude can find any of these addresses within their respective regions:
| 1172 Beacon St 02461 |
1172 Beacon St Newton MA |
6 Macquarie St 2000 |
6 Macquarie St Sydney NSW |
If you are trying to locate an address that you know is visible in the map window, you can find that address simply by entering the number and street name and checking the Search Only the Current Map box.
Maptitude can often locate an address even if you provide information that is incomplete or incorrect. For example, you may be able to leave off the street type (St., Blvd., Rd. etc.) or have a minor misspelling.
You can also find street intersections such as Beacon St. & Walnut St. The valid intersection separators are:
| And | & | / | At | @ |
|---|
Occasionally, Maptitude will find more than one address that matches the information you entered. When this occurs, the choices are displayed in a dialog box. You can pick the one you want from the list, or indicate that none of the choices is correct.
 |
TIP: Use the Find command when you want to zoom in a map to a particular address. If you want to create a new layer showing many addresses from information in your data use Create-a-Map Wizard or the Locate commands described in Geocoding: Locating Your Data on a Map. |
- Choose Edit>Find, click
 on the Standard toolbar, or right-click on the map window and choose Find, to display the Find dialog box.
 - If you have more than one region of data installed on your computer, verify that you are using the correct region for the address you want to find. If necessary, click
 and choose a different region from the Region Manager. See Using the Region Manager for more information on choosing a region.
 - Choose Address in the scroll list.
- Type the number and street name, or a street intersection, in the Address text box.
- Enter additional information as follows:
| If you know... | Do this... |
|---|---|
| The ZIP Code/Postal Code | Type it in the ZIP Code/Postal Code text box |
| The city and state/province/district name | Type them (e.g., Newton MA, Vancouver BC, or Sydney NSW) in the respective text boxes |
| The address is somewhere on the screen | Check the Search only the current map box |
- Choose any display options as follows:
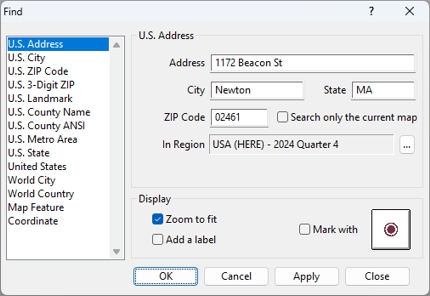
| To do this... | Do this... |
|---|---|
| Zoom the map to the location | Check the Zoom to fit box |
| Add a freehand text label with the address | Check the Add a label box |
| Show the location on the map | Check the Mark with box and optionally, click the symbol to change it |
- Click OK.
Maptitude zooms the map to the address and uses the display options to indicate the location. If the address cannot be found, Maptitude has several ways to help you find the location. See “Troubleshooting” later in this chapter for more information.
Try It Yourself: Finding an Address
1. Choose File>New Workspace or click  on the Standard toolbar, choose New map of {country name}, then use Create-a-Map Wizard to create a map of your country.
2. Choose Edit>Find or click on the Standard toolbar to display the Find dialog box.
3. Choose (Country Name) Address in the scroll list.
4. Type an address (e.g., “245 E 54th St” or “Via Milano 93”) in the Address text box and type a postal code (e.g., “10022” or “M6H”) in the Postal Code text box or other information such as city and state. Make sure the Zoom to fit box is checked.
5. Click OK. Maptitude finds the address and displays it on the map.
6. Choose File>Close Workspace and click Don't Save to close the workspace without saving any changes.
Finding Other Locations within a Region
Maptitude lets you find other types of locations such as city, state/province, postal code, etc. All you need to do is enter the name or number of the feature for which you are looking.
Maptitude does its best to find the location you want, even if the information you provide is incomplete. This means that you can enter partial names as well as full names for locations you want to find. For example, if you search for a state named “New,” Maptitude will find New Hampshire, New Jersey, New Mexico, and New York in the U.S. region state file. When Maptitude finds more than one possible match, it lists up to the first 100 choices in a dialog box. You can pick the one you want from the list, or click Cancel to return to the Find dialog box and further refine your search.
When you are searching for a city, you can make the search faster by including the state/province postal abbreviation. This also works for U.S. counties. For example, to find Monroe County, Alabama, type “Monroe, AL” as the county name. If you simply type “Monroe,” Maptitude will find all 17 Monroe counties in the U.S. and you will need to choose the one you want from a list.
- Choose Edit>Find, click on the Standard toolbar, or right click on the map window and choose Find, to display the Find dialog box.
- If you have more than one region of data installed on your computer, verify that you are using the correct region for the location you want to find. If necessary, click and choose a different region from the Region Manager. See Using the Region Manager for more information on choosing a region.
- Choose one of the region-specific location types (e.g., UK Town, Australia Suburb, Canada Province, U.S. Landmark) from the scroll list or choose World City, World Country, or Coordinate.
- Enter the full or partial name, abbreviation, postal code, etc. of the feature you want to find in the edit box and any other information that may be required. For example:
| To find... | Do this... |
|---|---|
| City/Town/Suburb | Type the name (e.g., Chicago, Paris, Perth) or the name and state/province/district name or abbreviation (e.g., Newton MA, Sydney NSW, Toronto ONT) in the edit box. |
| State/Province/District | Type the name or abbreviation in the edit box (e.g., California, NY, Distrito Federal, Victoria, ONT). |
| Postal Code | Type the ZIP Code, FSA, postal code, etc. in the edit box (e.g., 02461, K1N, 4000). |
| Landmark | Type some or all of the landmark name in the edit box. You can narrow your search to a specific state/province or to the visible portion of the map. |
| World City/Country | Type the name of the city or country. |
| Coordinate | Type a longitude and latitude either with a decimal point or with six implied decimal places (e.g., 43.25, 43250000). West longitude, such as in the United States, and south latitude, such as in Australia, are negative values. If the map is using a coordinate system you can also use an XY coordinate. |
- Choose any display options as follows:
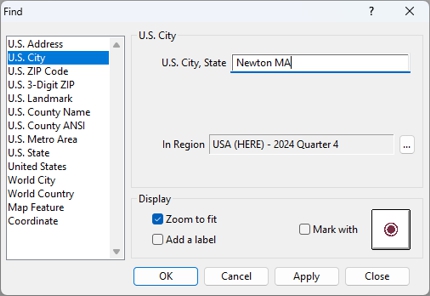
| To do this... | Do this... |
|---|---|
| Zoom the map to the location | Check the Zoom to fit box |
| Add a freehand text label with the city | Check the Add a label box |
| Show the location on the map | Check the Mark with box and optionally, click the symbol to change it |
- Click OK.
Maptitude zooms the map to the location you chose and uses the display options to indicate the location. If there are several possible locations that correspond to the information that you entered, Maptitude lists all of the matching records in the Choose a Matching Record dialog box. Choose a record from the list and click OK. Maptitude shows the location that you chose on the map.
Finding a Particular Map Feature
To find a particular feature in a map, you use the Edit>Find command and choose the layer to use, the field to use to identify the feature, and the name, ID, or other information about the features. For example, to locate a particular customer on a map, you could search the Customer Layer, using the Customer ID field, and entering the ID of the customer you want to see.
Maptitude does its best to find the location you want, even if the information you provide is incomplete. This means you can enter partial names as well as full names for locations you want to find. For example, if you search for a customer named “Smi,” Maptitude will find all the customers whose name begins with those three letters. Using an option, you can make sure that whole phrases or values match exactly.
- Choose Edit>Find or click on the Standard toolbar, or right-click on the map window and choose Find, to display the Find dialog box.
- Choose Map Feature in the scroll list and make choices as follows:
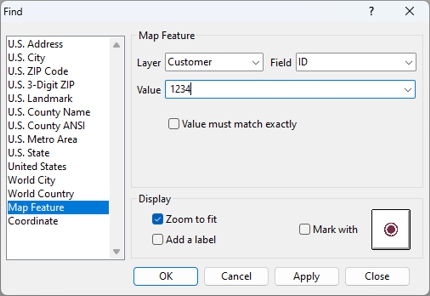
| To do this... | Do this... |
|---|---|
| Specify the feature to find | Choose the Layer that contains the feature and the Field to use to search for the feature from the drop-down lists. Type the name, ID, or other value to find in the Value box. |
| Find only exact matches | Check the Value must match exactly box |
| Zoom the map to the location | Check the Zoom to fit box |
| Add a freehand text label with the name of the feature | Check the Add a label box |
| Show the location on the map | Check the Mark with box and optionally, click the symbol to change it |
- Click OK.
Maptitude finds the feature and zooms the map to that location.
Try It Yourself: Finding a Map Feature
1. Choose File>Open Workspace or click  on the Standard toolbar, then open the NYCity workspace in the Tutorial folder.
2. Choose Edit>Find or click on the Standard toolbar to display the Find dialog box.
3. Choose Map Feature in the scroll list.
4. Choose School from the Layer drop-down list and Name from the Field drop-down list.
5. Type "Public School 84" in the Value text box.
6. Make sure the Zoom to fit box is the only checked option and click OK. Maptitude draws the map to show the school.
7. Right-click on the school layer in the Display Manager and choose New Dataview.
8. Move the dataview so that both the map and the dataview are visible.
9. Right-click on any school in the dataview and choose Zoom. Maptitude draws the map to show the school you chose.
10. Choose File>Close Workspace and click Don't Save to close the workspace without saving any changes.
Finding Two or More Locations
You can easily use the Edit>Find command to create a map that shows two or more locations at once. Simply use the Apply button (instead of the OK button) in the Find dialog box for each location you want to find. As you enter additional locations, Maptitude adjusts the scale and center of the map so that all of the locations are visible.
 To Find Two or More Locations
- Choose Edit>Find or click on the Standard toolbar, or right-click on the map window and choose Find. Maptitude displays the Find dialog box.
- Enter information about the first location you want to find and click Apply. Maptitude shows the location on the map.
- Enter information about the next location you want to find and click Apply. If necessary, Maptitude changes the map scale and center so that all the locations you have entered are shown.
- Return to Step 3 to enter additional locations.
- Click OK or Close to close the Find dialog box.
Using the Region Manager
When you install a region, it is automatically added to the Region Manager. If you have purchased and installed more than one region for your Maptitude license, then certain Maptitude tools, such as the Find dialog box, will need to know which region to use. For example, if you have the France and Italy regions and you want to find the Venice, Italy postal code 30121, you need to make sure to use the Italy region so as not to end up finding the 30121 postal code in Mus, France.
|
NOTE: You can choose the default region to use by choosing Edit>Preferences, clicking |
- Click in the Find dialog box to display the Region Manager dialog box and make choices as follows:
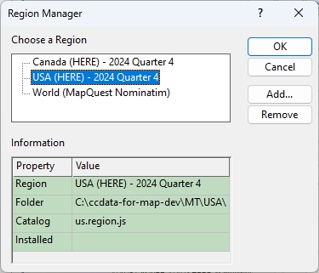
| To do this... | Do this... |
|---|---|
| Specify the region to use | Choose a region from the scroll list |
| Add a region to the Region Manager | Click Add, browse for the folder where the data is located, choose the region file, and click Open |
| Remove a region from the Region Manager | Highlight a region in the scroll list and click Remove |
- Click OK to make the highlighted region the active region to use.
©2026 Caliper Corporation