Maptitude Help / Creating Maps / Creating a Map
Creating a Map
There are several ways that you create a new map in your Maptitude workspace:
- Use Create-a-Map Wizard. Maptitude automatically chooses the appropriate geographic data files to display any location of your choice and gives you the option to attach your own data to the map.
- Use the Map Librarian to open an existing map for a location of your choice.
- Manually choose one or more geographic files. Maptitude opens a new map that displays only the files that you have chosen.
- Duplicating an open map.
- Combining existing maps.
Maptitude comes with dozens of different geographic files. Most are included in the maps you create with Create-a-Map Wizard and the Map Librarian. For more information on geographic files that come with Maptitude, see Maptitude Data Files. For more help on geographic files that come with your installed Country Package, choose Help>Regional Data Help>(Country Package Name).
Using Create-a-Map Wizard™
Create-a-Map Wizard provides a fast, easy way to create a new map. All you need to do is choose whether to create a map of some location or a map of your own data, answer a few simple questions, and Maptitude will create a map for you automatically.
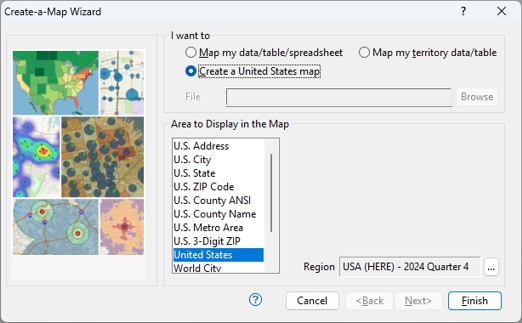
Create-a-Map Wizard lets you create maps in several different ways:
| Method... | How it works... |
|---|---|
| Map my data/table/spreadsheet | You choose an Excel, Access, or other tabular data file that contains your own data. Maptitude looks through the file and figures out how to use the data to make a map and presents you with options for how that data can be mapped. For more information see Mapping My Own Data. |
| Create a {country name} map | You tell Maptitude the location that you would like to see and Maptitude displays a map of that location with the appropriate layers using the geographic data included in your Country Package. For more information see To Use Create-a-Map Wizard to Create a Country Map. |
| Map my territory data/table | You build territories either interactively on a map, from a table, or from a point or area layer. For more information see Creating Territories. |
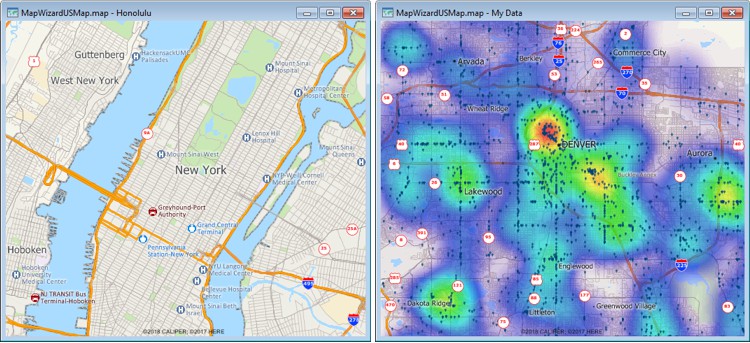
A map of New York created using the country map option (left) and a density analysis map of customer data created using the Map of My Own Data option (right)
 |
NOTE: Create-a-Map Wizard uses your region data to assemble maps. If you have more than one region installed, you can use the Region Manager to specify the region to use. See Using the Region Manager for more information. |
 |
For a video tutorial see: (Internet connection required) • Creating a General Purpose Overview Map with Maptitude |
 To Use Create-a-Map Wizard to Map Your Data
- There are several ways to map your data with Create-a-Map Wizard depending on whether or not you have a workspace open and whether or not you want to map your data to an open map or a new map. Make choices as follows:
| To create a map of your data in... | Do this... |
|---|---|
| A new workspace |
• Choose File>New Workspace or click |
| A new map in an open workspace | • Choose Map>New Map • Choose Map my data/table/spreadsheet and click Browse to choose the file that contains your data. • Choose the file that contains your data and click Open. If you chose an Excel file, choose the sheet that contains your data and clickOK. • Click Next. |
| An open map in a workspace | • Choose Map>Add Table/Spreadsheet to a Map. • Choose the file that contains your data and click Open. If you chose an Excel file, choose the sheet that contains your data and click OK. |
- Verify that Maptitude chose the correct address, city, state, province, postal code, country, and/or coordinate fields from those present in your file and click Next.
Create-a-Map Wizard takes over from there, walking you step by step through the process of creating a new map starting with choosing what kind of map you want to create. See Mapping My Own Data for more details on using Create-a-Map Wizard to map your own data.
To Use Create-a-Map Wizard to Create a Country Map
- There are several ways to create a country map with Create-a-Map Wizard depending on whether or not you have a workspace open. Make choices as follows:
| To create a country map in... | Do this... |
|---|---|
| A new workspace | • Choose File>New Workspace or click  on the Standard toolbar to display the Home dialog box on the Standard toolbar to display the Home dialog box• Choose New map of {country name} and click OK. (If you have more than one country package installed, you can click Choose Country to specify the country to use.) |
| An open workspace | • Choose Map>New Map. • Choose Create a {country name} map from the radio list. |
- Choose whether you want the map to display the entire country, a state, a city, a postal code, etc. from the scroll list and if necessary enter any other details.
- Click Finish.
Create-a-Map Wizard displays a map of the specified location with the appropriate layers using the geographic data included in your Country Package.
|
NOTE: If Maptitude cannot find one or more files that it needs, it displays the File Not Found dialog box. For more information, see File Not Found. |
Try It Yourself: Using Create-a-Map Wizard
1. Choose File>New Workspace or click on the Standard toolbar.
2. Choose New map of United States (or New map of {country name} if you are using a different Country Package) from the scroll list and click OK.
3. The types of areas you can display with your regional data are shown in the scroll list. Choose a type such as City, County, State, or Postal Code from the list.
4. In the edit box, type the name of a corresponding feature in your region (e.g., Victoria BC, New York NY, Cook IL, Queensland, M5T, 02461).
5. Click Finish. Maptitude creates a map of the location you specified.
6. Choose File>Close Workspace and click Don't Save to close the workspace without saving the changes.
To Use Create-a-Map Wizard to Create Territories
- There are several ways to create territories with Create-a-Map Wizard depending on whether or not you have a workspace open. Make choices as follows:
| To create territories in... | Do this... |
|---|---|
| A new workspace | • Choose File>New Workspace or click on the Standard toolbar to display the Home dialog box • Choose New territory map and click OK. |
| An open workspace | • Choose Map>New Map. • Choose Map my territory data/table from the radio list and click Next. |
- Maptitude displays the Territory Wizard.
See Creating Territories for information on the Territory Wizard.
Using the Map Librarian
For Country Packages that include demographic data, Maptitude includes several pre-made demographic maps that you can display at any scale and for any location. These maps are organized into categories and can be opened with bookmarks. A map category can be set with a range of scales (autoscale range) that is best for displaying the maps in the category. Bookmarks that will create maps within that range of scales have a } symbol next to them, other bookmarks have a | symbol. If a category does not have an autoscale range, all of the bookmarks will have a } symbol. For more information on bookmarks, see Saving and Using Bookmarks.
To Open Maps with the Map Librarian
- Choose Map>Demographic Map Librarian to display the Map Librarian dialog box, or choose File>New Workspace or click on the Standard toolbar to display the Home dialog box, choose New demographic map, and click OK.
- Choose a Map Category.
- Choose one or more maps that you want to open.
- Choose a bookmark or choose Other Location to specify the area to display.
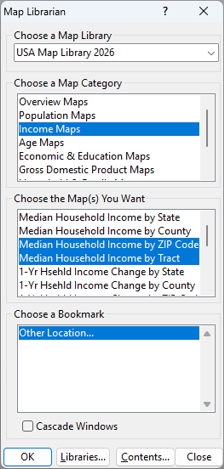
- Choose how to open the maps as follows:
| To do this... | Do this... |
|---|---|
| Open the map at the same height and width as the bookmark | Remove the check from the Cascade Windows box |
| Cascade all open maps | Check the Cascade Windows box |
- Click OK. If you chose Other Location specify a location and click OK.
Maptitude opens the maps you have chosen. The location of the maps is based on the bookmark.
Duplicating a Map
You can quickly make a duplicate of the current map with the Map>Duplicate command. All of the settings, except the map title, are identical to those in the original map. You can then make changes, such as having different themes or additional layers, and then save this new map.
To Duplicate a Map
- Choose the map you want to duplicate by clicking on the map window or choosing it from the Window menu.
- Choose Map>Duplicate.
Maptitude duplicates the map, and makes the new map the current map.
Combining Existing Maps
You can create a new map by mixing and matching the layers that appear in your other maps.
To Combine Existing Maps
- Open two or more maps. The extent of the new map will match the extent of the map that is the current map.
- Choose Map>Combine. Maptitude displays the Choose Layers to Combine dialog box.
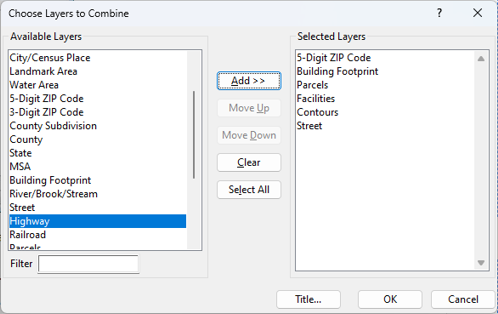
- Choose which of the available layers in the open maps to include in the new map as follows:
| To do this... | Do this... |
|---|---|
| Include all available layers in the new map | Click Select All. |
| Exclude particular layers from the new map | Highlight one or more layers in the Selected Layers scroll list and click <<Drop |
| Include particular layers from the open maps | Highlight one or more layers in the Available Layers scroll list and click Add>> |
| Change the order of layers in the new map | Highlight one or more layers in the Selected Layers scroll list and click Move Up or Move Down |
- If you want to specify a title for the new map, click Title, enter a title in the edit box, and click OK.
- Click OK.
Maptitude creates a new map with the layers you chose and with the extent of the map that was current.
Creating a Map by Opening Geographic Files
When you open one or more geographic files, Maptitude creates a new map and displays features from the files as layers in the map. You can choose whether to display the layers on a default map using additional layers from your Country Package or in a new map window containing just the geographic files that you choose to open.
 |
TIP: Maptitude supports many other geographic file formats other than the ones provided in your Country Package. See Using Other Geographic File Formats for more information. |
To Create a Map by Opening Geographic Files
- Choose File>Open or click
 on the Standard toolbar, or right-click anywhere inside the Maptitude frame except on a window and choose Open. Maptitude displays the File Open dialog box.
 - Choose Geographic File as the file type.
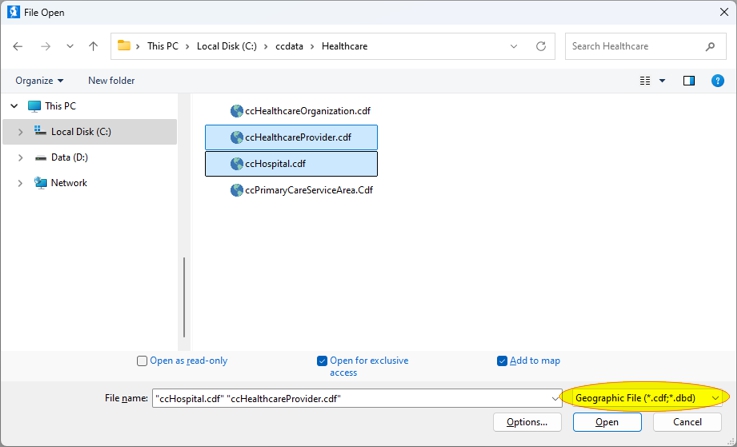
- Choose one or more geographic files.
- Check the Open as read-only box to protect the data from any changes.
- Check the Open for exclusive access box to prevent others from opening the file at the same time.
- Check the Add to Map box if you want to add the geographic files to the current working map, or if no maps are open, to open a default map for your Country Package with the geographic files you chose. Uncheck the box to open a map that contains only the geographic file(s) you chose.
- Click Open.
Maptitude creates a new map showing features from the file(s) you have chosen.
For more information on read-only and exclusive access, see Sharing Maptitude Data Files.
|
NOTE: By default the Add to Map option is chosen. You can change this default behavior by choosing Edit>Preferences and unchecking the Add them to a default/existing map box on the Map tab. |
Try It Yourself: Creating a New Map
1. Choose File>Open or click on the Standard toolbar.
2. Choose Geographic File as the file type.
3. From the Maptitude Tutorial folder, choose the file named CTCust.cdf which contains a point layer of customers in Connecticut.
4. Verify that the Add to map box is checked.
5. Click Open. Maptitude displays a map that includes the Connecticut customer layer.
6. Choose File>Close Workspace and click Don't Save to close the workspace without saving it.
Interrupting the Drawing of a Map
You can stop a layer or map from drawing before it is done using the buttons on the status bar.
To Stop a Map from Drawing
- Click
 on the Maptitude status bar or press the ESC key on your keyboard.
©2026 Caliper Corporation