Maptitude Help / Geographic Analysis Tools / Using the Buffers Toolbar
Using the Buffers Toolbar
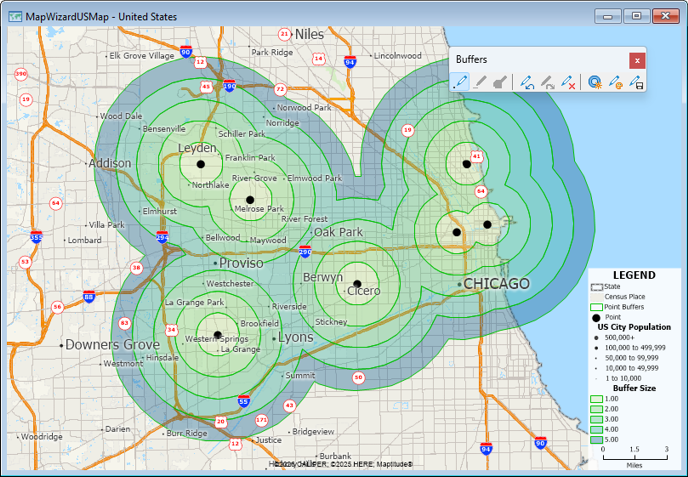
The Buffers toolbar makes it very easy to temporarily add points, lines, or areas to your map and then create buffers around them, for fast analysis of the characteristics around places of interest.
Once you start adding points, lines, or areas, the tools for the other types are disabled. After you remove all the temporary features or create buffers, you can switch to adding another type.
The temporary features are deleted when you close the Buffers toolbar, create buffers, or use the toolbar with a different map. Saving the temporary features to a geographic file saves them permanently, and adds the geographic file as a map layer so you can do further analysis. Once you save features to a layer you can use the Layer Editing toolbar to add, edit, or delete features in the layer that you created. See Editing Point Features, Editing Line Features, and Editing Area Features for more information.
 |
TIP: You can also use the Tools>Editing>New Layer command to manually create your own custom point, line, or area layers. You can then use the Buffers tool, as well as any of the other geographic analysis tools, with your new layer. See Creating New Geographic Files for more information. |
 To Use the Buffers Toolbar
- Open or create the map you want to use with the Buffers toolbar.
- Choose Tools>Analysis>Buffers Toolbar or click
 Buffers Toolbar in the analysis tools drop-down on the Standard toolbar to display the Buffers toolbar.
 - Make choices as follows:
| To do this... | Do this... |
|---|---|
| Add temporary points | Click  to activate the Add Temporary Points tool, and click on one or more places on the map. to activate the Add Temporary Points tool, and click on one or more places on the map. |
| Add temporary lines | Click  to activate the Add Temporary Lines tool, and add lines to the map by clicking at each point along a line, and double-clicking to end it. to activate the Add Temporary Lines tool, and add lines to the map by clicking at each point along a line, and double-clicking to end it. |
| Add temporary areas | Click  to activate the Add Temporary Areas tool, and add areas to the map by clicking at each corner of an area, and double-clicking to close it. The first and last points of an area will connect automatically. to activate the Add Temporary Areas tool, and add areas to the map by clicking at each corner of an area, and double-clicking to close it. The first and last points of an area will connect automatically. |
| Undo adding a temporary feature | Click  . The most recently added temporary feature is removed. . The most recently added temporary feature is removed. |
| Redo adding a temporary feature | Click  . The most recently removed temporary feature is added back. . The most recently removed temporary feature is added back. |
| Remove all temporary features | Click  . All temporary features are removed. . All temporary features are removed. |
| Undo removing all temporary features | Click right after clicking . All of the temporary features just removed are added back. |
| Change the temporary feature style | Click  to display the Point, Line, or Area Style dialog box, make the appropriate changes, and click OK. For more information, see Using Styles. to display the Point, Line, or Area Style dialog box, make the appropriate changes, and click OK. For more information, see Using Styles. |
| Save the temporary features | Click  to save the features as a layer in your map.* to save the features as a layer in your map.* |
| Create temporary feature buffers | Click  to display the Buffers dialog box, and follow the procedure To Create Buffers, starting with Step 3. Maptitude removes the temporary features and adds the buffers as a layer in the map. to display the Buffers dialog box, and follow the procedure To Create Buffers, starting with Step 3. Maptitude removes the temporary features and adds the buffers as a layer in the map. |
- If you have removed all the temporary features or created buffers around the temporary features, you can return to Step 3 and begin adding temporary points, lines or areas again.
- Click the Close button in the upper right corner of the toolbar when you are done.
Try It Yourself: Using the Buffers Toolbar
1. Choose File>New Workspace or click  on the Standard toolbar, choose New map of {country name}, then use Create-a-Map Wizard to create a map of the city where you live.
2. Choose Tools>Analysis>Buffers Toolbar or click Buffers Toolbar in the analysis tools drop-down on the Standard toolbar to display the Buffers toolbar.
3. Click on the Buffers toolbar.
4. Click on the map to add two or three locations around which you want to create buffers.
5. Click on the Buffers toolbar to display the Buffers dialog box.
6. Click Yes to add the points you clicked as a layer in the map.
7. Choose the Fixed Sizes radio button and type “1, 2” in the Sizes edit box, and make sure that the Units are Miles in the Units drop-down list.
8. Click OK. Maptitude creates the buffers and adds them to the map, showing what areas are within one and two miles of the points you clicked.
9. Choose File>Close Workspace and click Don't Save to close the workspace without saving any changes.
©2026 Caliper Corporation