Maptitude Help / Geocoding / Locating Records by Address
Locating Records by Address
The Locate by Address command can locate your data based on street address and postal/ZIP Code fields. A street address is a combination of a street number and a street name. Maptitude can find the right location for a street address even if the street name isn’t spelled correctly, the street type (St., Ave., etc.) is missing, or the street address has other information such as apartment numbers. Maptitude can also find the right location for intersections as long as the two street names are separated by And, &, At or @. Here are some examples of street addresses that Maptitude can locate:
| • 1172 Beacon Street | • 45 E. 3rd St., Apt #6 | • 40 Seventh St., SW |
|---|---|---|
| • 134-12 Archer Ave. | • Beacon St. at Walnut St. | • Hollywood & Vine |
By default, Maptitude locates addresses using the provided regional street file, which is a geographic file containing nearly all of the streets in a country. This file has a line feature for each segment of each street, with information on the street name and on the address ranges and postal codes that are along each segment.
 |
NOTE: You can specify a default region or street file to use by choosing Edit>Preferences and choosing a region or street/index file to use on the Locating tab. |
The first time you locate by address you should be able to locate most of your records using the normal settings. The procedure To Locate Records by Address in a New Point Geographic File below shows you how to use the normal settings. The Locate by Address command has other settings to help you deal with situations that you may encounter that are described in Using Other Settings for Locating Records by Address below.
There is also an option to use your own street file or a location index with your own custom street layers or other files. For more information, see Using a Different Street or Creating Location Indexes.
 |
For a video tutorial see: (Internet connection required) • Creating a Pin Map: Locating your data on a map using Locate by Address, Locate by ZIP Code, or manually by pointing |
 To Locate Records by Address in a New Point Geographic File
- Open a dataview of the records that you want to locate.
- Choose Tools>Locate>Locate by Address to display the Locate by Address dialog box.
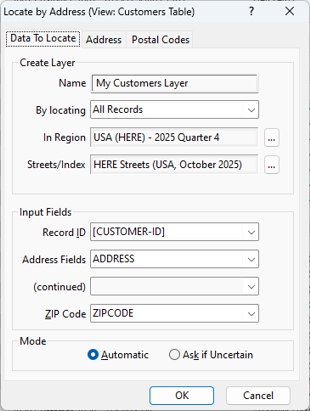
- Type a name for the new layer in the Name box.
- Choose whether to locate all records or a selection set from the Records drop-down list.
- If your data are in a different region than the one shown, click
 to choose another installed region.
 - Choose the field that contains unique IDs or choose to create new ID fields from the Record ID drop-down list.
- Choose the fields that contain address information from the Address Fields, (continued), and ZIP Code drop-down lists.
- Choose how to handle uncertain matches from the Mode radio list:
| To do this... | Do this... |
|---|---|
| Automatically handle uncertain matches | Click Automatic |
| Review uncertain matches | Click Ask If Uncertain |
For more information on uncertain matches, see Reviewing Uncertain Matches.
- Click OK. Maptitude locates the records and displays a message summarizing the results.
- Click OK.
Maptitude displays the locations in a new point layer and creates a new selection set called “Address Not Found” for any records that could not be located. See Deciding Which Other Settings to Use below for suggestions on what to do with the addresses that were not found.
|
NOTE: For a description of the other settings that you can use when locating records by address, see Using Other Settings for Locating Records by Address below. |
Try It Yourself: Locating Data That Have an Address
1. Choose File>Open or click  on the Standard toolbar, choose Excel Worksheet as the file type, and open the sample customer file for your region in the Tutorial folder.
2. Uncheck the Import box and click OK. Maptitude displays a dataview of the customer data from the Excel file.
3. Choose Tools>Locate>Locate By Address to display the Locate by Address dialog box.
4. Choose [Customer ID] from the Record ID drop-down list and verify that the address and postal fields are correct.
5. Click OK. Maptitude locates the records and displays the match statistics.
6. Click OK to continue.
7. Click  on the Standard toolbar, then click on any of the located customers to see their information.
8. Choose File>Close Workspace and click Don't Save to close the workspace without saving any changes.
Using Other Settings for Locating Records by Address
You might need to use the Locate by Address command several times with different settings, or some of the other Locate commands, to deal with records that were not found. Maptitude provides many ways to deal with records that could not be located with the normal settings. Below are some situations and how to solve them, using the other settings or the other Locate commands.
- To locate just some of the records: Create and use a selection set. See Filters, Queries, and Selection Sets. You can also use the Address Not Found selection set created the last time you located records by address. Choose the selection set from the By Locating drop-down list.
- To use streets in more than one region: Make selection sets of the records to locate based on which region they are in, then choose the appropriate region from the Region Manager before locating each selection set.
- To use your own Streets file: Open a map with your Streets file as a layer, and click
 next to Streets/Index to display the Choose Street Layer or Location Index dialog box. Choose the street layer or index, address format, and city format and click OK. See Using a Different Street Layer.
 - To use a Location index: Choose the Location index from the Using Layer or Index drop-down list. See Creating Location Indexes.
- The addresses are not in the normal region format: Maptitude can recognize several ways for showing street numbers and names, both in your data and in your Streets file. Click the Addresses tab and choose a format from the Streets & Numbers drop-down list. See Accepting Different Address Formats.
- There are more than three street address fields: Create a formula field to group the fields, with spaces in between, then use Locate by Address and choose the new formula field from the Number & Street drop-down list. For example, the formula STNUM+“ ”+STNAME would make sure there is a space between those street number and street name fields. See Creating a Formula Field.
- The postal code could be in one of several fields: This happens with the mailing label style of address fields. Create a formula field to group the fields, with spaces in between, then use Locate by Address and choose the new formula field from the Postal Code drop-down list. For example, the formula ADDR3 + “ ” + ADDR4 would make sure there is a space between a third and fourth address line fields. See Creating a Formula Field.
- A different ZIP Code/Postal Code might be needed: Click the Postal Codes tab and click the Use Postal Codes Near the One in the Postal Code Field radio button to try alternate postal codes. See Checking Nearby Postal Codes for Possible Matches.
- The postal code is missing: You can supply a list of postal codes to try, or indicate the city and state whose ZIP/Postal Codes are to be tried. Choose None from the Postal Code drop-down list, click the Postal Codes tab, click the Use Postal Codes in this List or Use Postal Codes For radio buttons, and fill in the necessary information. See Locating Records without Postal Codes.
- To change the rating for matching records: You can set the rating necessary to declare a match to be higher or lower than the normal setting. Click the Addresses tab and make a choice from the Matching method drop-down list. See Changing the Rating That Is Required for a Match.
- To choose when the match is uncertain: If there are several possible places to locate a record, you can review the list and make a choice. Click the Ask If Uncertain radio button. See Reviewing Uncertain Matches.
- To change the offset from the street: Maptitude has three ways to offset the location from a point along the street segment. Click the Addresses tab, click one of the Display Offset from Street radio buttons, and fill in the necessary information. See Changing How Locations Are Offset from the Street.
- Some of the locations are not quite right: Select the records that you would like to reposition, then use Locate Records by Pointing; see Locating Records by Pointing.
- Some addresses still were not found: Use one of the other Locate commands. If there is a Postal Code field, see Locating Records by Postal Code. If there are city and state fields, see Locating Records by City. If you can point to the right location, see Locating Records by Pointing.
- To report how each record was matched: Maptitude can save the standardized version of the addresses and the results of the match in a report file. Click the Addresses tab, check Save Standardization, and type a file name. See Creating a Report File.
To Locate More Records by Address Using Other Settings
- Choose the layer with the records that still need to be located, either from the drop-down list on the Standard toolbar or by making its dataview the current window.
- Choose Tools>Locate>Locate by Address to display the Locate by Address dialog box.
- Choose to locate All Records again, just the Address Not found selection set, or just your own selection set, from the By Locating drop-down list.
- If you have more than one region of data installed on your computer, verify that you are using the correct region for the address you want to find. If necessary, click and choose a different region from the Region Manager. See Using the Region Manager for more information.
- To use a different layer or index, click and make choices from the dialog box as follows:
- Choose whether to use the region street file, another layer in the map, or a location index from the Streets/Index drop-down list.
- Choose a format from the Address Format drop-down list and from the City & State Format drop-down list.
- Maptitude looks for the fields that contain address information. Verify that Maptitude has correctly identified the fields in the dataview that contain the following information:
| Field | Contains this information |
|---|---|
| Number & Street | The address or first portion of the address |
| (Continued) | The rest of the address (if any) |
| Postal Code | The postal code, the 5-digit ZIP Code, or the 9-digit ZIP+4 Code |
If you have created formula fields for the street address, the postal code, or both, make sure that these fields are chosen.
- Choose how to handle uncertain matches from the Mode radio list:
| To do this... | Do this... |
|---|---|
| Automatically handle uncertain matches | Click Automatic |
| Review uncertain matches | Click Ask If Uncertain |
For more information on uncertain matches, see Reviewing Uncertain Matches.
- Click the Address tab and choose a format from the Address Format drop-down list and the rating that is required for a match from the Matching Method drop-down list.
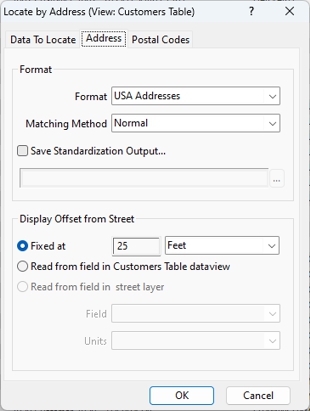
- Choose how far to offset the points from the street as follows:
| To do this... | Do this... |
|---|---|
| Offset a fixed distance | Choose Fixed at from the radio list and specify the distance and units |
| Offset based on a field in your data | Choose the second option in the radio list and choose the field that contains the offset value from the Field drop-down list and the units from the Units drop-down list |
| Use a field in your street layer | Choose the third option in the radio list and choose the field that contains the offset value from the Field drop-down list and the units from the Units drop-down list |
|
NOTE: For more about address formats, see Accepting Different Address Formats. |
- Click the Postal Codes tab. The options displayed will depend on choices you made on the other tabs.
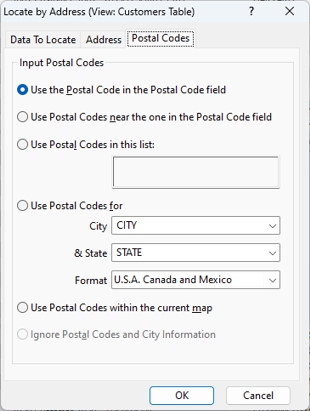
| To do this... | Do this... |
|---|---|
| Use the postal code in the chosen field | Click the Use the Postal Codes in the Postal Code field radio button. |
| Check the nearby postal codes | Click the Use Postal Codes Near the One in the Postal Code field radio button. |
| Use postal codes typed into a list | Click the Use Postal Codes in this list radio button and type the postal codes to search in the text box (e.g., 11001, 11431-11436, 12041). |
| Use city and state names | Click the Use Postal Codes for radio button and choose the field or fields containing the city and state names from the City and State editable drop-down lists, or type the city and state names in the City and State editable drop-down lists. If you are using a location index, choose a format from the Format drop-down list, otherwise use the default format for your region. |
| Use postal codes on the current map | Click the Use Postal Codes within the current map radio button. |
|
NOTE: For more about the postal code options, see Checking Nearby Postal Codes for Possible Matches or Locating Records without Postal Codes. |
If you are using a Location index, you can ignore postal codes in a Location index by clicking the Ignore Postal Codes and City Information radio button.
- Click OK. Maptitude starts locating records by address. If you clicked Ask If Uncertain, Maptitude displays the Choose a Matching Record dialog box when it encounters a record with several possible matches. Choose one of the following options:
| To do this... | Do this... |
|---|---|
| Accept one of the possible matches | Highlight the match in the list and click OK |
| Reject all of the possible matches | Click None |
| Stop locating by address | Click Cancel |
During the process of locating records by address, Maptitude does the following:
- Makes one pass through the records to do a careful cleanup, making sure that the addresses are formatted correctly and that common abbreviations are used, then sorts the records by postal code or by city and state.
- Makes a second pass through the records to locate based on street number and street name.
- Makes a third pass to locate any records with street intersections.
- Adds or updates the point for each record in the geographic file. The points are offset from the even or odd side of the street, as appropriate, or placed at the intersection.
- Draws the map at a scale that shows the locations of all the points.
- Displays a message telling you the number of records that were processed and the number that were successfully located.
- Updates the Address Not Found selection set.
- Optionally, creates a detailed report on what happened with each record, and displays the report file.
|
NOTE: You can set the default method for matching by choosing Edit>Preferences and choosing a method from the Method drop-down list on the Locating tab. You can also set the default offset distance and units on the Locating tab. |
Deciding Which Other Settings to Use
Because Maptitude has a number of settings for locating addresses, it is sometimes difficult to figure out which settings to use, and in what order. Here is one way to proceed:
- Locate by address with all the normal settings. Maptitude will match as many records as it can without asking for assistance.
- Locate the Address Not Found selection set by address using nearby postal codes. To choose this option, click Postal Codes and click Located Near the Ones Indicated by the Postal Code Field.
- Locate by address again with the Address Not Found selection set to review uncertain matches while using the less strict matching method. To choose these options, click Ask If Uncertain, then click Street Options, choose the Not Strict from the Matching Method drop-down list, check Save Standardization, and type a file name for the report file. Maptitude will show you the records it is unsure about. Accept any matches that look reasonable to you.
- Review the report file and see why the unmatched records aren’t matching. Look carefully to see if the addresses and postal codes of unmatched records are complete and make sense. If not, edit them in the dataview and start over again with Step 1, using the normal settings with the Address Not Found selection set. Otherwise, continue with Step 5.
- If the records are in your region, use Locate by ZIP/Postal Code or Locate by City/Town/Suburb for the remaining records in the Address Not Found selection set.
- If the records are outside of your region, use Locate by World City.
- If there are any further unfound records in a selection set but you know their location, use Locate by Pointing to manually place them on the map.
After you have tried these steps, stop where you are. You have probably located about as many records as you can.
©2026 Caliper Corporation