Last Updated: March 5, 2025
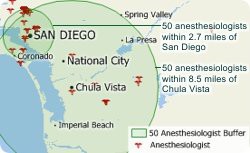
Maptitude allows you to see how large the area is that you will need to visit in relation to the number of healthcare providers that you want to target. Maptitude can create rings so that they contain a particular value such as number of doctor offices. For a video tutorial see: Maptitude video tutorial on buffers.
The following steps outline how to build a buffer that encompasses a particular type of healthcare provider:
Each record in the healthcare layers has up to 15 taxonomy codes for services provided. Therefore, to filter the records, you will need to create a filter that checks each of the taxonomy fields for the value of interest to you.
- Choose Map>Layers and click Add Layer to add the healthcare layer you want to analyze.
- Make the healthcare layer the working layer.
- Choose Tools>Analysis>Buffers Toolbar to display the Buffers toolbar.
- Use the Add Temporary Points tool to add one or more points about which you want to study and then click Create Buffers in the toolbox.
- Choose to create buffers around All Features from the Buffers Around drop-down list.
- Type a name for the new map layer in the Create Layer edit box.
- Check Build to Value, choose the source layer (e.g., Healthcare Provider) from the Layer drop-down list, and choose “Formula…” from the bottom of the Field drop-down list.
- Use the Formula Builder to create an expression for each of the taxonomy fields for the code that interests you. For example, to use anesthesiologists (207L00000X) from the physician layer, create the following formula:
if ( [Taxonomy 1] = "207L00000X" or [Taxonomy 2] = "207L00000X" or [Taxonomy 3] = "207L00000X" or [Taxonomy 4] = "207L00000X" or [Taxonomy 5] = "207L00000X" or [Taxonomy 6] = "207L00000X" or [Taxonomy 7] = "207L00000X" or [Taxonomy 8] = "207L00000X" or [Taxonomy 9] = "207L00000X" or [Taxonomy 10] = "207L00000X" or [Taxonomy 11] = "207L00000X" or [Taxonomy 12] = "207L00000X" or [Taxonomy 13] = "207L00000X" or [Taxonomy 14] = "207L00000X" or [Taxonomy 15] = "207L00000X") then 1 else 0 - Enter the target values you want, separated by spaces or commas (e.g., 10, 50), in the Values edit box.
- Check Separate Buffers to have each feature have its own separate buffers.
- Click OK. Maptitude displays the Save As dialog box. Type a file name for the new geographic file, and click Save.
- Maptitude creates a new layer containing the buffers and adds the new layer to the map.