Last Updated: April 19, 2024
You can determine and map a franchise territory using franchise mapping software.
Mapping a franchise territory with Maptitude involves a few key steps. First, you’ll need to assemble relevant data such as demographic information, population density, and local business trends. Once you have your data, how do you determine a franchise territory? You can use the Maptitude mapping tools to visualize and analyze the information you’ve gathered. Maptitude allows you to overlay different layers of information on a map, helping you identify suitable territories based on your criteria.
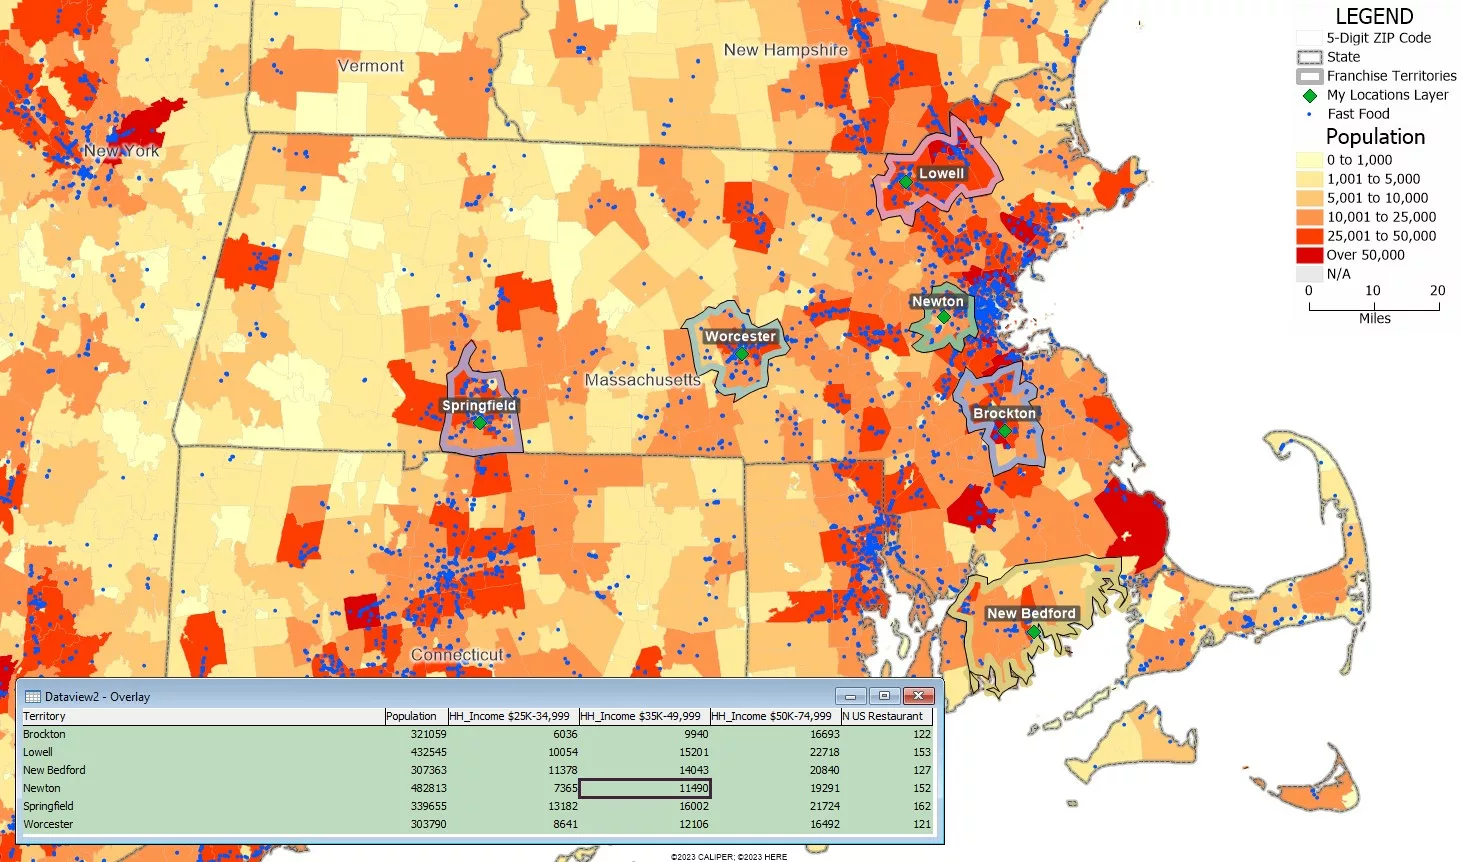
As an example, we can consider creating territories for a fast-food restaurant franchise operating in the state of Massachusetts. We are interested in the following metrics:
- The total population in each territory.
- The number of households with an annual income between $25,000 and $75,000 in each territory.
- The number of competitors in each territory.
You can try out this analysis yourself by requesting a free trial of Maptitude mapping software or using your own license.
Table of Contents
Step 1: Use the Map Librarian and thematic mapping to visualize demographic data
Step 2: Show additional demographics with hover fields
Step 4: Map your own data with the Create-a-Map Wizard
Step 6: Calculate additional data for your territories
Collect Data That Is Relevant to Your Franchise Territories
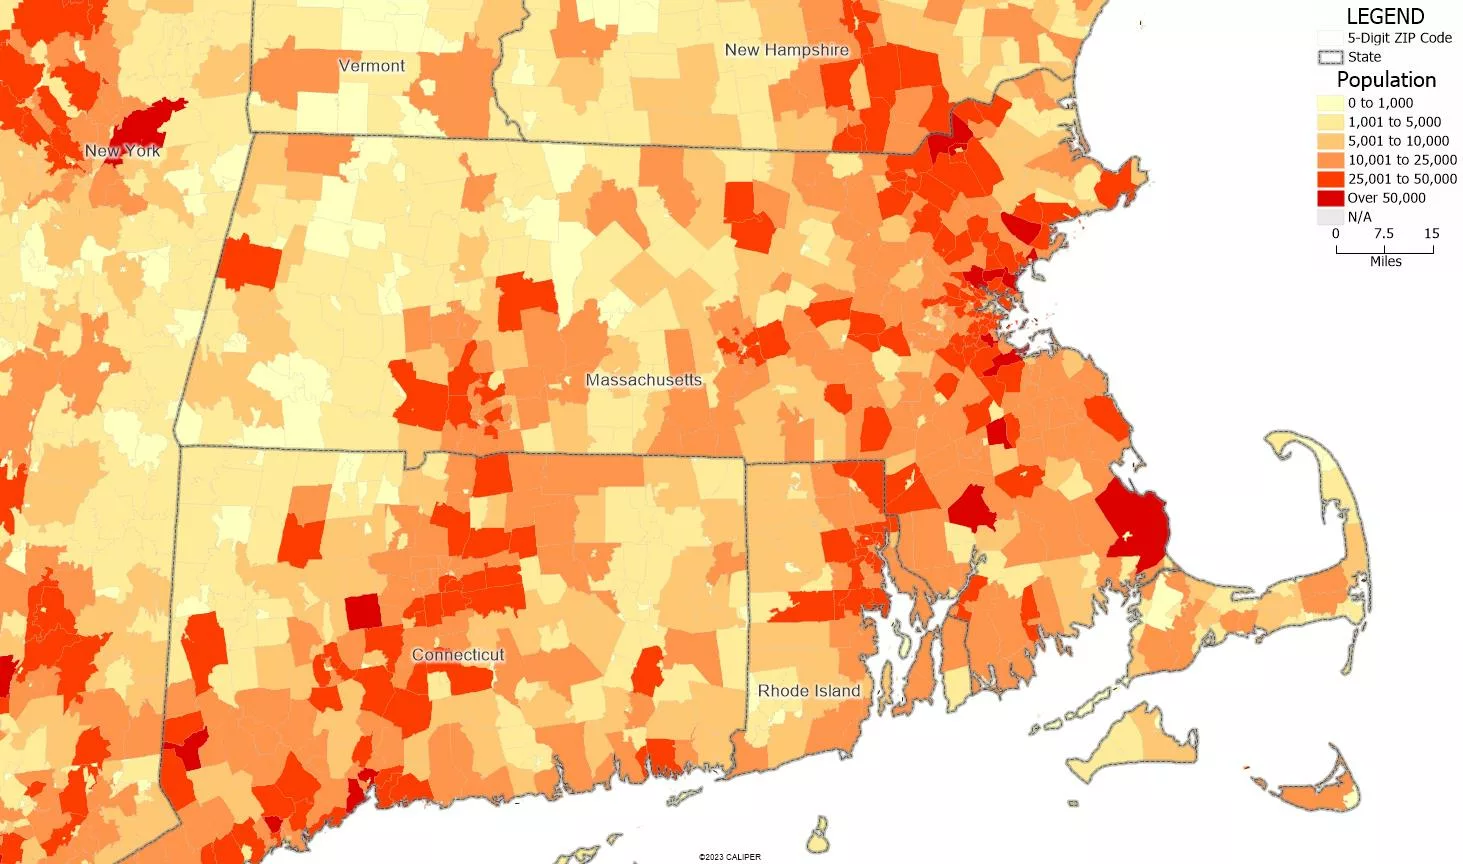
Step 1: Use the Map Librarian and thematic mapping to visualize demographic data.
You can use the Map Librarian to show different demographic fields in your area of interest.
In our case, we can visualize Total Population at the ZIP code level in Massachusetts.
- From the Maptitude Home screen, choose New demographic map and click OK.
- Choose USA Map Library 202X from the Choose a Map Library drop down.
- Choose Population Maps to display information for population.
- Choose the Population by ZIP code to see population at the ZIP code level.
- Click OK.
- Choose to zoom to a U.S. State, type in MA, and click OK to display a map of Massachusetts.
For more information on thematic mapping, please see the tutorial video on thematic mapping in Maptitude.
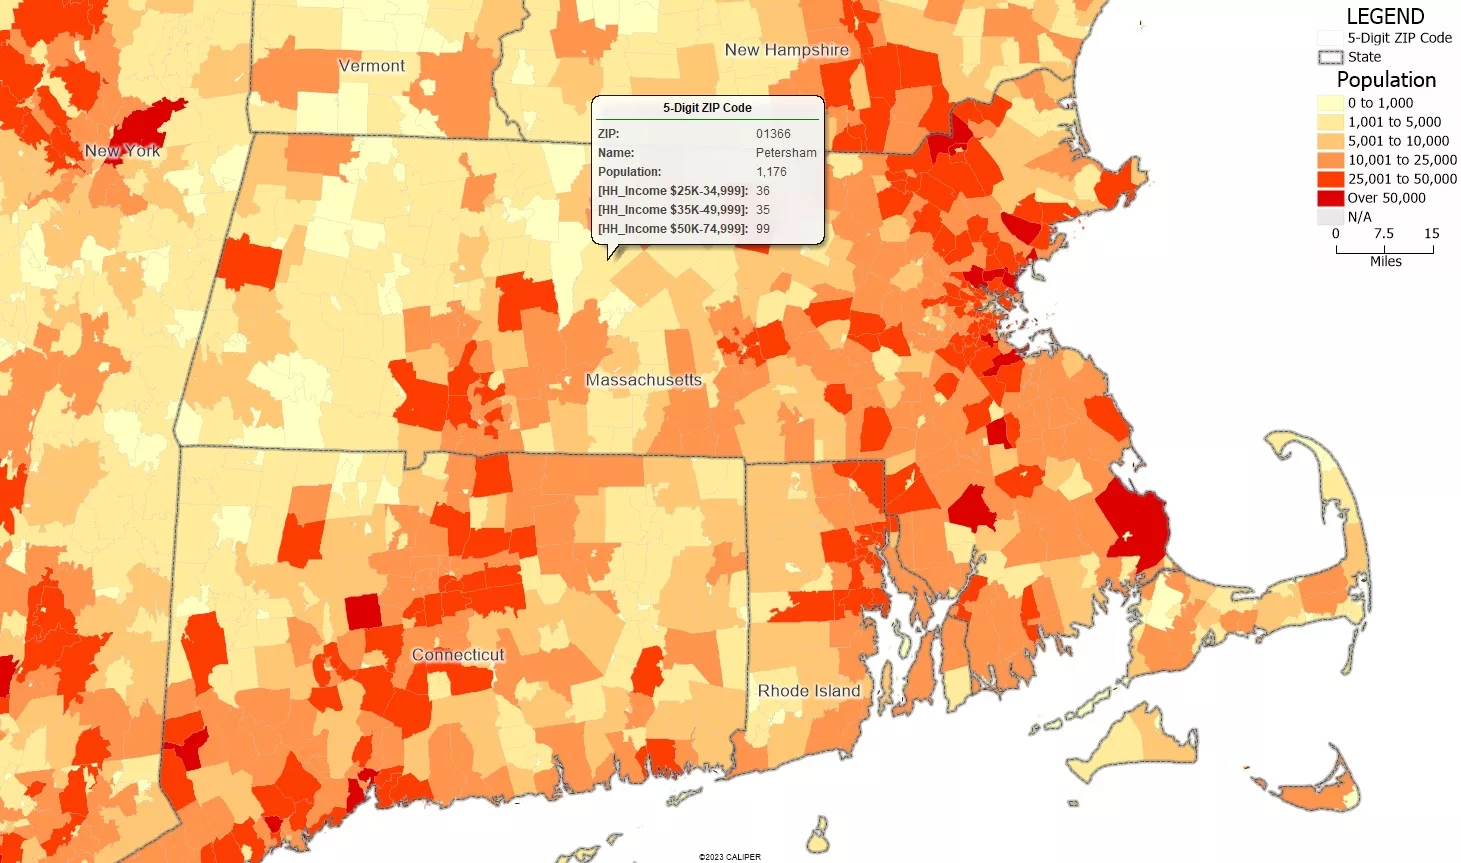
Step 2: Show additional demographics with hover fields.
- In the Display Manager, right click 5-Digit ZIP Code and choose Choose Hover Fields…
- Using the list on the left and the Add > > button, add the [HH_Income $25k-$34,999], [HH_Income $35k-$49,999], [HH_Income $50k-$74,999] fields.
- Click OK. Hovering over a ZIP code will display the relevant demographic information for our analysis.
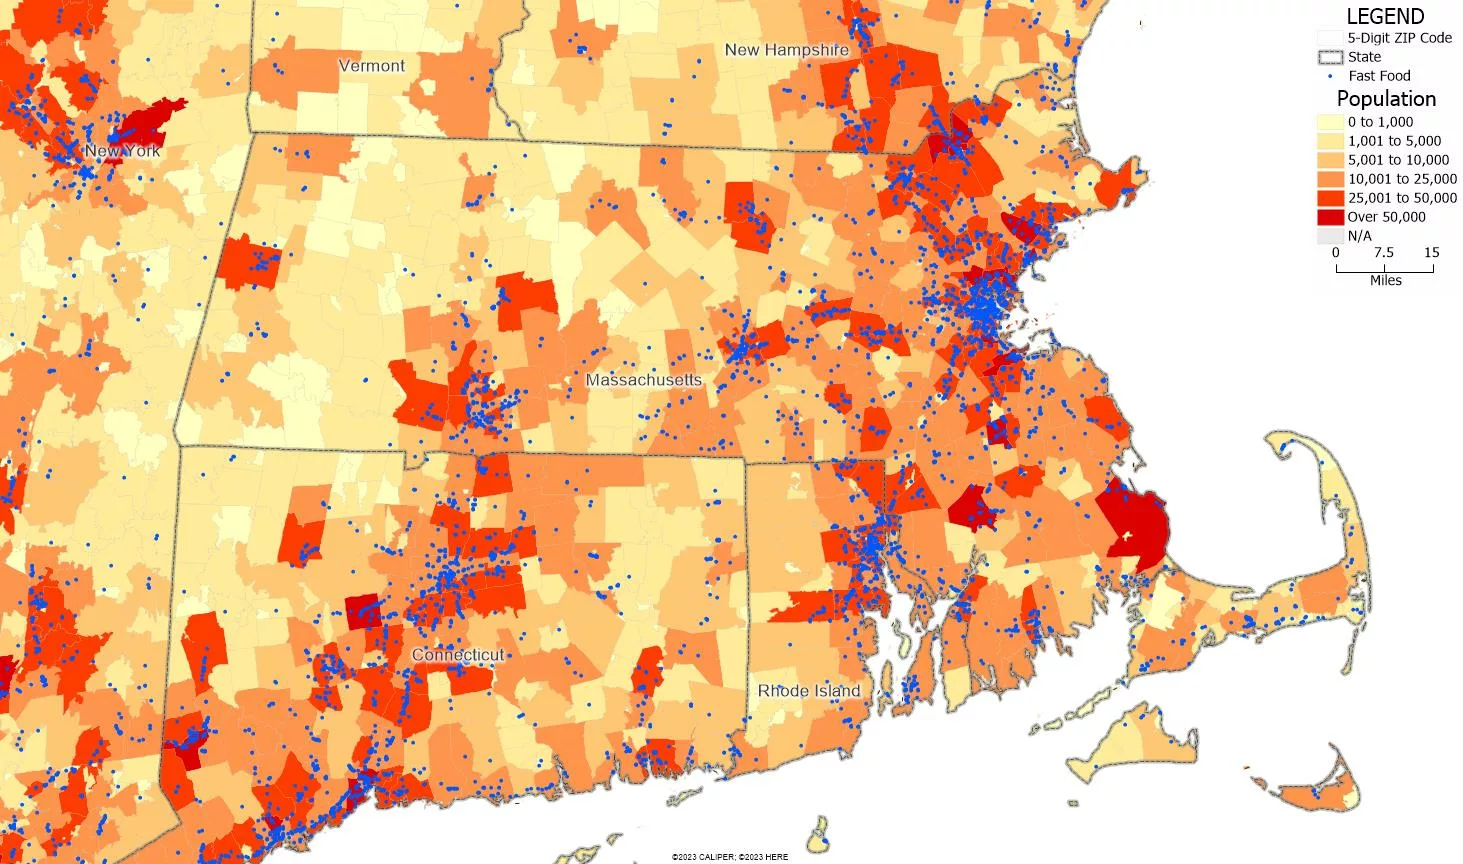
Step 3: Add competitor and existing locations to a map from the Maptitude business and landmark layers.
With the free data layers included with Maptitude, you can visualize and analyze the locations of competitors and other businesses in your industry to create the best territories for your franchise.
- Download and install the Business Location Layers or the Point of Interest Layers.
- Go to Map>Layers>Add Layer.
- Browse to C:\ccdata\ or wherever you installed the downloaded layers.
- Choose to add the category or brand that you are interested in. In our case, we can choose to add ccRestaurant layer from the Point of Interest layers.
- Click Close, restaurant locations will be added to the map.
- We can filter the restaurants to only show fast food restaurants using Selection>Select by Condition.
- Then, type in the condition: Category = “Fast Food”
- Under the Set Name drop down, type in: Fast Food Restaurants
- Click OK.
- In the Display Manager, expand the US Restaurant layer until you see the set called Fast Food Restaurants.
- Right click the Fast Food Restaurants set and choose Show this set only.
- The map will only show you the locations of fast food restaurants.
For more information on selection sets, please see the tutorial video on creating selection sets in Maptitude.
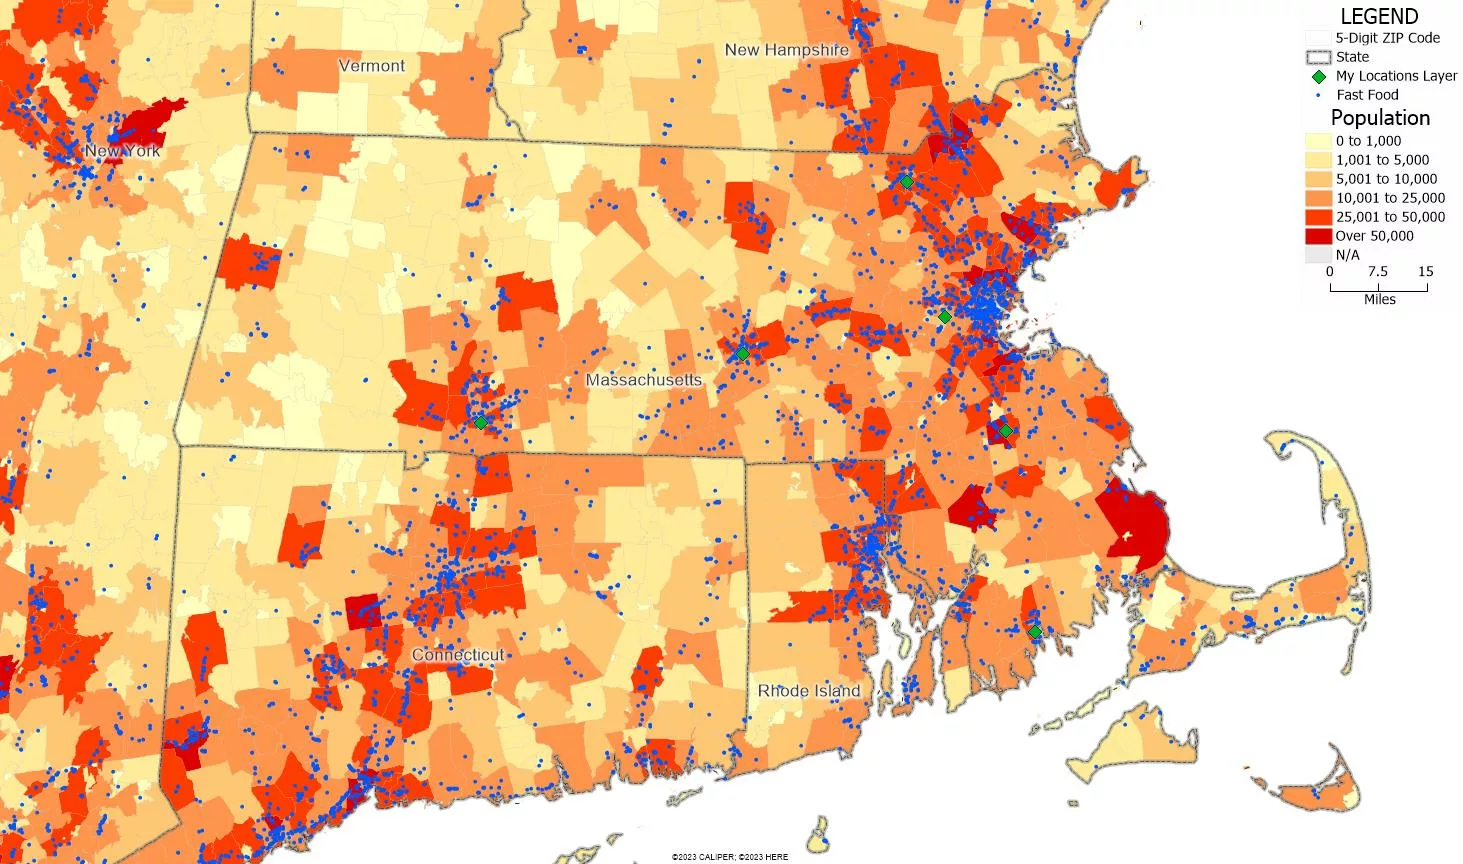
Step 4: Map your own data with the Create-a-Map Wizard.
You can use the Create-a-Map Wizard to add your own data to the maps and inform your franchise territory creation.
These can vary from plotting your existing franchise locations on the map to attaching sales data to ZIP codes.
For more information on the Create-a-Map Wizard, please see the tutorial video on mapping your own data in Maptitude.
Decide How You Want to Determine the Franchise Territories
Maptitude provides various options for defining franchise territories, such as mileage radius rings, drive-time or drive-distance areas, and ZIP codes. You can customize your approach based on the specific needs of your franchise model.
To create radius rings, please see the tutorial video on creating buffers in Maptitude.
To create drive-time or drive-distance areas, please see the tutorial video on creating drive-time rings in Maptitude.
To determine franchise territories efficiently, you can leverage existing administrative boundaries like ZIP codes, townships, or states. Maptitude allows you to incorporate these boundaries seamlessly into your mapping strategy, making the process faster, simpler, and cost-effective.
In our example, we can choose to create territories for our franchise using ZIP code boundaries.
Step 5: Create territories.
The territory tools in Maptitude makes it easy to create your own territories from scratch or from existing data.
- Go to Map>New Territory Layer.
- Choose Interactively from areas in a map and click Next.
- Make sure that the Geography Layer is set to 5-Digit ZIP Code and click Next.
- We can specify additional Tracking Fields that will be calculated as we create our territories.
Please note: not all data can be added as Tracking Fields. - Click the Plus button and choose Add Geography Layer Fields. Choose to add the Population field and the HH_Income brackets starting from $25k ending at $75k.
- Click Finish to open the Territory Manager.
- You can use the Territory Manager to assign ZIP Codes to your franchise territories.
For more information on creating territories, please see the tutorial video on creating territories in Maptitude.
For more information on managing territories, please see the tutorial video on working with territories in Maptitude.
Step 6: Calculate additional data for your territories.
If there are other data sources that cannot be added as Tracking Fields, you can choose to calculate them separately.
You can add information such as the number of businesses in each territory or the median household income for each territory.
- Make the Territories layer the working layer.
- Go to Tools>Analysis>Overlay.
- Here, select the US Restaurants in the Layer drop down and choose to Include the Fast Food Restaurants set.
- Make sure that Count the Number of Features is checked and click OK.
- Maptitude will calculate the number of other fast food restaurants in each of our territories.
For more information on configuring demographic reports, please see the tutorial article on using your own data in demographic reports in Maptitude.
By integrating the Maptitude mapping tools with these tips, you can streamline the process of mapping and determining franchise territories, ultimately helping you make informed decisions about selecting the best locations for your franchise.