Last Updated: March 5, 2025
Several of the layers that are in the default map for your region or that you can download as free add-ons may have a special type of styling called Feature Display. If you try to edit the style of one of these layers you may get the following warning message: 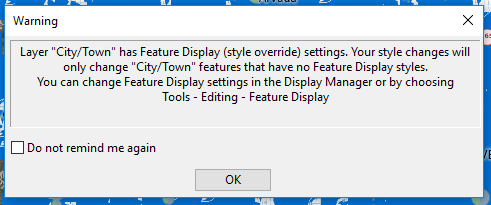 Feature Display is a way of allowing different features in a given layer to have different styles, similar to a theme, but it has the added benefit of allowing different classes of features to display at different zoom levels. The motivation behind Feature Display settings is most easily seen with the Street layer. When you are zoomed out to a national scale, you don’t want every individual back alley to be showing, as this would be far too much information to show at once. In this case, you only want the major roads to show. As you zoom in however you may want to display smaller roads. In addition to just turning different types of roads on and off, we also want to display them differently. Instead of including 10+ different layers for each type of road, we condense it into just the Street Layer (and Highway/Freeway layer for some countries) and apply a Feature Display. It is somewhat rare that you will want to apply a Feature Display to your own layer. For more information on how this works, see Using Feature Display Settings in the Maptitude Help. This article will go over some common ways you may want to interact with the Feature Display settings already applied to a layer. To Open the Feature Display Settings Dialog Box
- Right-click on the layer you wish to edit (e.g. Highway/Freeway) and choose Feature Display…
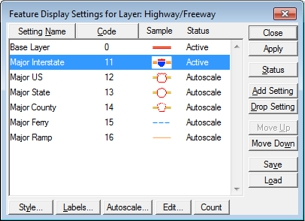 The first row will be for the Base Layer and each row after that will show you the different available Feature Display classes. Each class can have one of three statuses:
- Active – features in this class will be showing with its unique style at all scales
- Autoscale – features in this class will be showing at some scales, and not at others
- Inactive – features in this class will have the same display settings as the Base Layer
Note that if a class is inactive, this does not mean that you won’t see the features of this class. It just means that the features don’t receive the unique style from the Feature Display settings for this class and they will just look like the Base Layer Below are some common things you might want to do with the Feature Display Classes: Change the Autoscale range for a class
- Open the Feature Display Dialog Box for the layer
- Highlight the Feature Class you want to edit the Autoscale Settings for
- Click Autoscale
- Enter a Largest and/or Smallest scale that you want the class to be visible at. The Map Scale is shown for reference
- Click OK.
- The status of the class should be Autoscale.
Remove Autoscale from a class so that it is always showing
- Open the Feature Display Dialog Box for the layer
- Highlight the Feature Class you want to remove the Autoscale Settings from
- Click Autoscale
- Click Clear
- Click OK
- The status of the class should be Active
- Click Apply to see the change in the map
Turn off specific classes and only show others (very common with the Landmark layer)
- Open the Feature Display Dialog Box for the layer
- Highlight the Feature Class or Classes you want to hide
- Click Status until they say Inactive. An Inactive class has the same display settings as the Base Layer, so now we just need to make the Base Layer invisible so only the Active layers are showing.
- Highlight the Base Layer
- Click Style…
- If the layer is a point layer (e.g. Landmark), set the icon to the first option, which is invisible
- If the layer is a line layer (e.g. Street), set the Style to None
- If the layer is an area layer (e.g. Landmark Area), set both the Border and Fill Style to None
- Click OK
- Now the classes you set to inactive will have the same style as the Base Layer, which is invisible. Click Apply to see the change in the map.
Change the Style or Labels for a Class
- Open the Feature Display Dialog Box for the layer
- Highlight the Feature Class or Classes you want to edit
- Click Style… to change how the class looks (See Working with Map Styles for more details). Click OK when you are done.
- Click Labels… to change the label settings for the class (see Working with Labels for more details). Click OK when you are done.
- Click Apply to see the change in the map.