The Highway Exit and Interchange layer is great to use as a visual tool to show on a map, but this layer can also be used with the selection and tagging tools in Maptitude to determine those that are close by to your locations. The first step to tagging is to create columns to populate. These can be added as blank columns in your spreadsheet before you import or added to the data in the map. These instructions assume that you have a map open and the Highway Exit and Interchange layer loaded. **The images below refer to the “US Highway Exit” layer name. If you are using the Canadian layers, then use the “CA Highway Exit” layer.** Step 1: Create the fields on the layer to fill in with the data
- Right click on the layer name that represents your locations and choose New Dataview.
- Choose Dataview>Table>Modify.
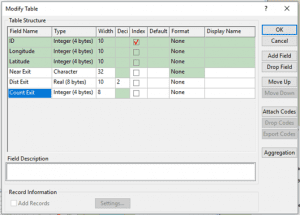
- Click Add Field three times to add three new fields/columns to your data.
- Click “Field_1” that you added in the Field Name column and rename the field “Near Exit”. Rename the other field that you created “Dist Exit” (this will be the straight-line distance to the nearest Exit). Rename the third field to “Count Exit” (this will be the count of Exits within a specified radius). Your field names can be different if you like, but these will be used for describing the steps in this exercise.
- Choose “Character” from the drop-down list in the Type column for the “Near Exit” field, choose Real (8 bytes) for the “Dist Exit” field, and choose Integer (4 bytes) for the “Count Exit” field.
- Click OK and Yes to confirm. The fields have now been added to your Dataview. Scroll the Dataview to the far right so that you can see the headings for the new fields.
Step 2: Tag with the nearest exit
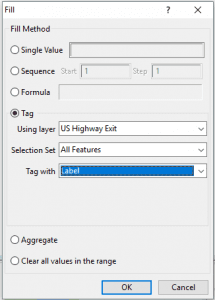
- Right-click on the “Near Exit” field heading and choose Fill to display the Fill dialog box.
- Choose the Tag option from the radio list.
- Choose Highway Exit from the Using Layer drop-down list, All Features from the Selection Set drop-down list, and Label from the Tag With drop-down list.
- Click OK. Maptitude fills the field with the Exit number and the Destination for the nearest Exit.
 Step 3: Tag with Distance to the Nearest Exit
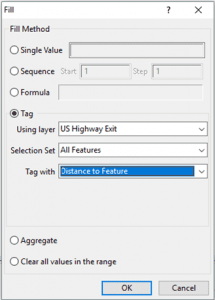
- Right-click on the “Dist to Exit” field heading and choose Fill to display the Fill dialog box.
- Choose the Tag option from the radio list.
- Choose Highway Exit from the Using Layer drop-down list, All Features from the Selection Set drop-down list, and Distance to Feature from the Tag With drop-down list.
- Click OK. Maptitude fills the field with the distance to the nearest Exit. This value will be reported in the default units for Maptitude (found on the System tab when you choose Edit>Preferences).
Step 4: Tag with the number of exits within x miles
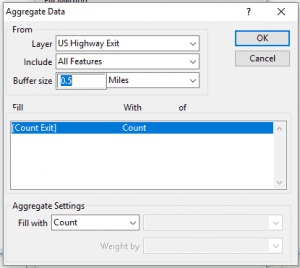
- Right-click on the “Count Exit” field heading and choose Fill to display the Fill dialog box.
- Choose the Aggregate option from the radio list to display the Aggregate Data dialog box.
- Choose Highway Exit from the Layer drop-down list and All Features from the Include drop-down list.
- Enter a buffer size (this can be any distance and units you want).
- Choose Count from the Fill With drop-down list.
- Click OK and click OK again. Maptitude fills the field with a count of exits within the buffer radius that you chose.