Last Updated: February 25, 2026
You can compute and export drive time values for mapped points using driving analysis and mapping software. Drive-time tools, such as Drive-Time Rings, create results in a separate layer. By tagging your point layer with the ring “From” and “To” values, you can ensure that the exported Excel file contains drive-time information for each point, making it easy to filter and analyze results by drive-time interval.
Table of Contents
- Quick Method: Export Data Inside the Drive-Time Rings
- Manual Method: Tag Points with Drive-Time Values
- Why Include Drive Times in Excel Exports?
Quick Method: Export Data Inside the Drive-Time Rings
If you only need a list of records that fall within the overall drive-time extent (for example, everything within 0–45 minutes), you can export directly from the Drive-Time Rings layer:
- Download and install a free trial of Maptitude mapping software, or use your existing license of desktop Maptitude.
- Map your points onto Maptitude.
- Create your drive-time rings using Tools > Routing & Directions > Drive-Time Rings.
- Make the Drive-Time Rings layer the working layer.
- Click Export to Excel.
Note: This quick method exports the data that falls within the drive-time area, but it does not automatically identify which individual ring (0–15 vs. 16–30, etc.) each point belongs to. If you need ring-by-ring drive-time values for each point, use the manual method below.
Manual Method: Tag Points with Drive-Time Values
Follow these steps to append drive-time fields from the Drive-Time Rings layer into your point layer, so they will be included when you export to Excel. This method is best when you need to clearly identify which ring each point falls into.
Step 1: Download and Install Software
- Download and install a free trial of Maptitude mapping software, or use your existing license of desktop Maptitude.
Step 2: Create Drive-Time Rings
- Open your map and confirm your origin point(s) are displayed.
- Choose Tools > Routing & Directions > Drive-Time Rings.
- Set your ring intervals (for example: 0–15, 16–30, 31–45 minutes) and create the rings.
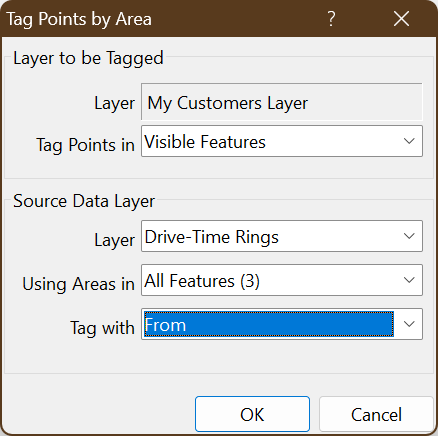
Step 3: Tag Points with the Drive-Time “From” Value
- Make the point layer you want to export (customers, ZIP Codes, facilities, etc.) the working layer.
- Choose Tools > Analysis > Tag Points by Area.
- Set the Drive-Time Rings layer as the area (source) layer.
- For Tag with, select the From field.
- Click OK.
Step 4: Tag Points with the Drive-Time “To” Value
- Repeat Tools > Analysis > Tag Points by Area.
- Set the Drive-Time Rings layer as the area (source) layer again.
- For Tag with, select the To field.
- Click OK.
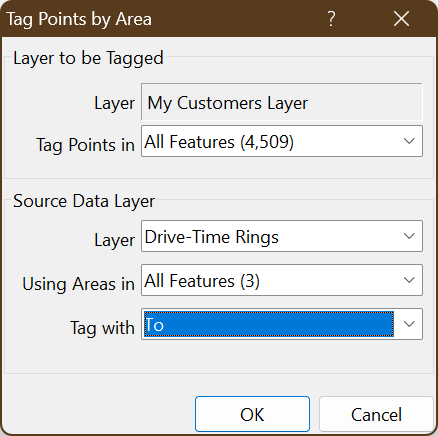
Maptitude appends the drive-time From and To fields to your point layer. These values define which ring each point falls within.
Step 5: Export the Point Layer to Excel
- Make your point layer the working layer.
- Click Export to Excel.
- Open the workbook and confirm the new From and To fields are included.
Why Include Drive Times in Excel Exports?
Adding drive-time fields to your point layer before exporting lets you:
- Identify which drive-time ring (0–15, 16–30, etc.) each point belongs to
- Filter and group points by drive-time interval in Excel
- Share ring-based results with stakeholders without additional GIS processing