Last Updated: March 5, 2025
Formatting dates correctly can be quite an annoying part of data entry. There are many different formats that different people tend to use based on habit. This difference in formatting even extends to how different programs output the data. Some common examples of how you can write “January 5th 2017”:
01/05/17
2017-01-05
5-Jan-17
Jan 5th, 2017
None of these are wrong, but they make formatting dates really tough for different softwares. This article will go over a quick and easy way to reformat, correct if needed, and import from a table in Excel so that Maptitude recognizes a field in your data as a Date. This article will deal with importing from Excel, as it has decent but sometimes tricky formatting for dates. If you are importing from a different source, instead of Steps 2 & 3 below, make sure the export is in Date format and that EVERY entry has a valid date.
Step 1: Check if you need to do anything
The first thing to do is to check whether any reformatting is necessary. Obviously, the best case scenario is that the dates are formatted correctly in the source data and you don’t have to change everything. To do this:
- If needed, cancel out of the Home Window, and go to File>Open
- Change the file type in the bottom right to the format of the data source, e.g. Excel Worksheet
- Select the data source and click Open
- Click OK
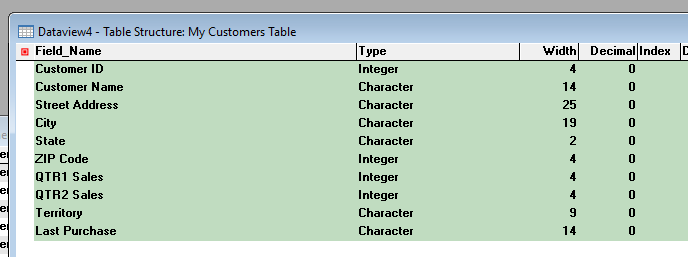
- Right Click anywhere in the dataview and choose Structure…
- You will get a list of the fields you imported and the Type field for each
Step 2: Reformat
What makes the reformatting hard is that there can be a mix of dates and text in the column and its hard to tell them apart. In this step, we will convert the entire column into just Text and then use the VALUE function to try to turn them back into Dates. This will highlight the entries that are in the wrong format and can’t be turned into Dates:
- Open your Excel file and highlight the entire column that contains your dates
- Right click and choose Format Cells
- Choose Text and click OK. A lot of your dates will turn into random-looking numbers – this is to be expected
- Create a new column labeled as the column that will contain the correctly formatted dates, e.g. Last Purchase Formatted
- In the first cell for that column type =VALUE( and then click in the Last Purchase column in the correct row and type ) . Hit Enter
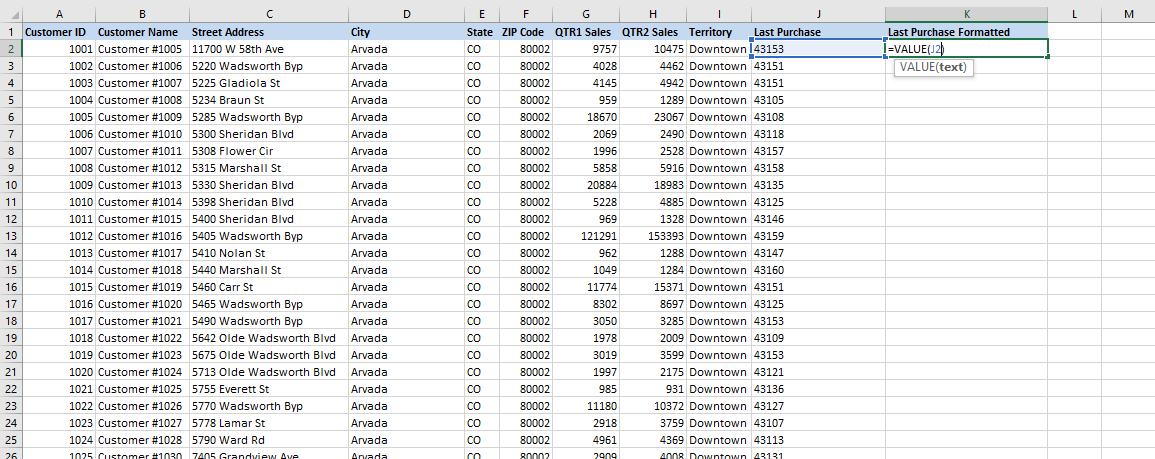
- Drag down to copy the formula for the rest of the rows
- Highlight the Last Purchase Formatted column, right click and choose Format Cells
- Choose Date and click OK
This will convert the new column back into Date format. What we’ve done so far might seem redundant but we have now converted all the data either into Date or if it wasn’t able to be converted, it has the entry #VALUE, which we can search for.
Step 3: Check for errors, then correct
- Right click on one of the cells in Last Purchase Formatted and choose Sort>Sort Largest to Smallest
- This will push to the top all cells with the entry #VALUE, which means the respective entry wasn’t able to be converted into the Date Format.
- For each one, you can look at the respective value in the Last Purchase column and see why it wasn’t able to convert. Fix these entries and the #VALUE should become the correct date
- After correcting all the dates, it might be worth it to sort the Last Purchase Formatted column from Largest to Smallest and from Smallest to Largest to make sure all the dates are in the expected range.
Step 4: Import again
Repeat Step 1 to check that it is now registering the Formatted column as a date and you can now proceed with the import as you would normally.
See How can I filter my data based on a Date field? for help to make a Selection Set of just the data points within a certain Date Range.