Last Updated: April 30, 2024
You create a sales territory hierarchy map using sales territory mapping software.
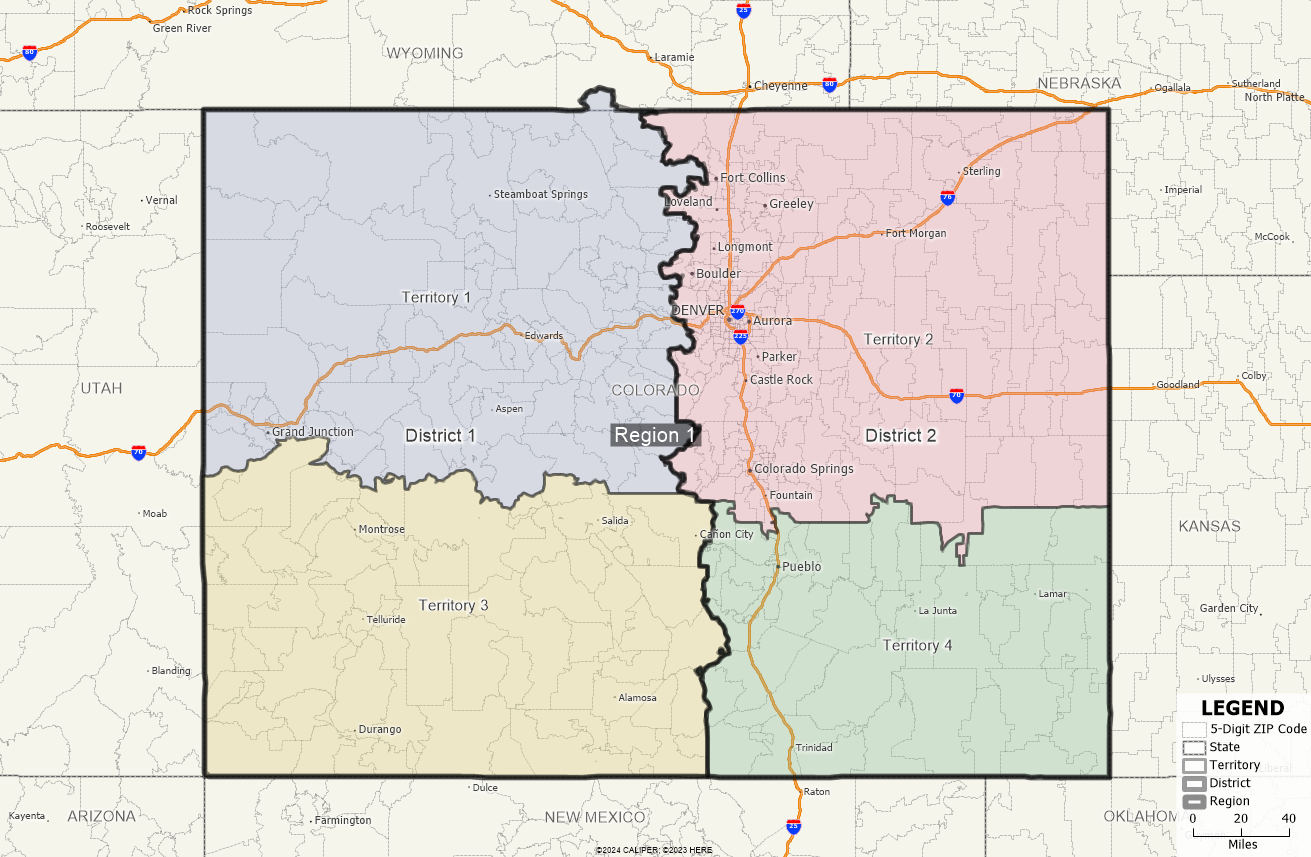
A territory hierarchy allows your organization to manage multiple levels of territories in a single map.
For example, you can have three levels in your hierarchy:
The first level of the hierarchy is ‘Territory’ which are the smallest geographic area and built from 5-Digit ZIP Codes.
The second level of the hierarchy is ‘District’ which are built using the ‘Territory’ layer.
The third level of the hierarchy is ‘Region’ which are built using the ‘District’ layer.
You can try out the steps in this article yourself by requesting a free trial of Maptitude mapping software or using your own license of Maptitude.
Setting up new Territory Hierarchy
You can follow the steps below to setup a Territory Hierarchy in your workspace:
- From the Home Window, choose New map of my territory data/table and click OK.
- Choose Interactively from areas in a map to create your territories by selecting boundaries interactively on the map and click Next.
- Change the Geography Layer to the geography you want to use to create your lowest level territories. For example, use the 5-Digit ZIP Code layer to have ‘Territory’ layer be based on 5-Digit ZIP Codes.
- Click Next and click Add Row to add the territory levels that you want to include in your territory hierarchy. To add ‘Territory’, ‘District’, and ‘Region’, click the Add Row button twice then click Next.
- Specify the Tracking Fields you would like to use for your territory hierarchy, and click Finish.
Create territories in the ‘Territory’ layer
Once you have Territory Hierarchy setup in your workspace, you can follow the steps below to start creating areas for the lowest level in the hierarchy, which is the ‘Territory’ layer:
- Click the Add New Territory button to add the first territory for your ‘Territory’ layer.
- Name the new territory and click OK.
- Use the Select by Pointing button to click on several 5-Digit ZIP Codes.
- When finished selecting 5-Digit ZIP Codes, click the Save Territory Changes button to create the territory.
- You can repeat these steps to add multiple territories to the first level in your Territory Hierarchy.
Create territories in the ‘District’ layer
- Click the Add New Territory button and increase the Level option to 2 to add a new territory to the ‘District’ layer.
- Click OK. Now you can use the Select by Pointing button to click on several territories in the ‘Territories’ layer to add to the new district.
- When finished selecting territories, click the Save Territory Changes button to create the district.
- You can repeat these steps to add multiple districts to the second level in your Territory Hierarchy.
Create territories in the ‘Region’ layer
- Click the Add New Territory button and increase the Level option to 3 to add a new territory to the ‘Region’ layer.
- Click OK. Now you can use the Select by Pointing button to click on several districts in the ‘District’ layer to add to the new region.
- When finished selecting districts, click the Save Territory Changes button to create the region.
- You can repeat these steps to add multiple regions to the third level in your Territory Hierarchy.
You now have a Sales Territory Hierarchy with three levels: ‘Territory’, ‘District’, and ‘Region’.
To track sales and demographic data for your territories, please see the tutorial article on adding tracking fields to your territories in Maptitude.
For a tutorial on the different ways you can use to create your territories, please see the video tutorial on creating territories in Maptitude.
If you are looking to combine territories from multiple countries, please see the tutorial article on combining territory maps in Maptitude.